Table of Contents
Introduction
In this article, we will walk through a complete approach for Automated Oracle 19c Binary Installation Using Shell Script.
This method helps DBAs eliminate manual steps, reduce human errors, and standardize Oracle software installation across environments.
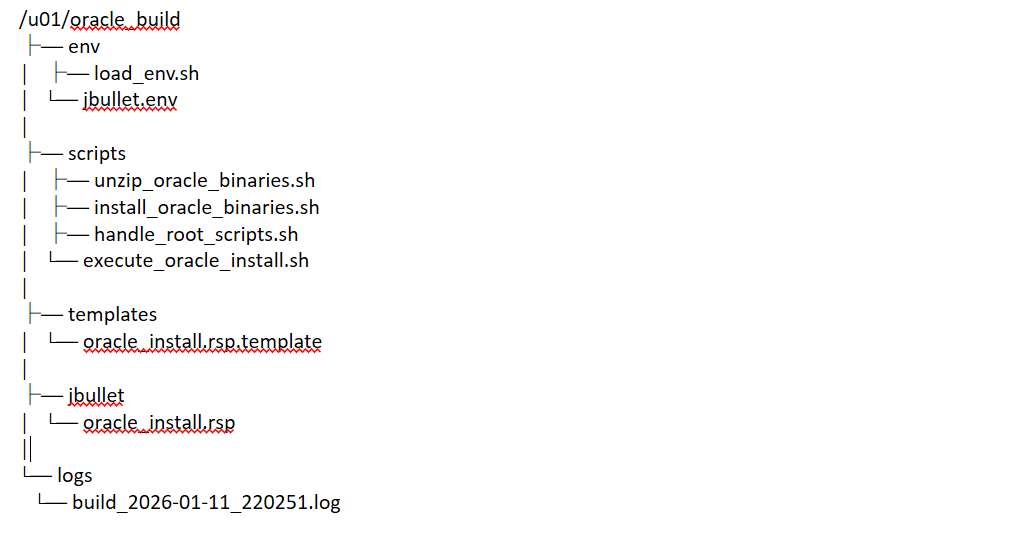
Oracle 19c Automation Binary Installation Directory Structure
1. OS prerequisites
Before starting the automated Oracle 19c binary installation using a shell script, ensure that all required OS-level prerequisites are already configured, such as users, groups, kernel parameters, limits, required packages, etc.
If this is a fresh setup and the OS is not ready yet, complete the following first:
1. Installation of Oracle VirtualBox.
2. Installation of Guest Additions.
3. Download the Oracle 19c Binary Software.
Note: If you need an automated script for OS prerequisites, please let me know in the comment box. I will share that with you all as well.
2. Create Required Directories and Copy Oracle Binary
In this step, the directory structure has been created, which is required for Oracle 19c binary installation automation.
Directories Creation
mkdir -p /u01/app/oracle
mkdir -p /u01/app/oracle/product/19.0.0/dbhome_1
mkdir -p /u01/app/oraInventory
mkdir -p /u01/oracle_build/env
mkdir -p /u01/oracle_build/scripts
mkdir -p /u01/fra
mkdir -p /u01/oradata
mkdir -p /u01/oracle_build/jbullet/secure
chown -R oracle:oinstall /u01
chmod -R 775 /u01
Copy Oracle Software Zip File
[oracle@practice oracle_build]$ ll
total 2987996
drwxr-xr-x 2 oracle oinstall         25 Jan 11 12:51 env
-rwxr-x--- 1 oracle oinstall 3059705302 Jan 11 12:54 LINUX.X64_193000_db_home.zip
3. Create Database Environment Files
To make the Oracle 19c installation fully automated, we separate environment variables from scripts using reusable environment files.
1. A database-specific environment file (for example: jbullet.env)
2. A common load_env.sh file, which dynamically loads the correct database environment based on input.
Both files will be placed under the environment directory:
ENV_DIR=/u01/oracle_build/env
Set ENV_DIR (One-Time Activity)
For the first time only, add the following entry to the Oracle user’s .bash_profile:
Location: – /home/oracle/.bash_profile
Add inside bash profile.
export ENV_DIR=/u01/oracle_build/env
After this, reload the profile or log in again:
source ~/.bash_profile
Note: – You are free to create any directories as per your requirement, and you can just change them in the scripts, whatever you have created.
Create load_env.sh File
This file acts as a common environment loader and will be used by all automation scripts.
Location : – /u01/oracle_build/env/load_env.sh
Content of load_env.sh
#!/bin/bash
# Common environment loader for all DB scripts

if [[ -z "$DB_ENV" ]]; then
  echo "ERROR: DB_ENV not set (example: DB_ENV=testdb)"
  exit 1
fi

if [[ -z "$ENV_DIR" ]]; then
  echo "ERROR: ENV_DIR not set"
  exit 1
fi

ENV_FILE="$ENV_DIR/$DB_ENV.env"

if [[ ! -f "$ENV_FILE" ]]; then
  echo "ERROR: Environment file not found: $ENV_FILE"
  exit 1
fi

. "$ENV_FILE"
Make the file executable:
chmod +x /u01/oracle_build/env/load_env.shWhat this load_env.sh script does
==> DB_ENV : This variable represents the database name and is passed while executing the script.
==> DB_ENV.env : This variable represents the database environment file. (e.g. jbullet.env)
==> ENV_DIR : Central directory where all environment-related files are stored.
Path of ENV_DIR : /u01/oracle_build/env
==> ENV_FILE : Combines ENV_DIR and DB_ENV to locate the correct database environment file.
==> . $ENV_FILE : Loads all required environment variables for the selected database into the current shell.
Environment file of jbullet.env
# Oracle paths
export ORACLE_BASE=/u01/app/oracle
export ORACLE_HOME=/u01/app/oracle/product/19.0.0/dbhome_1
export TNS_ADMIN=$ORACLE_HOME/network/admin
export ORA_INVENTORY=/u01/app/oraInventory

# Oracle Script Paths
export PATH=$ORACLE_HOME/bin:$PATH
export STAGE_DIR=/u01/oracle_build
export ORACLE_ZIP=LINUX.X64_193000_db_home.zip
export ENV_DIR=/u01/oracle_build/env

#Database Paths and Info
export ORACLE_SID=jbullet
export DB_NAME=jbullet
export DB_UNIQUE_NAME=jbullet
export SERVICE_NAME=jbullet
export CHARSET=AL32UTF8
export DATA_DIR=/u01/oradata/$DB_UNIQUE_NAME
export FRA_DIR=/u01/fra/$DB_UNIQUE_NAME
export TOTAL_MEMORY=4096
export REDO_SIZE=200
export LISTENER_PORT=1521
export LISTENER_NAME=LISTENER

#SYS Password
export PRIMARY_SECURE_DIR=/u01/oracle_build/${DB_UNIQUE_NAME}/secure

#Oracle groups
export OSDBA_GROUP=dba
export OSOPER_GROUP=dba
export OSBACKUPDBA_GROUP=dba
export OSDGDBA_GROUP=dba
export OSKMDBA_GROUP=dba
export OSRACDBA_GROUP=dba
export OSRACDBA_GROUP=dba
export HOSTNAME=$(hostname -f)
export UNIX_GROUP_NAME=oinstall

#Control Files
export CONTROL_FILES="/u01/oradata/$DB_UNIQUE_NAME/control01.ctl,/u01/fra/$DB_UNIQUE_NAME/control02.ctl"
4. Unzip Oracle binaries
As part of the automated Oracle 19c setup, the script checks whether binaries already exist and unzips them only when required.
This script will check and extract the Oracle 19c binaries before starting the actual installation.
unzip_oracle_binaries.sh
#!/bin/bash
set -e
set -o pipefail

. "$ENV_DIR/load_env.sh"
echo
echo "Checking Oracle software status..."

if [[ -x "$ORACLE_HOME/runInstaller" ]]; then
  echo
  echo "Oracle binaries already unzipped in $ORACLE_HOME"
  echo
  echo "Skipping unzip step."
  echo
  exit 0
fi

echo "Checking unzip utility..."
command -v unzip >/dev/null 2>&1 || {
  echo
  echo "ERROR: unzip not installed. Install unzip package first."
  exit 1
}

ZIP_FILE="$STAGE_DIR/$ORACLE_ZIP"
echo
echo "Checking Oracle binary zip file..."
if [[ ! -f "$ZIP_FILE" ]]; then
  echo "ERROR: Oracle zip file not found: $ZIP_FILE"
  echo
  exit 1
fi

echo "Preparing ORACLE_HOME directory..."
echo
mkdir -p "$ORACLE_HOME"
chmod 775 "$ORACLE_HOME"

echo "Unzipping Oracle binaries to $ORACLE_HOME"
echo
unzip -oq "$ZIP_FILE" -d "$ORACLE_HOME"

echo "Oracle binaries unzipped successfully."
echo
Make it executable
chmod +x unzip_oracle_binaries.shOutput
5. Install Oracle binaries
In this step actual Oracle software binaries in silent mode which help to complete our Oracle 19c binary installation automation process.
Note: – We are setting 2 variables here :
a) TEMPLATE_DIR : – In this location, we put our templates in this location.
b) RSP_FILE : – In this location, we will put the response file.
install_oracle_binaries.sh
#!/bin/bash
set -e
set -o pipefail
. "$ENV_DIR/load_env.sh"

# Step 1: Variable setting for Binaries Installation

TEMPLATE_DIR=/u01/oracle_build/templates
RSP_FILE=/u01/oracle_build/${DB_UNIQUE_NAME}/oracle_install.rsp

echo
echo "Generating Oracle install response file..."

[[ -f "$TEMPLATE_DIR/oracle_install.rsp.template" ]] || {
  echo "ERROR: Response template not found"
  exit 1
}

sed -e "s#__HOSTNAME__#$HOSTNAME#g" \
    -e "s#__ORACLE_HOME__#$ORACLE_HOME#g" \
    -e "s#__ORACLE_BASE__#$ORACLE_BASE#g" \
    -e "s#__ORA_INVENTORY__#$ORA_INVENTORY#g" \
    -e "s#__OINSTALL_GROUP__#$OINSTALL_GROUP#g" \
    -e "s#__DBA_GROUP__#$DBA_GROUP#g" \
    "$TEMPLATE_DIR/oracle_install.rsp.template" > "$RSP_FILE"
echo
echo "Response file generated at $RSP_FILE"
echo

# Step 2: Install binaries only if not installed
if [[ ! -x "$ORACLE_HOME/bin/sqlplus" ]]; then
  echo "Installing Oracle binaries..."
  $ORACLE_HOME/runInstaller -silent -force \
    -responseFile $STAGE_DIR/$DB_UNIQUE_NAME/oracle_install.rsp \
    -ignorePrereqFailure \
    -waitforcompletion
else
  echo "Oracle binaries already installed. Skipping install."
  echo
fi

# Step 3: Handle root scripts
cd $STAGE_DIR/scripts
./handle_root_scripts.sh
Note: – During the Oracle installation process, certain scripts must be executed with root privileges (for example, inventory and permission-related scripts). To automate this step, we handle the root scripts separately.
/etc/sudoers.d/oracle file
You need to take help from unix team to create the Oracle file inside the /etc/sudoers.d directory because they have root access to do it.
cd /etc/sudoers.d

visudo -f oracle

oracle ALL=(root) NOPASSWD: /u01/app/oraInventory/orainstRoot.sh
oracle ALL=(root) NOPASSWD: /u01/app/oracle/product/19.0.0/dbhome_1/root.sh

chmod 440 oracle
handle_root_scripts.sh
cd /u01/oracle_build/scripts

#!/bin/bash
set -e
set -o pipefail
. "$ENV_DIR/load_env.sh"

echo "Checking Oracle installation status..."

# Check software installed
if [[ ! -x "$ORACLE_HOME/bin/sqlplus" ]]; then
  echo "Oracle software not installed yet."
  echo "Run Oracle binary installation first."
  exit 1
fi
echo
echo "Oracle software binaries are installed."
echo
# Detect if root scripts already executed
ROOT_LOG=$(ls $ORACLE_HOME/install/root_*.log 2>/dev/null | head -1 || true)

if [[ -n "$ROOT_LOG" ]]; then
  echo "Root scripts already executed."
  echo
  echo "Found log: $ROOT_LOG"
  echo
  exit 0
fi

echo "Root scripts NOT executed yet."
echo "Executing root scripts now..."

# Execute root scripts (requires sudo/root)
sudo $ORA_INVENTORY/orainstRoot.sh
sudo $ORACLE_HOME/root.sh
echo
echo "Root scripts execution completed successfully."
echo
Make it executable
chmod +x handle_root_scripts.shoracle_install.rsp.template
cd /u01/oracle_build/templates

vi oracle_install.rsp.template

oracle.install.responseFileVersion=/oracle/install/rspfmt_dbinstall_response_schema_v19.0.0
oracle.install.option=INSTALL_DB_SWONLY

ORACLE_HOSTNAME=__HOSTNAME__
UNIX_GROUP_NAME=__OINSTALL_GROUP__
INVENTORY_LOCATION=__ORA_INVENTORY__

SELECTED_LANGUAGES=en,en_GB

ORACLE_HOME=__ORACLE_HOME__
ORACLE_BASE=__ORACLE_BASE__

oracle.install.db.InstallEdition=EE

oracle.install.db.OSDBA_GROUP=__DBA_GROUP__
oracle.install.db.OSOPER_GROUP=__DBA_GROUP__
oracle.install.db.OSBACKUPDBA_GROUP=__DBA_GROUP__
oracle.install.db.OSDGDBA_GROUP=__DBA_GROUP__
oracle.install.db.OSKMDBA_GROUP=__DBA_GROUP__
oracle.install.db.OSRACDBA_GROUP=__DBA_GROUP__

SECURITY_UPDATES_VIA_MYORACLESUPPORT=false
DECLINE_SECURITY_UPDATES=true
Make it executable
chmod +x oracle_install.rsp.templateOutput

6. Single Script for Automated Oracle 19c Binary Installation
Instead of running multiple scripts manually, we can use a single master script to perform the complete Automated Oracle 19c Binary Installation using a shell script.
execute_oracle_install.sh
cd /u01/oracle_build/scripts

#!/bin/bash
set -e
set -o pipefail

# Prevent recursion
if [[ "$SHLVL" -gt 5 ]]; then
  echo "ERROR: Recursive shell execution detected. Exiting."
  exit 1
fi

# Load environment variables
. "$ENV_DIR/load_env.sh"

# -------------------------------
# Logging
# -------------------------------
LOG_DIR=/u01/oracle_build/logs
mkdir -p "$LOG_DIR"
LOG_FILE="$LOG_DIR/build_$(date +%F_%H%M%S).log"

exec > >(tee -a "$LOG_FILE") 2>&1

log() {
  echo
  echo "=================================================="
  echo "$(date '+%F %T') : $1"
  echo "=================================================="
}

log "ORACLE BINARY INSTALLATION HAS STARTED"

log "STEP 1: Unzip Oracle binaries"
./unzip_oracle_binaries.sh

log "STEP 2: Install Oracle binaries"
./install_oracle_binaries.sh

log "ORACLE BINARIES HAS BEEN INSTALLED SUCCESSFULLY"
Make it executable
chmod +x execute_oracle_install.sh7. Two ways to execute the Final script.
1. Recommended Execution Method (One Command)
cd /u01/oracle_build/scripts

DB_ENV=jbullet ./execute_oracle_install.sh
2. Alternative Method (Two-Step Execution)
cd /u01/oracle_build/scripts

export DB_ENV=jbullet

./execute_oracle_install.sh
8. Full Output of Automated Oracle 19c Binary Installation using shell script
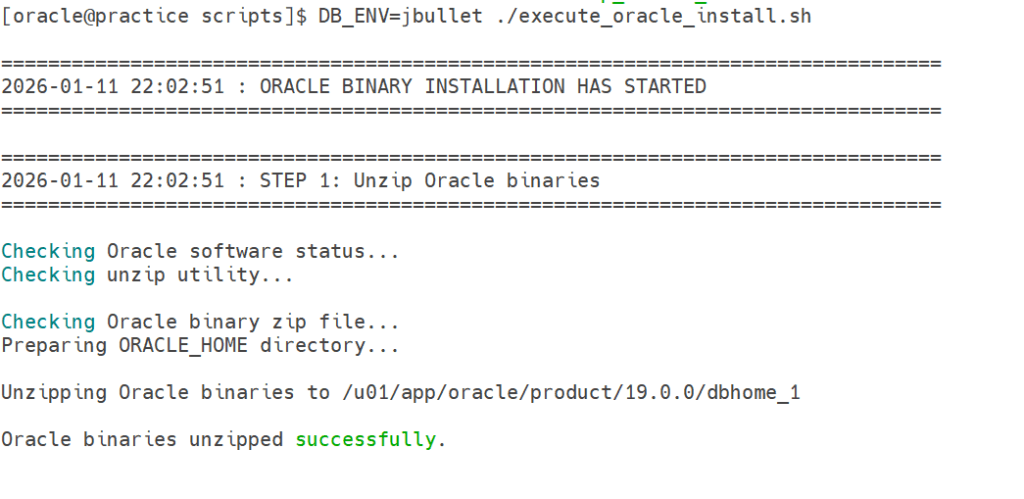
[oracle@practice scripts]$ DB_ENV=jbullet ./execute_oracle_install.sh
================================================================================
2026-01-11 22:02:51 : ORACLE BINARY INSTALLATION HAS STARTED
================================================================================
================================================================================
2026-01-11 22:02:51 : STEP 1: Unzip Oracle binaries
================================================================================
Checking Oracle software status...
Checking unzip utility...
Checking Oracle binary zip file...
Preparing ORACLE_HOME directory...
Unzipping Oracle binaries to /u01/app/oracle/product/19.0.0/dbhome_1
Oracle binaries unzipped successfully.
================================================================================
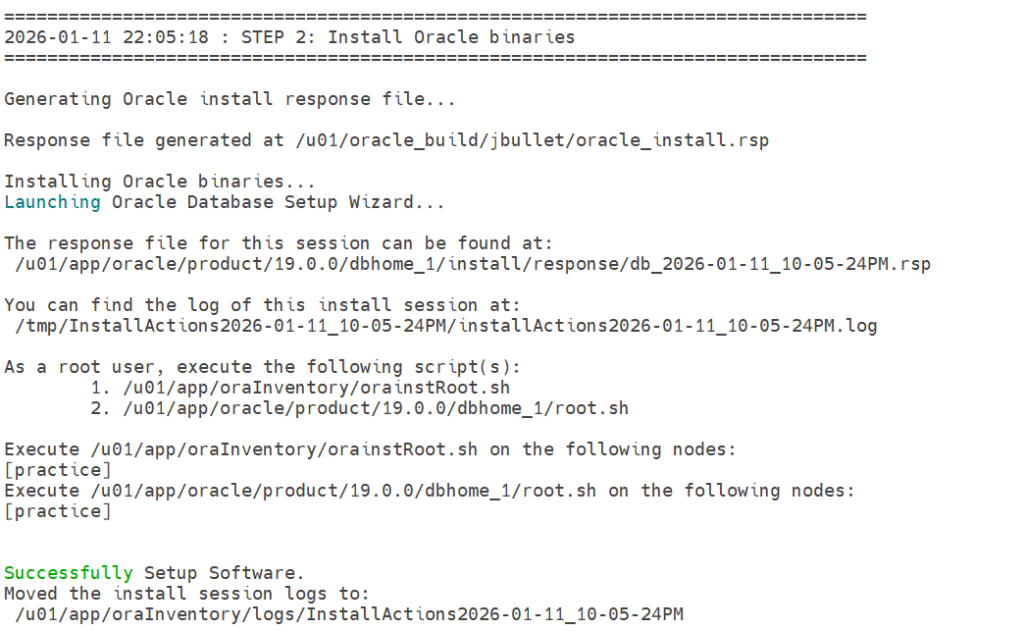
2026-01-11 22:05:18 : STEP 2: Install Oracle binaries
================================================================================
Generating Oracle install response file...
Response file generated at /u01/oracle_build/jbullet/oracle_install.rsp
Installing Oracle binaries...
Launching Oracle Database Setup Wizard...
The response file for this session can be found at:
/u01/app/oracle/product/19.0.0/dbhome_1/install/response/db_2026-01-11_10-05-24PM.rsp
You can find the log of this install session at:
/tmp/InstallActions2026-01-11_10-05-24PM/installActions2026-01-11_10-05-24PM.log
As a root user, execute the following script(s):
1. /u01/app/oraInventory/orainstRoot.sh
2. /u01/app/oracle/product/19.0.0/dbhome_1/root.sh
Execute /u01/app/oraInventory/orainstRoot.sh on the following nodes:
[practice]
Execute /u01/app/oracle/product/19.0.0/dbhome_1/root.sh on the following nodes:
[practice]
Successfully Setup Software.
Moved the install session logs to:
/u01/app/oraInventory/logs/InstallActions2026-01-11_10-05-24PM
Checking Oracle installation status...
Oracle software binaries are installed.
Root scripts NOT executed yet.
Executing root scripts now...
Changing permissions of /u01/app/oraInventory.
Adding read,write permissions for group.
Removing read,write,execute permissions for world.
Changing groupname of /u01/app/oraInventory to oinstall.
The execution of the script is complete.
Check /u01/app/oracle/product/19.0.0/dbhome_1/install/root_practice_2026-01-11_22-08-09-890865506.log for the output of root script
Root scripts execution completed successfully.
================================================================================
2026-01-11 22:08:10 : ORACLE BINARIES HAS BEEN INSTALLED SUCCESSFULLY
================================================================================
9. Conclusion
By following this approach, we can achieve a reliable and repeatable Automated Oracle 19c Binary Installation Using Shell Script, making Oracle deployments faster and error-free.
If you enjoyed the article, please leave a comment and share it with your friends. Also, let me know which Oracle and MySQL topics you'd like to see covered in future articles.
Note: – If you want to practice this whole activity in your home lab, then you'll need a platform to perform the installation. To set that up, you first need to download and install Oracle VirtualBox, followed by the operating system, the Oracle binary software, and finally, create the database.