Table of Contents
Introduction
In this article, we'll learn how to perform the Database Refresh activity in Oracle.
Before starting with our practical, we can understand what the Database Refresh is and the different types of Refresh.
Refresh activity involves the copying of data from one database to another. This typically means copying PRODUCTION data to NON-PROD databases like development, UAT, and QA after which the application team can perform their testing without hampering the PROD database.
There are multiple types of Database Refresh activities in Oracle.
1) Full Database refresh using RMAN utility.
a) Backup-based database refresh.
b) Active database refresh (Kindly use this method in non-business hours to avoid performance issues in the PROD database).
2) Schema refresh using the Data pump utility.
We will explore the step-by-step process of a Full Database (backup-based and Active duplicate) refresh in this article.
Note: – If you want to practice this whole activity in your home lab, then you'll need a platform to perform the installation. To set that up, you first need to download and install Oracle VirtualBox, followed by the operating system, the Oracle binary software, and finally, create the database.
Database Refresh activity in Oracle
Backup-based Database Refresh
| PROD Database Name (Source) | Non-PROD Database Name (Target) |
| ORA01234 | ORADB |
Target Side Operations
==================
Step 1) Before doing the refresh activity first we need to take the prerequisites.
a) Name of the datafile: – select name from v$datafile;
b) Name of the controlfile: – select name from v$controlfile;
c) Name of the redolog file: –
set lines 200
set pages 200
col MEMBER for a90;
select * from v$logfile;
d) Parameter file Information: – show parameter spfile;
e) Name of the tempfile: –
set lines 200
set pages 200
col NAME for a70
select FILE#, STATUS, BYTES/1024/1024 "MB", NAME from v$tempfile;
f) Back up the Non-PROD database using the command below.
run {
allocate channel ch1 device type disk;
allocate channel ch2 device type disk;
crosscheck backup;
delete noprompt expired backup;
crosscheck archivelog all;
delete noprompt expired archivelog all;
backup incremental level 0 database format='/u01/app/oracle/backup/ORADB_LEVEL_0_backup_%d_%T_%U.bkp' plus archivelog format='/u01/app/oracle/backup/ORADB_archivelog_backup_%d_%T_%U_arc.bkp';
backup current controlfile format='/u01/app/oracle/backup/ORADB_controlfile_%d_%T_%U.ctl';
backup spfile format='/u01/app/oracle/backup/ORADB_spfile_%d_%T_%U';
crosscheck backup;
crosscheck archivelog all;
release channel ch1;
release channel ch2;
}
Output

g) Command to take the profile and password of users.
set lines 999
set pages 999
select 'alter user '||username||' profile default;' from dba_users;
select 'alter user '||name||' identified by values "'||password||"';' from user$ where password is not null;
select 'alter user '||username||' profile '||profile||';' from dba_users;
h) You can take the USER DDL as well from TOAD/SQL Developer.
Step 2) Before dropping the database, create a pfile from the spfile for backup purposes.
Command:- Create pfile from spfile;
Step 3) Now we need to shut down and open the database in the mount stage, and then put the database in restrict mode, and drop it.
shut immediate;
startup mount;
alter system enable restricted session;
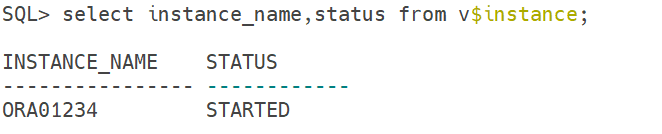
Select name from v$database;
drop database;

Step 4) Next step is to transfer all the backup files from the source to the target database for the restoration.
Note: – This is the step that you need to perform from the Source side.

Step 5) Now, we need to open the file of the Non-PROD database, change the DB NAME parameter to the PROD database name, and then set the ORACLE_SID as the PROD database using the export/set command.
[oracle@test2 dbs]$ grep -i db_name initORADB.ora*.db_name='ORA01234' —–> This is the PROD database name.
export ORACLE_SID=ORA01234
echo $ORACLE_SID
Step 6) Start up the database in the nomount state.
SQL> startup nomount pfile='$ORACLE_HOME/dbs/initORADB.ora';
ORACLE instance started.
Total System Global Area 1845493760 bytes
Fixed Size 8621904 bytes
Variable Size 637534384 bytes
Database Buffers 1191182336 bytes
Redo Buffers 8155136 bytes
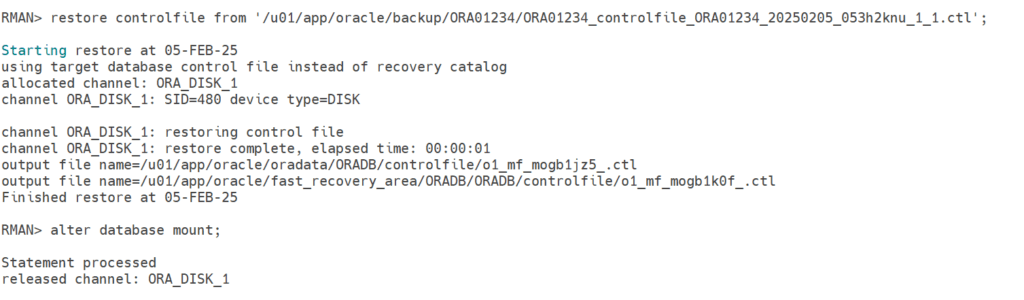
Step 7) Now connect from RMAN and restore the PROD control file, which will be present where the PROD backup has been taken, and then mount the database.
Step 8) Now we need to inform RMAN about the backup pieces file with the help of the CATALOG command.

Step 9) Now we need to prepare the RESTORE script through the Vi editor.
Note: – Here, we need to change the directory structure of the data files from PROD to QA/DEV.
vi ORADB.rcv and put the content inside this file.
RUN
{
ALLOCATE CHANNEL d1 DEVICE TYPE disk;
ALLOCATE CHANNEL d2 DEVICE TYPE disk;
SET NEWNAME FOR DATAFILE 1 TO '/u01/app/oracle/oradata/ORADB/datafile/o1_mf_system_mog9z0p0_.dbf';
SET NEWNAME FOR DATAFILE 2 TO '/u01/app/oracle/oradata/ORADB/datafile/o1_mf_sysaux_mogb03sv_.dbf';
SET NEWNAME FOR DATAFILE 3 TO '/u01/app/oracle/oradata/ORADB/datafile/o1_mf_undotbs1_mogb0lwk_.dbf';
SET NEWNAME FOR DATAFILE 4 TO '/u01/app/oracle/oradata/ORADB/datafile/o1_mf_users_mogb0myr_.dbf';
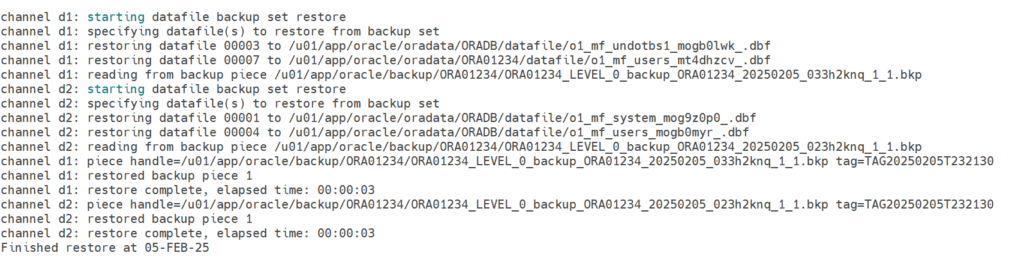
restore database;
switch datafile all;
RECOVER DATABASE;
release channel d1;
release channel d2;
}
Execute the restoration script in the background using the command below.
Command: – nohup rman target / nocatalog log='backup_ORADB_restore.log' cmdfile='ORADB.rcv' &
Step 10) Next step is to rename the redo logfile name because it is still a PROD name. It will be done in the Mount stage.
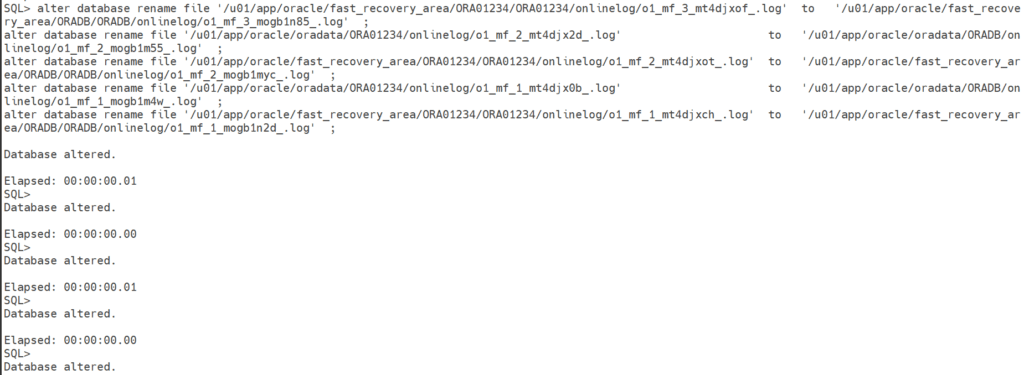
Step 11) Open the database in reset logs.

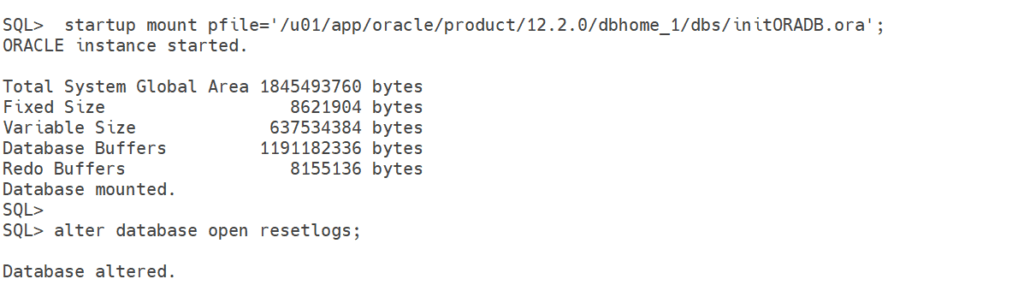
Step 12) Now again, we need to stop the database, start in the mount stage, and then use the NID utility to change the DB Name from PROD to QA/DEV.
SQL> startup mount pfile='/u01/app/oracle/product/12.2.0/dbhome_1/dbs/initORADB.ora';
ORACLE instance started.
Total System Global Area 1845493760 bytes
Fixed Size 8621904 bytes
Variable Size 637534384 bytes
Database Buffers 1191182336 bytes
Redo Buffers 8155136 bytes
Database mounted.
NID utility command: – nid target=/ dbname=ORADB
Output
[oracle@test2 dbs]$ nid target=/ dbname=ORADB
DBNEWID: Release 12.2.0.1.0 – Production on Thu Feb 6 00:10:24 2025
Copyright (c) 1982, 2017, Oracle and/or its affiliates. All rights reserved.
Connected to database ORA01234 (DBID=1881068914)
Connected to server version 12.2.0
Control Files in database:
/u01/app/oracle/oradata/ORADB/controlfile/o1_mf_mogb1jz5_.ctl
/u01/app/oracle/fast_recovery_area/ORADB/ORADB/controlfile/o1_mf_mogb1k0f_.ctl
Change database ID and database name ORA01234 to ORADB? (Y/[N]) => yes
Proceeding with operation
Changing database ID from 1881068914 to 2945568496
Changing database name from ORA01234 to ORADB
Control File /u01/app/oracle/oradata/ORADB/controlfile/o1_mf_mogb1jz5_.ctl – modified
Control File /u01/app/oracle/fast_recovery_area/ORADB/ORADB/controlfile/o1_mf_mogb1k0f_.ctl – modified
Datafile /u01/app/oracle/oradata/ORA01234/datafile/o1_mf_system_mt7cc4v8_.db – dbid changed, wrote new name
Datafile /u01/app/oracle/oradata/ORA01234/datafile/o1_mf_sysaux_mt7cc4tn_.db – dbid changed, wrote new name
Datafile /u01/app/oracle/oradata/ORA01234/datafile/o1_mf_undotbs1_mt7cc4vc_.db – dbid changed, wrote new name
Datafile /u01/app/oracle/oradata/ORA01234/datafile/o1_mf_users_mt7cc4tr_.db – dbid changed, wrote new name
Datafile /u01/app/oracle/oradata/ORA01234/datafile/o1_mf_temp_mt7cw5o0_.tm – dbid changed, wrote new name
Control File /u01/app/oracle/oradata/ORADB/controlfile/o1_mf_mogb1jz5_.ctl – dbid changed, wrote new name
Control File /u01/app/oracle/fast_recovery_area/ORADB/ORADB/controlfile/o1_mf_mogb1k0f_.ctl – dbid changed, wrote new name
Instance shut down
Database name changed to ORADB.
Modify parameter file and generate a new password file before restarting.
Database ID for database ORADB changed to 2945568496.
All previous backups and archived redo logs for this database are unusable.
Database is not aware of previous backups and archived logs in Recovery Area.
Database has been shutdown, open database with RESETLOGS option.
Succesfully changed database name and ID.
DBNEWID – Completed successfully.
Step 13) Now open the pfile and edit the database name parameter, put the QA/DEV name from the PROD database, and then start the db in mount and again in open reset logs.
Step 14) Now, finally take the final shutdown and create a spfile from a pfile. Set the Non-PROD environment and open the database.
[oracle@test2 dbs]$ . oraenvORACLE_SID = [ORA01234] ? ORADB
The Oracle base remains unchanged with value /u01/app/oracle
SQL> create spfile from pfile;
File created.
SQL> startup
ORACLE instance started.
Total System Global Area 1845493760 bytes
Fixed Size 8621904 bytes
Variable Size 637534384 bytes
Database Buffers 1191182336 bytes
Redo Buffers 8155136 bytes
Database mounted.
Database opened.
Step 15) Run the USER DDL, which we took in the prerequisites, and hand it over to the application team for testing.
Finally, we have completed the backup-based Database Refresh activity in Oracle.
Active Duplicate Database Refresh
Kindly check out this article on Active Duplicate Database refresh activity in Oracle.
Schema Refresh using the Data pump utility
Kindly check out this article on Schema Refresh using the Data pump utility in Oracle.
Conclusion
We have seen from the above steps how to perform a backup-based Database Refresh activity in Oracle. In our next article, we will cover Active database refresh so till then stay tuned with us.
If you enjoyed the article, please leave a comment and share it with your friends. Also, let me know which Oracle and MySQL topics you'd like to see covered in future articles.