Table of Contents
Introduction
In our previous article, we covered the Installation of Oracle 19c Binaries. In contrast, today we will see How to deinstall Oracle 19c binaries on Linux.
How to deinstall Oracle 19c binaries on Linux
We will follow the below steps to deinstall Oracle 19c binaries.
1. Prerequisites
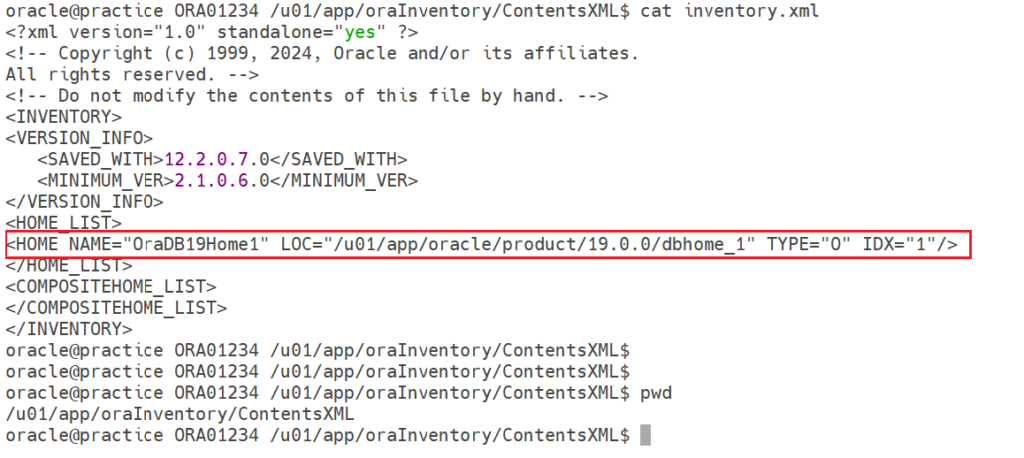
a) As a prerequisite, we should check where are the details of our oracle home present which you will get at the below path.
cd /u01/app/oraInventory/ContentsXML
cat inventory.xml
Output

b) Before starting the deinstallation, it's a good practice to back up the Oracle Home directory. While this step is optional, having a backup ensures that if you need to reinstall later, you can easily restore from it.
tar -pcvf /u01/OH_backup/Oracle_Home.tar /u01/app/oracle/product/19.0.0/dbhome_1
Output

2. Deinstallation of Oracle Binaries
Step 1) First, navigate to the directory where the deinstallation script is located.
cd $ORACLE_HOME/deinstall
Step 2) You need to execute the deinstall script and pass the details wherever required.
./deinstall
Output
oracle@practice ORA01234 /u01/app/oracle/product/19.0.0/dbhome_1/deinstall$ ./deinstall
Checking for required files and bootstrapping …
Please wait …
Location of logs /tmp/deinstall2024-10-09_05-49-06PM/logs/
###### ORACLE DECONFIG TOOL START ############
######## DECONFIG CHECK OPERATION START########
Checking for existence of the Oracle home location /u01/app/oracle/product/19.0.0/dbhome_1
Oracle Home type selected for deinstall is: Oracle Single Instance Database
Oracle Base selected for deinstall is: /u01/app/oracle
Checking for the existence of central inventory location /u01/app/oraInventory
## [END] Install check configuration ##
Network Configuration check config START
Network de-configuration trace file location: /tmp/deinstall2024-10-09_05-49-06PM/logs/netdc_check2024-10-09_05-50-19PM.log
Network Configuration check config END
Database Check Configuration START
Database de-configuration trace file location: /tmp/deinstall2024-10-09_05-49-06PM/logs/databasedc_check2024-10-09_05-50-19PM.log
Use a comma as a separator when specifying the list of values as input
Specify the list of database names that are configured in this Oracle home []: —->Here you need to provide the database name if any of them are configured
Database Check Configuration END
############ DECONFIG CHECK OPERATION END############
########### DECONFIG CHECK OPERATION SUMMARY###########
Oracle Home selected for deinstall is: /u01/app/oracle/product/19.0.0/dbhome_1
inventory Location where the Oracle home is registered is: /u01/app/oraInventory
Do you want to continue (y – yes, n – no)? [n]: Y ——> Please check properly if the correct home is selected for deinstallation
A log of this session will be written to: '/tmp/deinstall2024-10-09_05-49-06PM/logs/deinstall_deconfig2024-10-09_05-50-18-PM.out'
Any error messages from this session will be written to: '/tmp/deinstall2024-10-09_05-49-06PM/logs/deinstall_deconfig2024-10-09_05-50-18-PM.err'
################## DECONFIG CLEAN OPERATION START##################
Database de-configuration trace file location: /tmp/deinstall2024-10-09_05-49-06PM/logs/databasedc_clean2024-10-09_05-50-19PM.log
Network Configuration clean config START
Network de-configuration trace file location: /tmp/deinstall2024-10-09_05-49-06PM/logs/netdc_clean2024-10-09_05-50-19PM.log
The network configuration has been cleaned up successfully.
Network Configuration clean config END
#######DECONFIG CLEAN OPERATION END#######
####### DECONFIG CLEAN OPERATION SUMMARY#######
#######DEINSTALL CLEAN OPERATION SUMMARY#######
Successfully detached Oracle home '/u01/app/oracle/product/19.0.0/dbhome_1' from the central inventory on the local node.
Successfully deleted directory '/u01/app/oracle/product/19.0.0/dbhome_1' on the local node.
Successfully deleted directory '/u01/app/oraInventory' on the local node.
Successfully deleted directory '/u01/app/oracle' on the local node.
Oracle Universal Installer cleanup was successful.
Run 'rm -r /etc/oraInst.loc' as root on node(s) 'practice' at the end of the session.
Run 'rm -r /opt/ORCLfmap' as root on node(s) 'practice' at the end of the session.
Run 'rm -r /etc/oratab' as root on node(s) 'practice' at the end of the session.
Oracle deinstall tool successfully cleaned up temporary directories.
####### ORACLE DEINSTALL TOOL END #######
Step 3) Now you need to run a few above recommendations as a last step of how to deinstall Oracle 19c binaries on Linux
a) rm -r /etc/oraInst.loc as root user

b) rm -rf /opt/ORCLfmap as root user

c) rm -rf /etc/oratab as root user

3. Manual Deletion of Oracle Home
At times, the ORACLE software installation may become corrupted, and in such cases, the deinstallation utilities mentioned above won't be enough to remove the software. You’ll need to stop all running Oracle databases and processes associated with ORACLE_HOME, then manually delete the ORACLE_HOME files.
a) cd $ORACLE_HOME
rm -rf *
Remove all the contents from the ORACLE_BASE directory
b) cd $ORACLE_BASE
rm -rf *
Remove oraInst.loc file
c) rm -rf /etc/oraInst.loc
Remove all the contents from the ORCLfmap directory
d) rm -rf /opt/ORCLfmap
Remove all the contents from the oratab directory
e) rm -rf /etc/oratab
Conclusion
This concludes our step-by-step article on How to deinstall Oracle 19c binaries on Linux. If you enjoyed the article, please leave a comment and share it with your friends. Also, let me know which Oracle and MySQL topics you'd like to see covered in future articles. Please see the related articles along with the guide to downloading the required software and files from Oracle and MySQL official websites.


