Table of Contents
Refreshing a non-production Oracle 19c database without taking a physical backup is now easier with the Oracle RMAN Active Duplicate feature.
In this guide, we’ll walk through the exact steps to refresh non-prod from Active Duplicate in Oracle 19c. Oracle RMAN active duplicate allows you to create a real-time duplicate of the source database over the network, without needing backup files. Whether you're cloning for development, testing, or UAT, this approach helps you save time, storage, and effort.
Note: – Kindly use this method in non-business hours to avoid performance issues in the PROD database. In case if your requirement is still a Backup-based database refresh, then you can check out the article that I have created in previous blogs.
Steps to refresh non-prod from Active Duplicate
| PROD Database Name (Source) | Non-PROD Database Name (Target) |
| ORAP0123 | TEST |
1. On Source Database (Production)
We need to make sure the database is up and running, and the database should be in Archive log mode. Otherwise, during refresh, it will throw an error stating that the remote database must be in archive log mode during Oracle RMAN Active Duplicate.
Command:-
set lines 250 pages 250
col HOST_NAME for a25
col DB_Start_Time for a20
SELECT NAME as DB_NAME,OPEN_MODE,instance_name,status,HOST_NAME,database_role,logins,to_char(startup_time,'DD-MON-YYYY HH24:MI') DB_Start_Time FROM
gV$INSTANCE,v$database;

2. On Target Database Server (Non-Prod Database)
a) We need to take the pre-output of datafiles, logfiles, and tempfiles location, which will help to understand post refresh if everything looks good and in place.
Command: –
Database Status
============
set lines 250 pages 250
col HOST_NAME for a25
col DB_Start_Time for a20
SELECT NAME as DB_NAME,OPEN_MODE,instance_name,status,HOST_NAME,database_role,logins,to_char(startup_time,'DD-MON-YYYY HH24:MI') DB_Start_Time FROM
gV$INSTANCE,v$database;
Datafile Status
===========
set lines 200
set pages 200
col NAME for a70
col STATUS for a40
select File#,name,status,bytes/1024/1024/1024 "Datafile Size in GB" from v$datafile;
Logfile Status
==========
set lines 999
set pages 999
col MEMBER for a60
select * from v$logfile;
Tempfile Status
===========
set lines 999
set pages 999
col FILE_NAME for a70
select FILE_NAME,TABLESPACE_NAME,BYTES/1024/1024 as Tempfile_size_MB,STATUS from dba_temp_files;
b) Make sure we have a password file and know the SYS user password. If we don't know, then we can reset it by using the command below.
Command: – alter user sys identified by newpassword;
The password file should reside in the default location.
Path : – cd $ORACLE_HOME/dbs

c) We should take the location of the spfile as well.
Command: –
sqlplus / as sysdba
show parameter spfile
d) We need to take the pre-output of the profile and User Passwords as well in the non-PROD database, which again needs to be set post refresh activity.
Command: –
select 'alter user '||username||' profile default;' from dba_users;
select 'alter user '||name||' identified by values "'||password||"';' from user$ where password is not null;
select 'alter user '||username||' profile '||profile||';' from dba_users;
e) We need to take the pre-output of the DB links, which also need to be created post refresh activity.
Command: –
col owner for a20
col host for a20
col db_link for a20
col username for a20
set lines 200 pages 200
select * from dba_db_links;
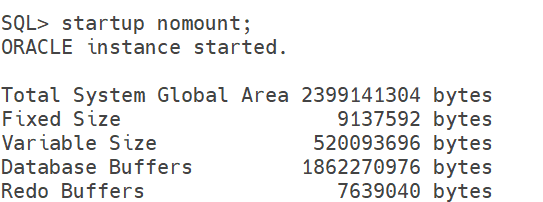
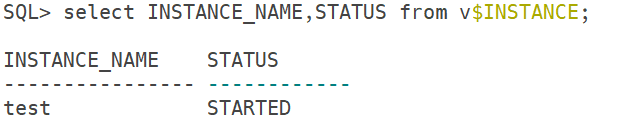
f) We need to start the database in NOMOUNT mode.
Command: –
sqlplus / as sysdba
startup nomount;
Output:-
3. Verify TNS Connectivity
We need to make sure that TNS connectivity must happen from both the Source and the Target database.
Command: –
tnsping ORAP0123
tnsping TEST
Test Connection on Source side: –
========================
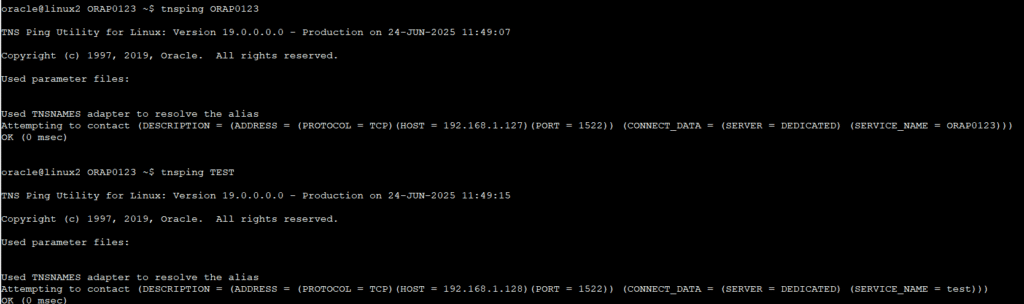
Test Connection on Target side: –
========================

4. DB_FILE_NAME_CONVERT and LOG_FILE_NAME_CONVERT
We need to check and set the DB_FILE_NAME_CONVERT and LOG_FILE_NAME_CONVERT parameters, so that DATA and LOGS go in the correct directories in the non-prod database.
Command: –
a) sqlplus / as sysdba
b) show parameter db_file_name_convert
c) show parameter log_file_name_convert
d) alter system set db_file_name_convert='/u01/app/oracle/data/ORAP0123','/u01/app/oracle/oradata/TEST' scope=spfile;
e) alter system set log_file_name_convert='/u01/app/oracle/redolog','/u01/app/oracle/oradata/TEST' scope=spfile;
5. Spfile backup
We need to take the backup of the spfile as well, so that we can again start the database in case of any issue during Oracle RMAN Active Duplicate activity.
Command: –
sqlplus / as sysdba
create pfile='/tmp/initTEST.ora' from spfile;
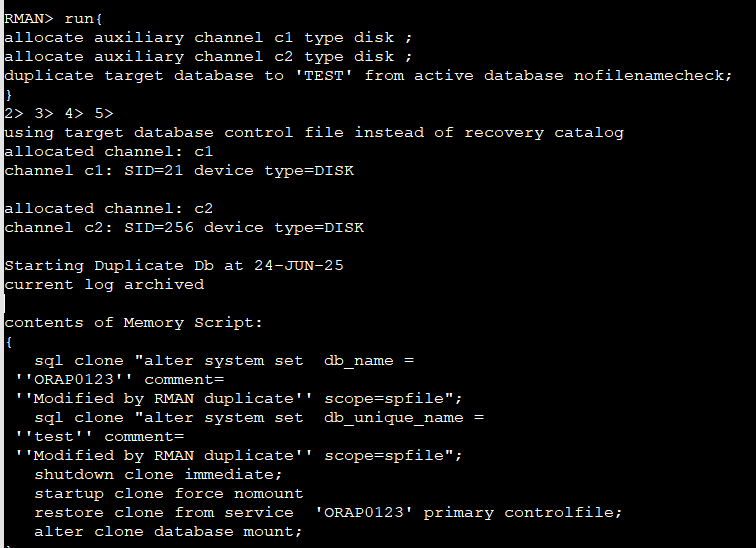
6. Oracle RMAN Active Duplicate
On the Target Side, connect with the RMAN using the SYS password.
Command: –rman target sys@ORAP0123 auxiliary sys@TEST
Output: –
[oracle@practice dbs]$ rman target sys@ORAP0123 auxiliary sys@TEST
Recovery Manager: Release 19.0.0.0.0 – Production on Tue Jun 24 12:22:46 2025
Version 19.3.0.0.0
Copyright (c) 1982, 2019, Oracle and/or its affiliates. All rights reserved.
target database Password:
connected to target database: ORAP0123 (DBID=2983517535)
auxiliary database Password:
connected to auxiliary database: TEST (DBID=2502652427)
Duplicate Command: –
run{
allocate auxiliary channel c1 type disk ;
allocate auxiliary channel c2 type disk ;
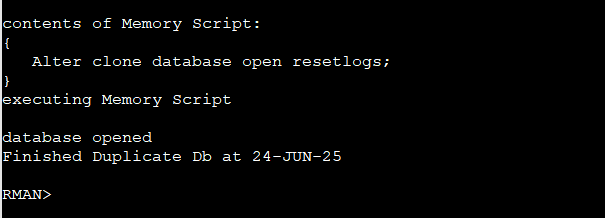
duplicate target database to 'TEST' from active database nofilenamecheck;
}
Output: –
7. Database Status

8. Post-Refresh Steps
We need to perform the post-refresh steps after the completion of the activity that we had already shared in Step 2.
a) Database Status.
b) Datafile Status.
c) Logfile Status.
d) Tempfile Status.
e) DB Links Status.
f) Profile and User Password Status.
Conclusion
We have seen from the above steps how to refresh non-prod from Active Duplicate activity in Oracle.
If you enjoyed the article, please leave a comment and share it with your friends. Also, let me know which Oracle and MySQL topics you'd like to see covered in future articles.
Note: If you want to set up the Lab in your home for practice to get your hands dirty, then you can download and install Oracle VirtualBox, followed by the operating system, the Oracle binary software, and finally, create the database.


Excellent article.. Thanks for writing the blog.