Table of Contents
Introduction
Before moving towards the Oracle 19c RAC Database Installation Steps, we will first understand why we require an RAC machine.
RAC stands for Real Application Cluster, where we can create a cluster, and later, we can add multiple nodes to it.
At a high level, RAC provides a high availability solution, ensuring that if any node goes down, the client can still perform operations using the available machines.
Oracle 19c RAC Database Installation Steps
1. Oracle Virtual Machine Creation
We need to install the 2 virtual machines with the same set of configurations. You can check out this article on how to install Oracle VirtualBox and VirtualBox Guest Additions to set up the environment.
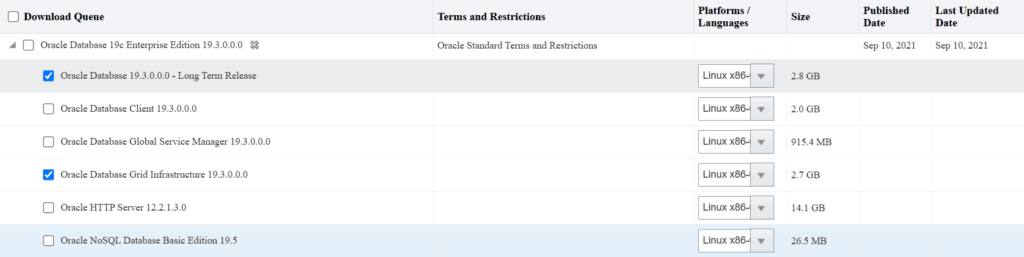
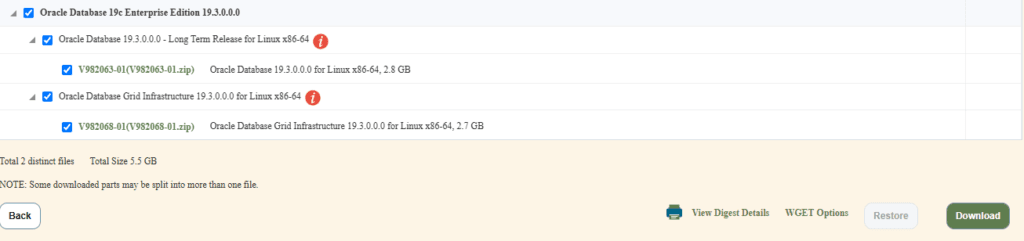
2. Software Download
You can download the software from the Oracle eDelivery website.
a) Oracle Database Grid Infrastructure 19.3.0.0.0 (Linux x86-64)
b) Oracle Databaase 19.3.0.0.0 (Linux x86-64)
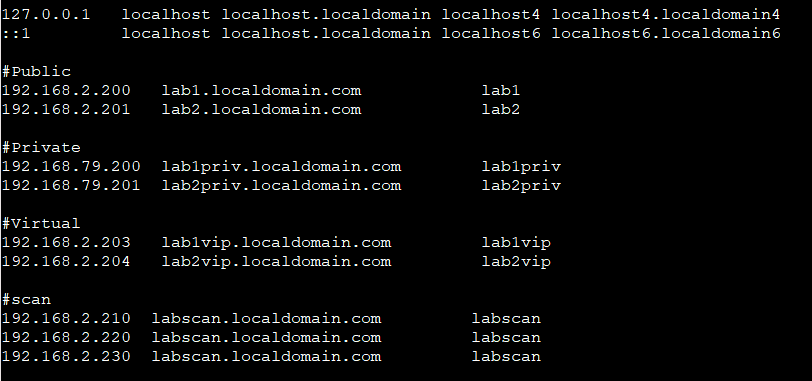
3. /etc/hosts File Configuration
Need to set these IP's entry on both the nodes so that they can ping each other before oracle 19c RAC database installation.
4. Prerequisites Packages
We need to install the prerequisite RPM packages, which can help to install our Oracle user and Kernel parameters, so that we can save our time for the rest of the Oracle 19c RAC Database Installation.
As in our practice, we can only set up 2 nodes because of the shortage of resources, so we can use the 1st machine as a DNS server to resolve the Name and the IP Addresses.
RPM of the Oracle Installation: – yum install -y oracle* –skip broken

RPM of Name Resolution: – yum install bind

5. Zone Configuration (Forward, Reverse)
a) Put entry in /etc/named.conf file
options {
listen-on port 53 { 127.0.0.1; 192.168.2.200; };
allow-query { localhost; 192.168.2.0/24; };
zone "localdomain.com" IN {
type master;
file "forward.localdomain";
allow-update { none; };
};
zone "2.168.192.in-addr.arpa." IN {
type master;
file "reverse.localdomain";
allow-update { none; };
};
b) File for Forward/Reverse Lookup Zone: –
vim /var/named/forward.localdomain
$TTL 86400
@ IN SOA lab1.localdomain.com. root.localdomain.com. (
2014051001 ; serial
3600 ; refresh
1800 ; retry
604800 ; expire
86400 ; minimum
)
@ IN NS lab1.localdomain.
localhost IN A 127.0.0.1
lab1 IN A 192.168.2.200
lab2 IN A 192.168.2.201
lab1priv IN A 192.168.79.200
lab2priv IN A 192.168.79.201
lab1vip IN A 192.168.2.203
lab2vip IN A 192.168.2.204
labscan IN A 192.168.2.210
labscan IN A 192.168.2.220
labscan IN A 192.168.2.230
vim /var/named/reverse.localdomain
$TTL 86400
@ IN SOA lab1.localdomain.com. root.localdomain.com. (
2
3H
1H
1W
1H )
@ IN NS lab1.localdomain.com.
@ IN PTR localdomain.com.
lab1 IN A 192.168.2.200
lab2 IN A 192.168.2.201
labscan IN A 192.168.2.210
labscan IN A 192.168.2.220
labscan IN A 192.168.2.230
200 IN PTR lab1.localdomain.com.
201 IN PTR lab2.localdomain.com.
210 IN PTR labscan.localdomain.
220 IN PTR labscan.localdomain.
230 IN PTR labscan.localdomain.
6. resolv.conf
vi /etc/resolv.conf
#Generated by NetworkManager
search localdomain.com
nameserver 192.168.2.200
rotate
options timeout:1
options attempts:5
Take backup of the file: – cp /etc/resolv.conf /etc/resolv.conf_bkp
service named restart (It should not give any error otherwise need to check about issue)
nslookup labscan.localdomain.com
nslookup lab1.localdomain.com
nslookup lab2.localdomain.com
7. Change Oracle User Password
[root@lab1 ~]# id oracleuid=54321(oracle) gid=54321(oinstall) groups=54321(oinstall),54322(dba)
[root@lab1 ~]# passwd oracle
Changing password for user oracle.
New password:
BAD PASSWORD: The password is shorter than 8 characters
Retype new password:
passwd: all authentication tokens updated successfully.
8. Directory and Group Creation
We need to create the required directories and groups.
[root@lab1 ~]# mkdir -p /u01/app/oracle/product/19.0.0.0/dbhome_1[root@lab1 ~]# mkdir -p /u01/app/19.0.0.0/gridhome_1
[root@lab1 ~]# chown -R oracle:oinstall /u01
[root@lab1 ~]# chmod -R 755 /u01[root@lab1 ~]# groupadd -g 5001 oinstall
[root@lab1 ~]# groupadd -g 5002 dba
[root@lab1 ~]# groupadd -g 5003 oper
[root@lab1 ~]# groupadd -g 5004 asmadmin
[root@lab1 ~]# groupadd -g 5005 asmdba
[root@lab1 ~]# groupadd -g 5006 racoper
9. Central Inventory Creation
vim /etc/oraInst.loc
inventory_loc=/u01/app/oraInventory
inst_group=oinstall
chmod 775 /etc/oraInst.loc
chown oracle:oinstall oraInst.loc
10. Creation of Shared Disk
Now we will create 3 disks which are as below.
1) 3GB –> ASM Installation
2) 20GB–> Database
3) 10GB–> Database
Note: – While adding we will get 2 options FIXED/DYNAMIC, We need to select FIXED option.
Steps to create the Shared disks
======================
Creation of Shared Disks : –
Open Oracle Virtual Box –> File –> Virtual Media Manager –> Create –> VDI (VirtualBox Disk Image)–> Fixed Size –> Location & Size –> Make it Shareable
Attach Created Disk to both Machines : –
Power off Both Machines –> Click on 1st Machine –> Settings –> Storage –> Controller: SATA –> Add hard disk –> Add all the disks in both the nodes

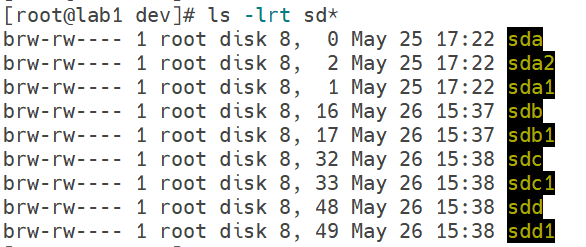
11. Disk Formatting
Now we need to format the disks and create the partitions which we can do it from any one of the nodes.
Command : – fdisk /dev/sdb –> Command (m for help) : n –> Partition type : p (primary) –> Press enter for 3 times so that default value can be taken –> Command (m for help) : w (save)
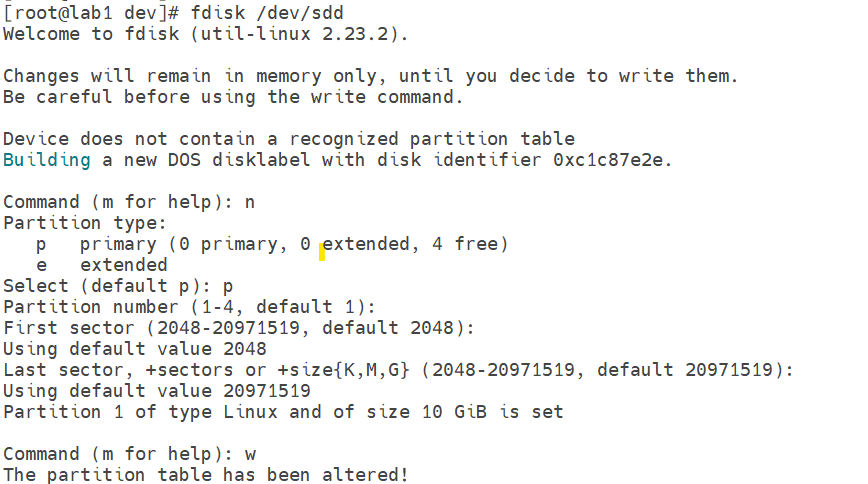
We can see below output after disk has been formatted.
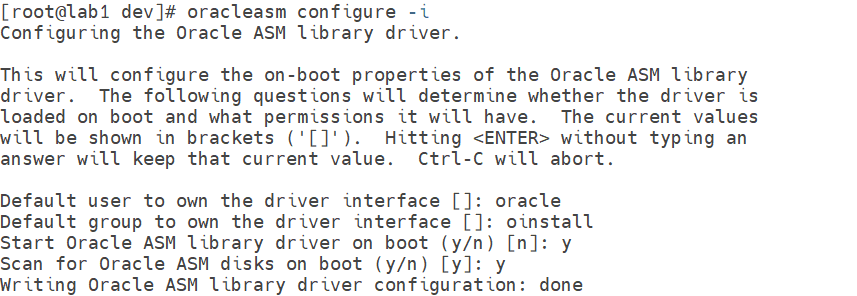
12. ASM Disk Creation
Now we need to create the ASM disks, but before that we need to configure the ASM library.
Note: – You need to configure oracleasm library in both the nodes.

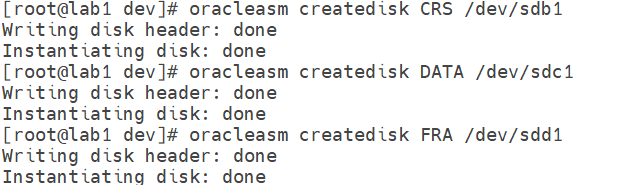
ASM Disk Creation Command : –
We can run below command from only one node and create the disks.
oracleasm createdisk CRS /dev/sdb1
oracleasm createdisk DATA /dev/sdc1
oracleasm createdisk FRA /dev/sdd1

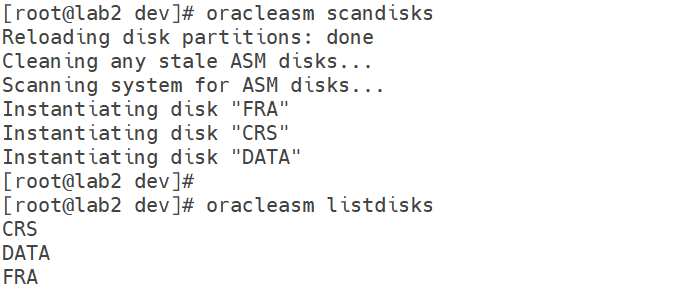
The same disks will not be visible in the 2nd node to make it visible you need to execute oracleasm scandisks command.
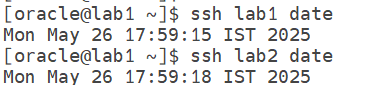
13. Password less connectivity
Password less connectivity is also important in this setup because at the time of remote software transfer oracle require password less connectivity to copy software without any issues.
Command : – ssh-keygen (run from both the nodes)

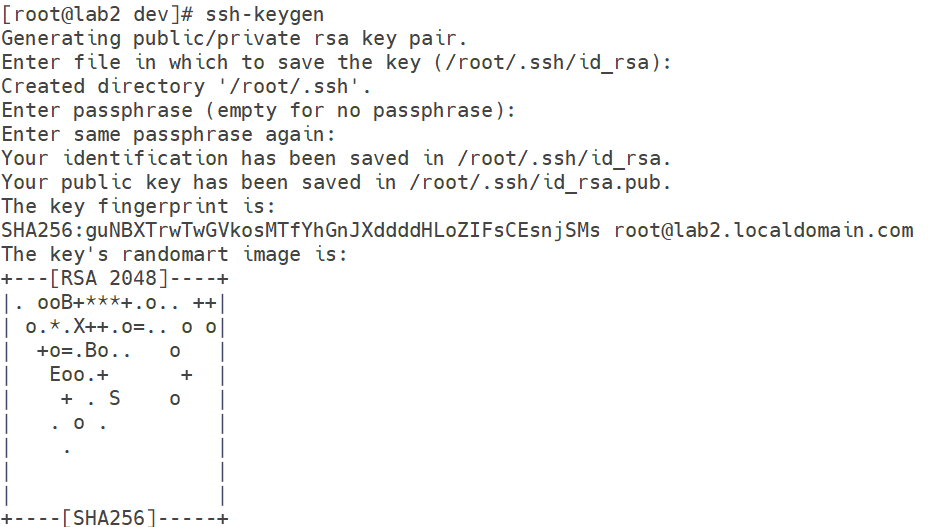
Steps of password less connectivity : –
Node1 –> /home/oracle/.ssh –> create file authorized_keys –> put the content of id_rsa.pub of 2nd and 1st node
Node2 –> /home/oracle/.ssh –> create file authorized_keys –> put the content of id_rsa.pub of 1st and 2nd node
Output: –

14. Grid Software Download and Unzip
Now we need to install the grid software. I have already provided the steps to download the software in step number 2.
You might face issue during copy of the software to the virtual machine, in that case you should have first Installed VirtualBox Guest Additions.

Unzip Command : – unzip LINUX.X64_193000_grid_home.zip -d /u01/app/19.0.0.0/gridhome_1/
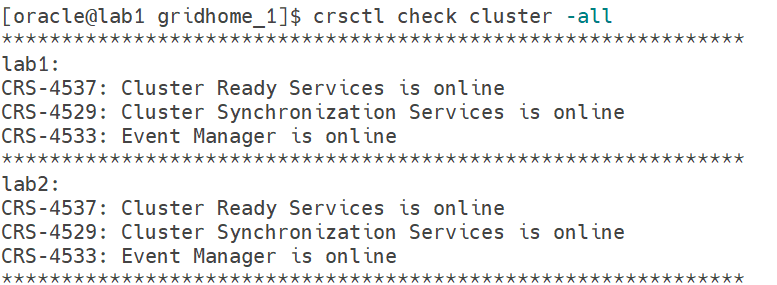
15. Cluvfy (Cluster Verification Utility)
Command : – ./runcluvfy.sh stage -pre crsinst -n lab1,lab2 -verbose
Output : –
Verifying Daemon "proxyt" not configured and running …PASSED
Verifying User Equivalence …PASSED
Verifying RPM Package Manager database …INFORMATION (PRVG-11250)
Verifying /dev/shm mounted as temporary file system …PASSED
Verifying File system mount options for path /var …PASSED
Verifying DefaultTasksMax parameter …PASSED
Verifying zeroconf check …PASSED
Verifying ASM Filter Driver configuration …PASSED
Verifying Systemd login manager IPC parameter …PASSED
Pre-check for cluster services setup was successful.
Note: – Kindly check the issues related to the Cluvfy prechecks.
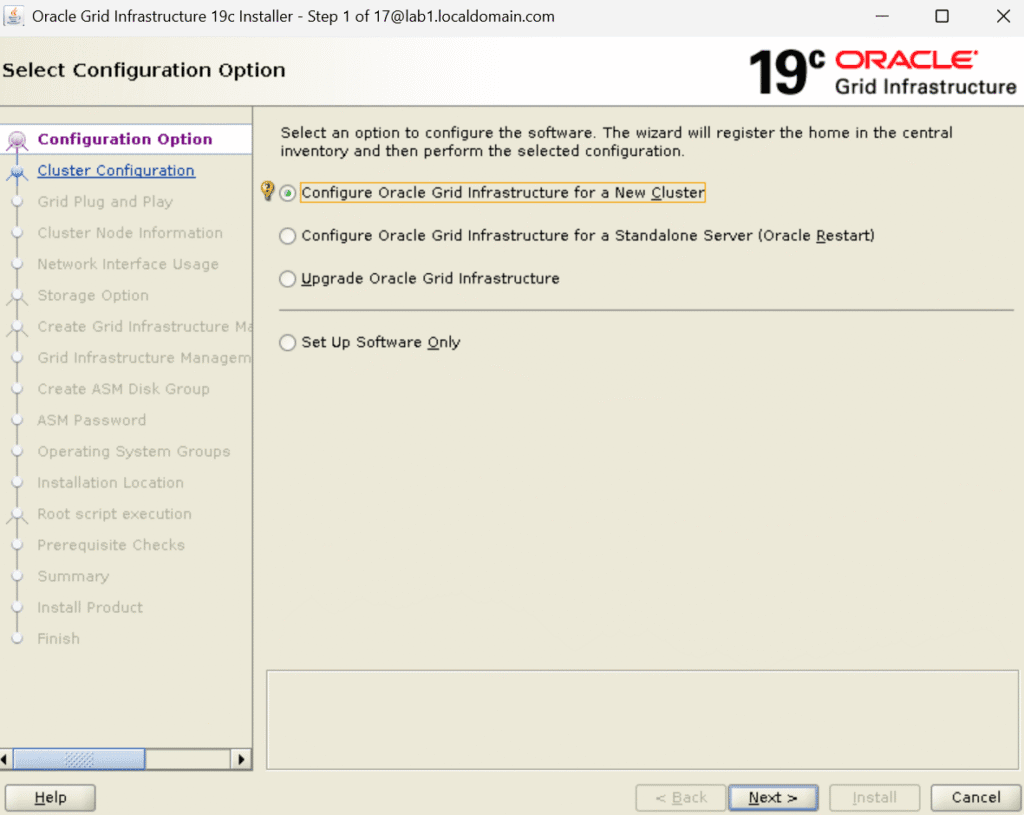
16. Clusterware Installation (Grid+ASM)
In Oracle 19c RAC Database installation the next step is to install cluster setup for that go to the home location and execute below command to start the setup.
Command : –
1) cd /u01/app/19.0.0.0/gridhome_1
2) ./gridSetup.sh
Installation Steps : –
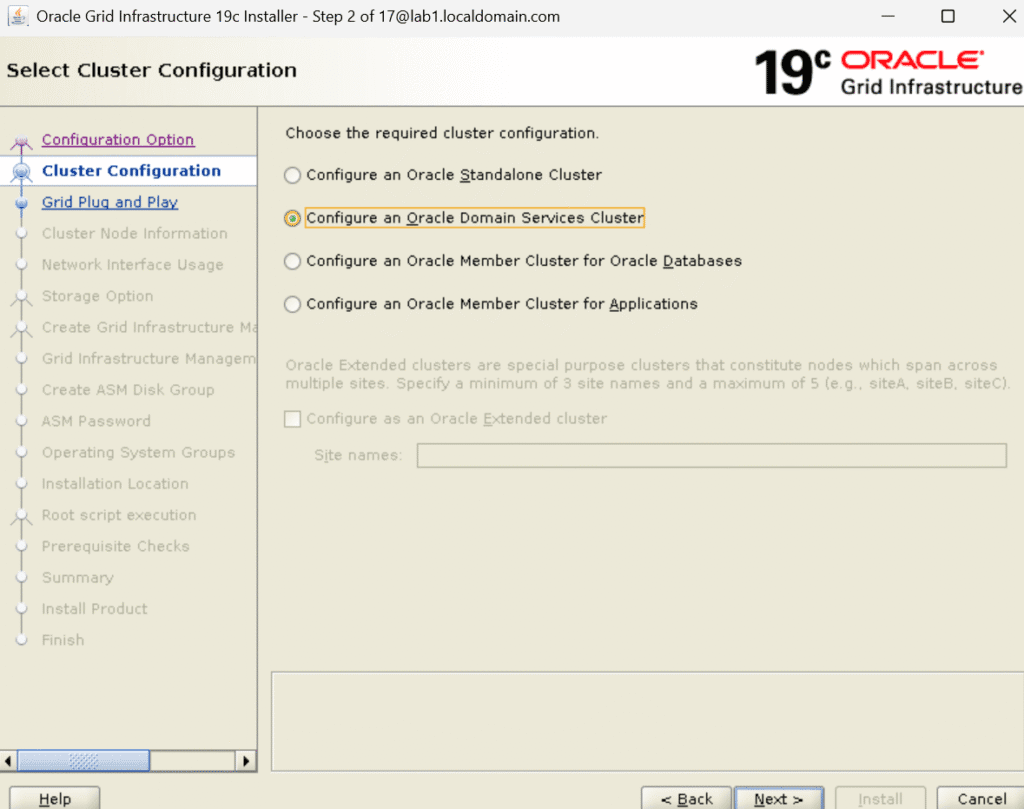
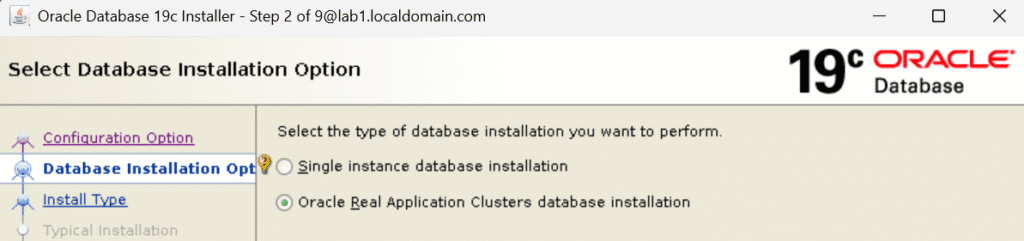
Step 1) Launch the wizard and choose option Configure Oracle Grid Infrastructure for a New Cluster.
Step 2) Select Configure an Oracle Standalone Cluster.
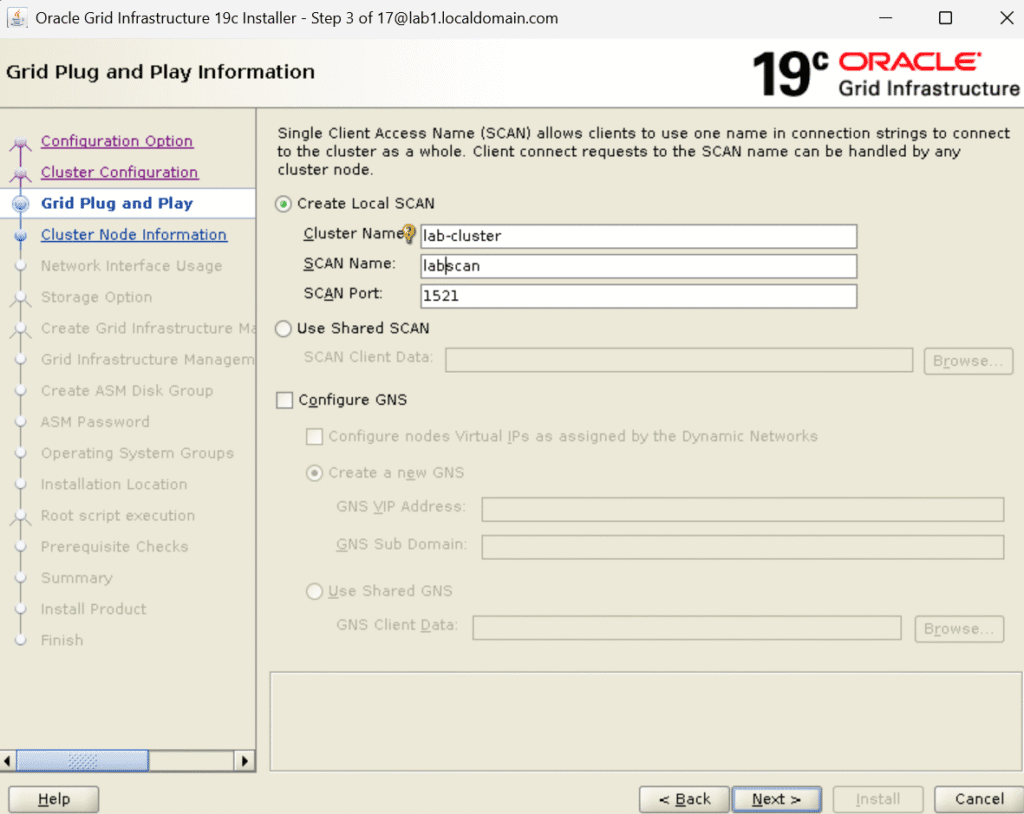
Step 3) Put the SCAN and Cluster name entries.
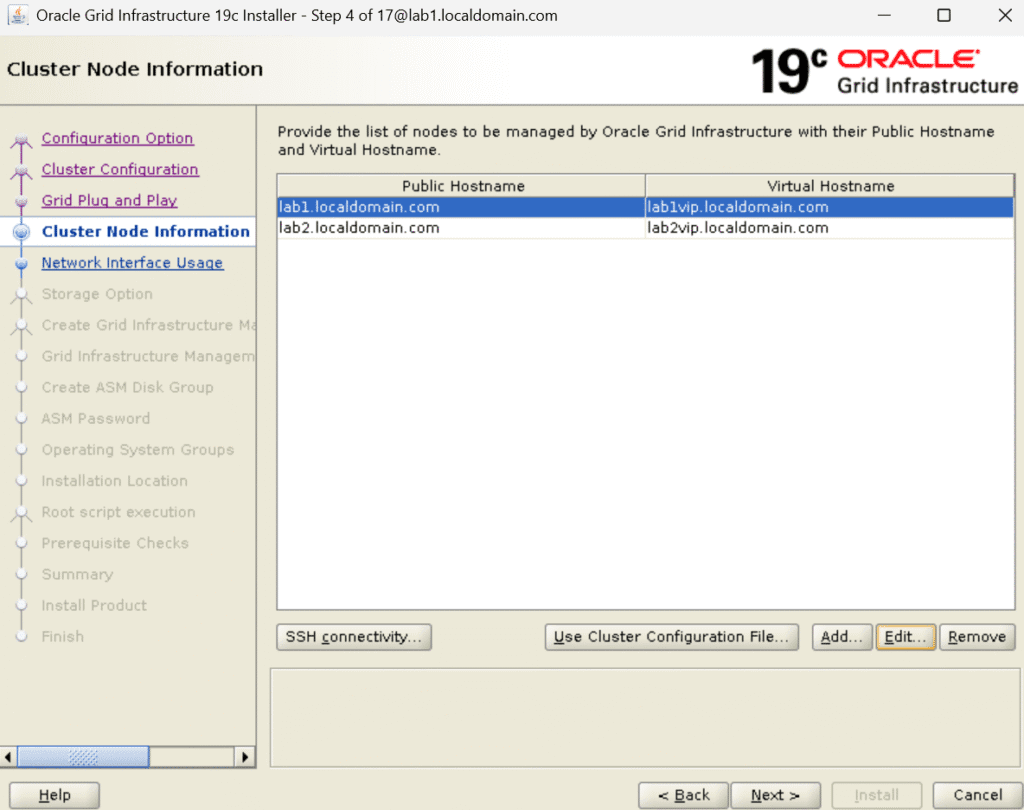
Step 4) Provide the Public and Virtual hostname.
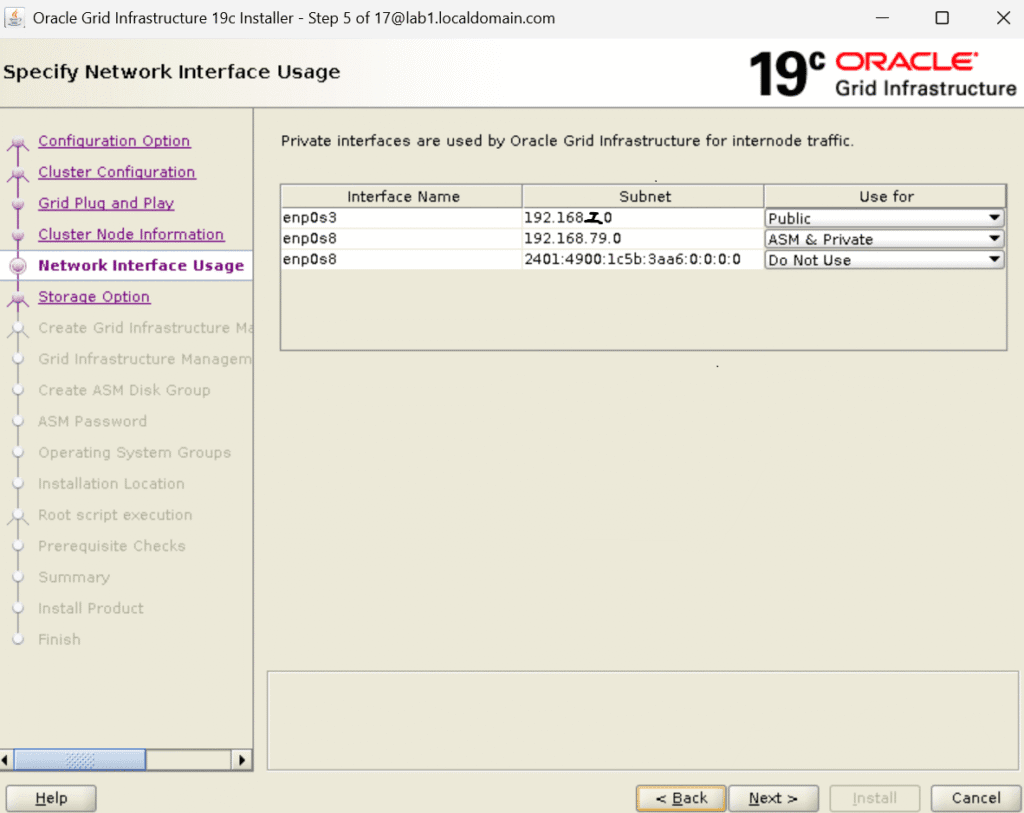
Step 5) Select the Network interface usage.
Step 6) Select option use Oracle Flex ASM for storage.
Step 7) Select NO option in configure Grid Infrastructure Management Repository.
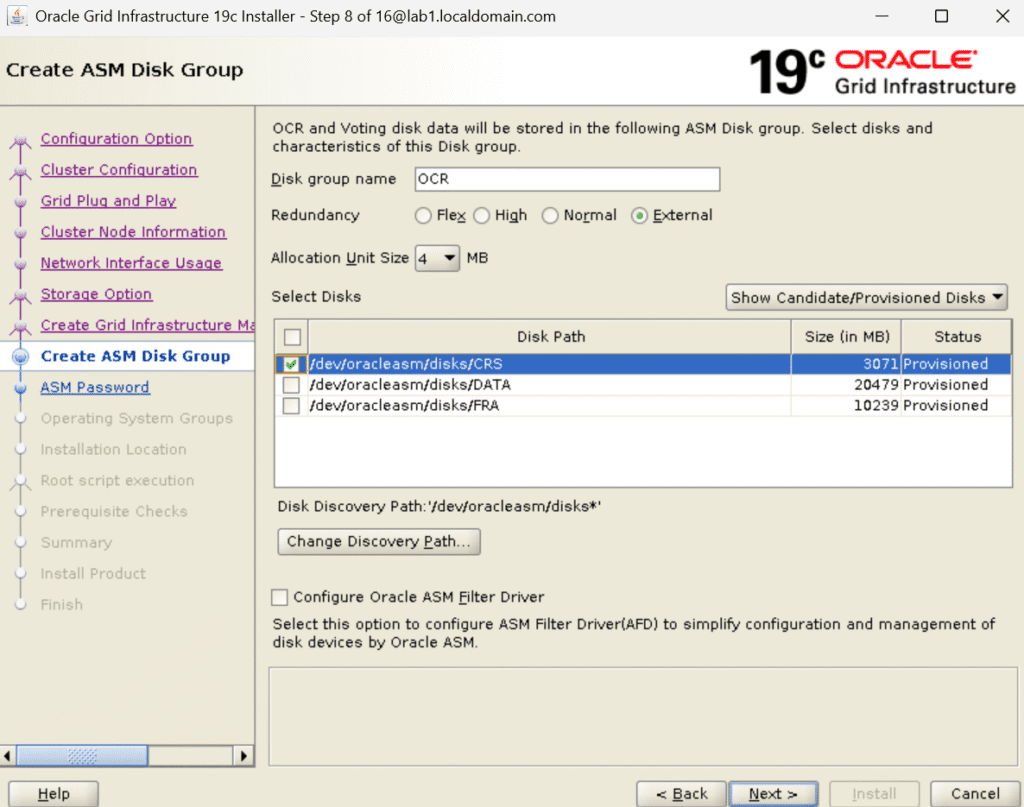
Step 8) Select ASM disk group option for OCR and Voting disk data.
Step 9) Confirm SYS and ASMSNMP account password.
Step 10) Select option Do not use Intelligent Platform Management Interface (IPMI).
Step 11) Uncheck the box of Register with Enterprise Manager (EM) Cloud Control.
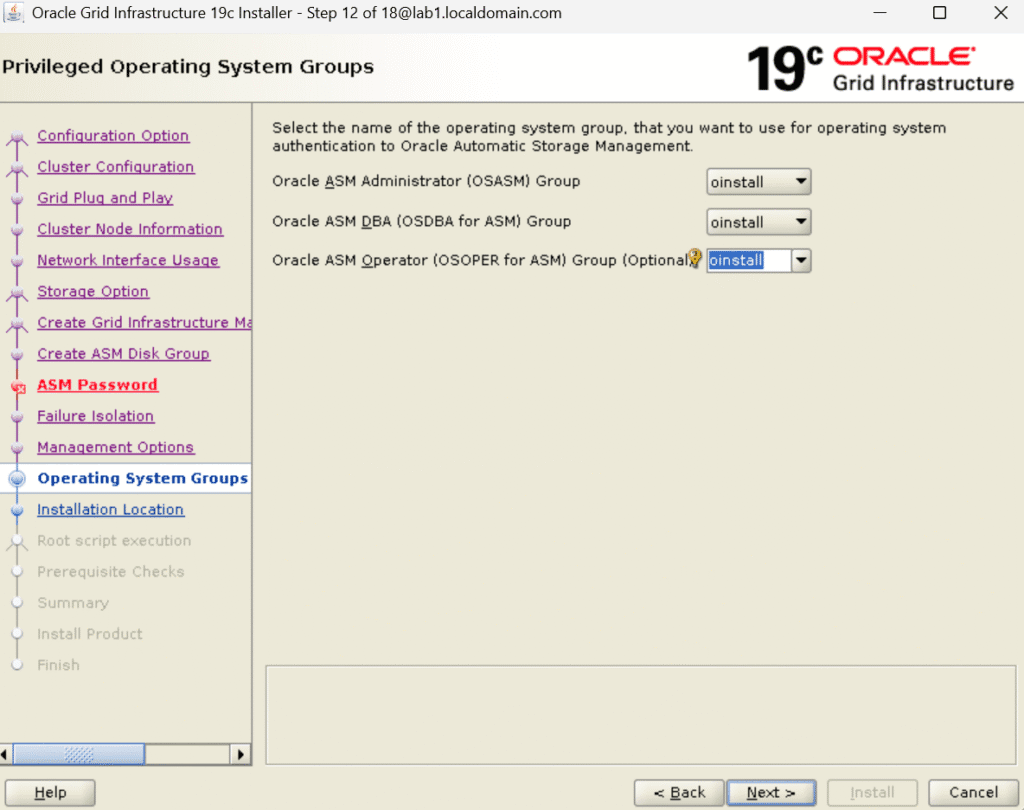
Step 12) Select OS group for the OS authentication.
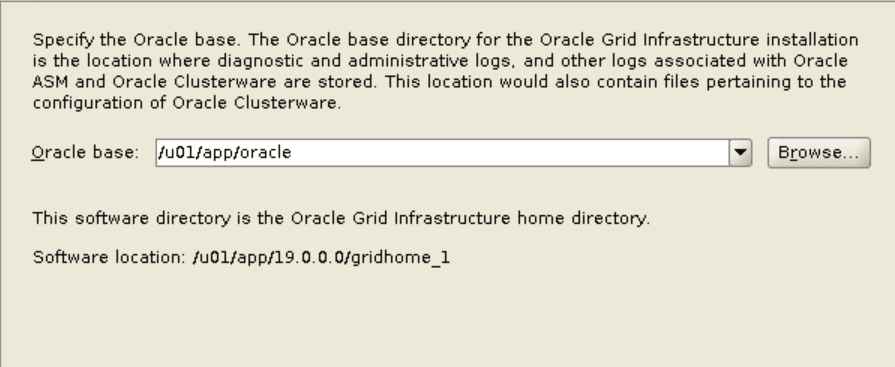
Step 13) Check the Oracle Base and Software directory path for Grid Infrastructure home directory.
Step 14) Uncheck the option for Automatically run configuration scripts because we will run those scripts manually one by one.
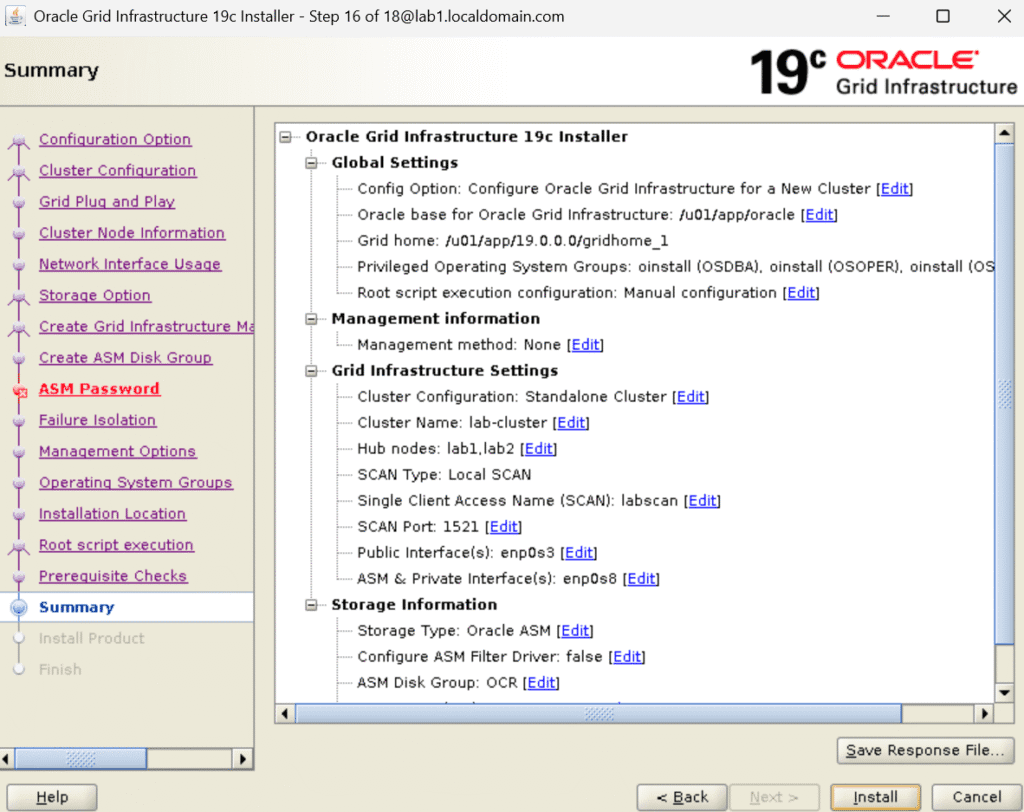
Step 15) Check the Summary part before starting the Installation.
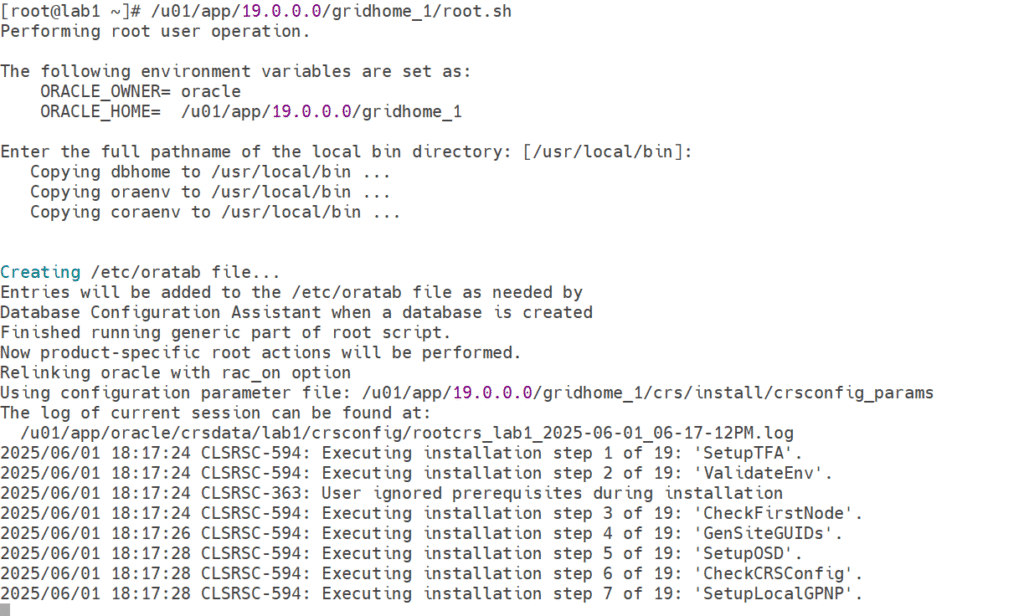
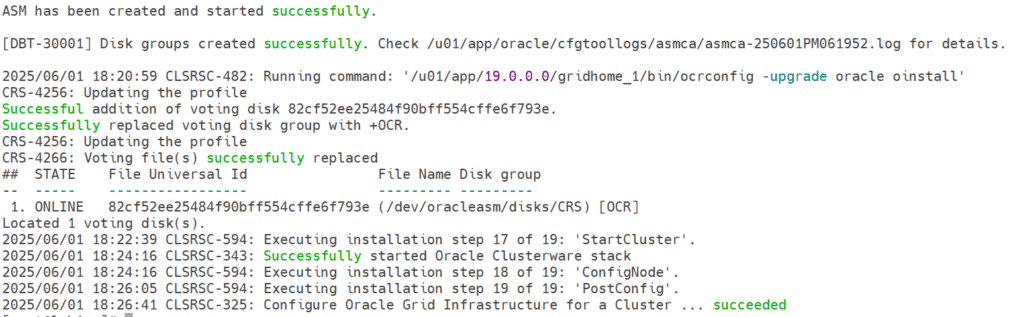
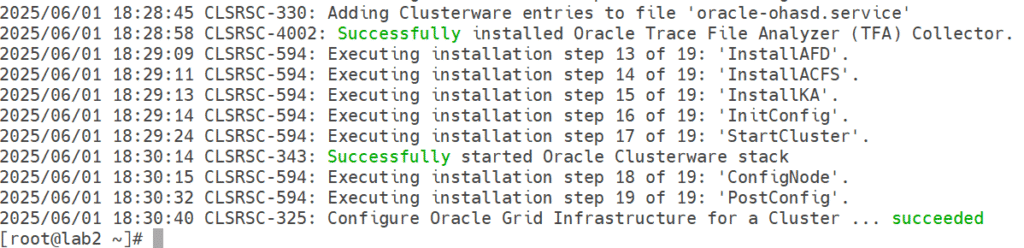
Step 16) Need to execute the root.sh script in both nodes but one by one from root user.
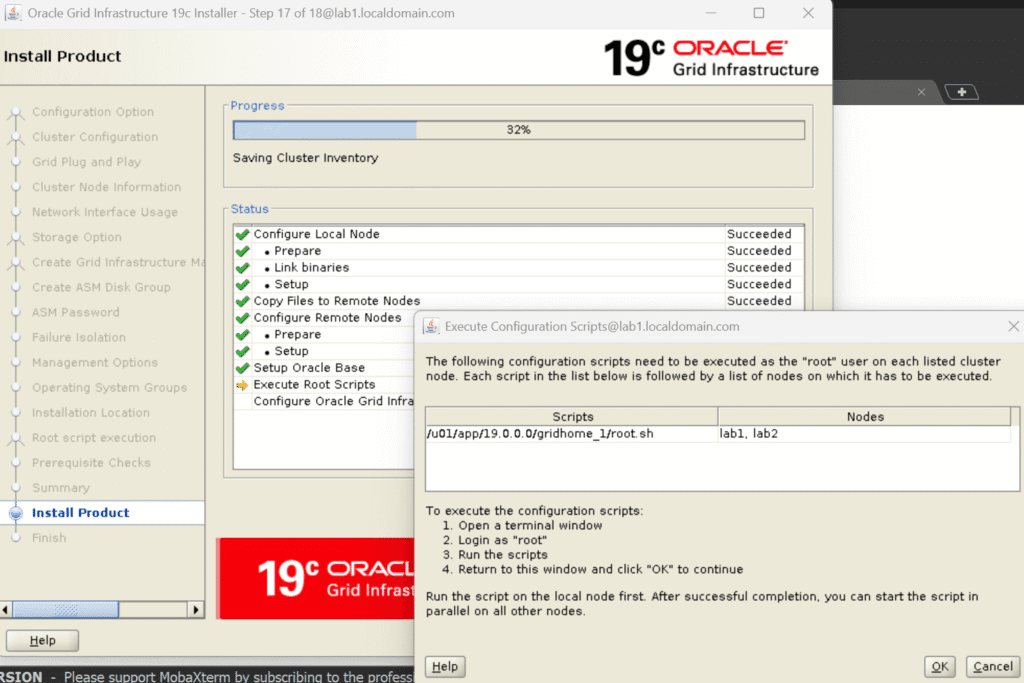
Step 17) Below are the output of the root.sh script execution from root user.
Node 1 Output : –
Node 2 Output : –
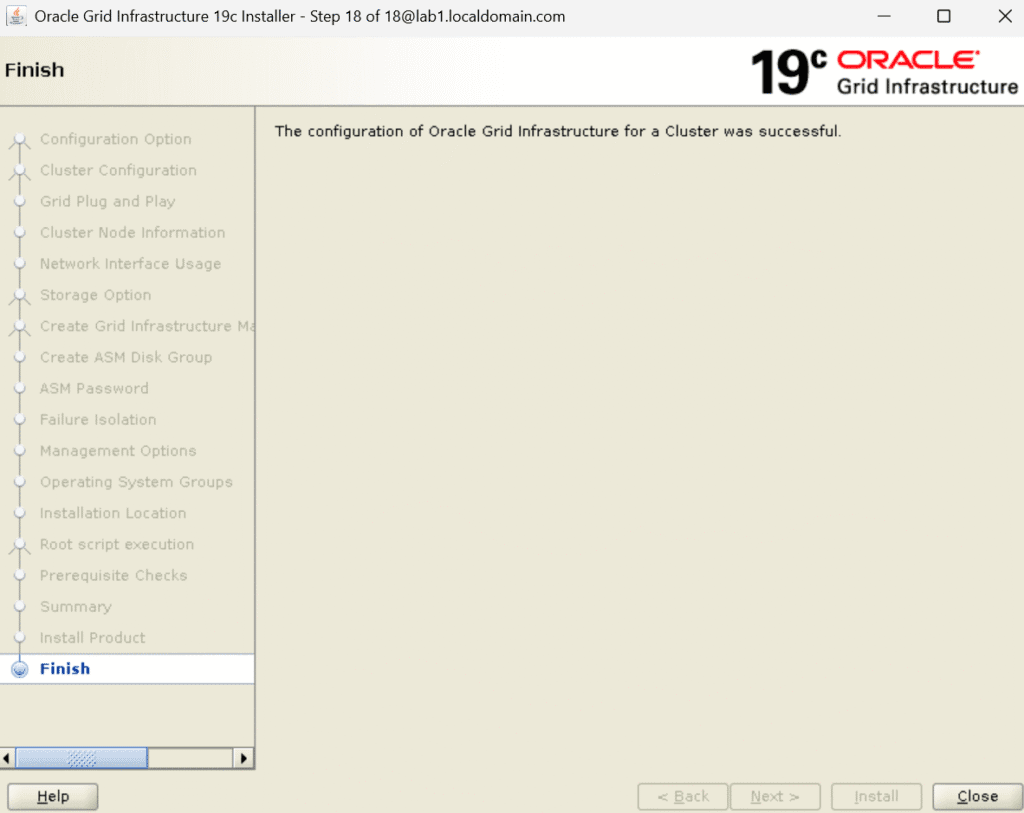
Note: – After ran of root.sh script on both the nodes then again go the terminal and click on OK to proceed with the Grid Installation.
Step 18) Final output of the Grid Installation.
17. Oracle Software Installation
Now we need to install the Oracle Software to proceed with the Oracle 19c RAC database Installation.
Step 1) First need to copy the software file in some directory and unzip it.

Unzip Command : – unzip LINUX.X64_193000_db_home.zip -d /u01/app/oracle/product/19.0.0.0/dbhome_1
Step 2) Execute the run Installer script to install the oracle software binaries.
Command : – ./runInstaller
Step 3) Select Set Up Software Only option .

Step 4) Select Oracle Real Application Clusters Database Installation option.
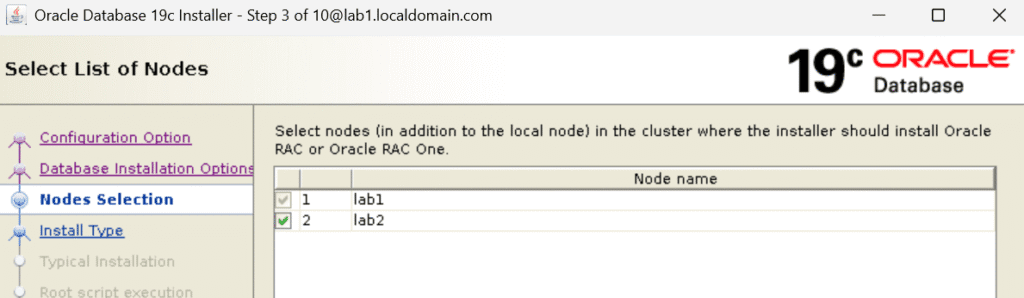
Step 5) In node selection select both the hostnames.
Step 6) Select Enterprise Edition option.
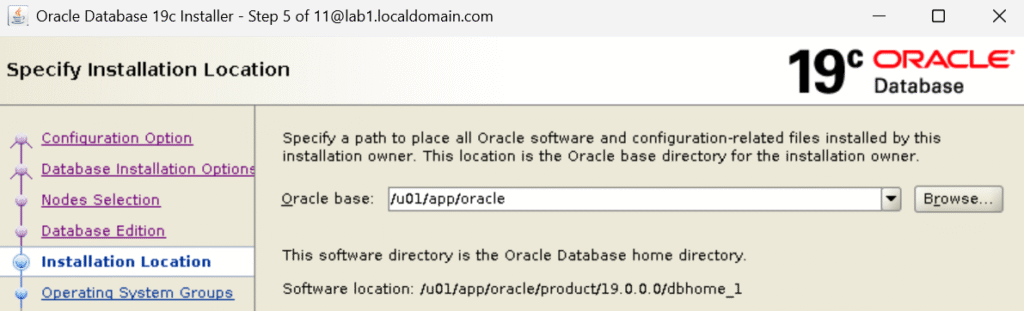
Step 7) Check the Oracle Base and Oracle Software Location.
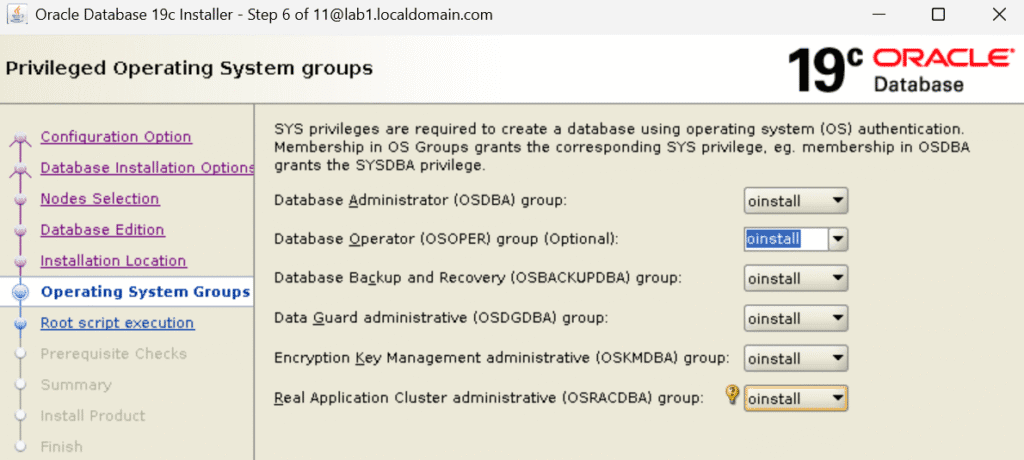
Step 8) Select Operating System Groups option as per your requirement.
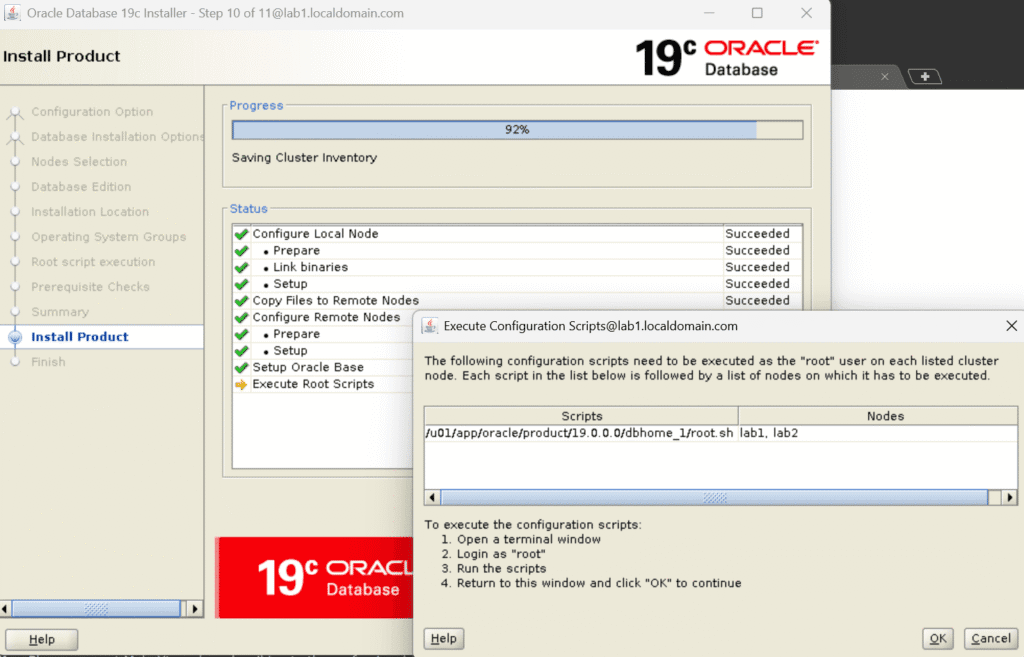
Step 9) Uncheck the option for Automatically run configuration scripts because we will run those scripts manually one by one.
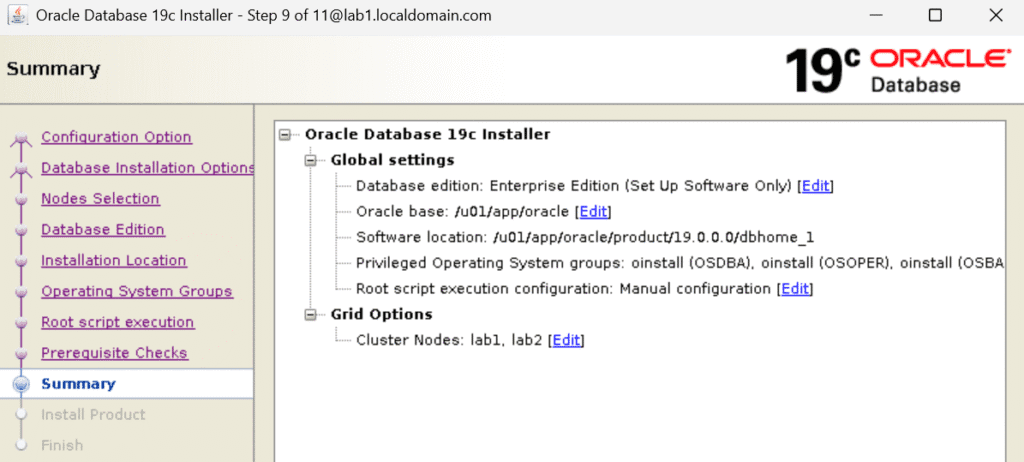
Step 10) Check the Summary part and click on Install option.
Step 11) Need to execute the root.sh script in both nodes but one by one from root user.
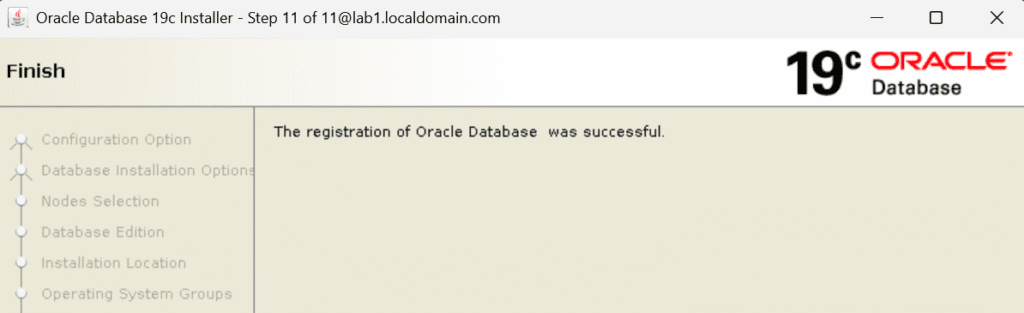
Oracle Software Installation has been completed.
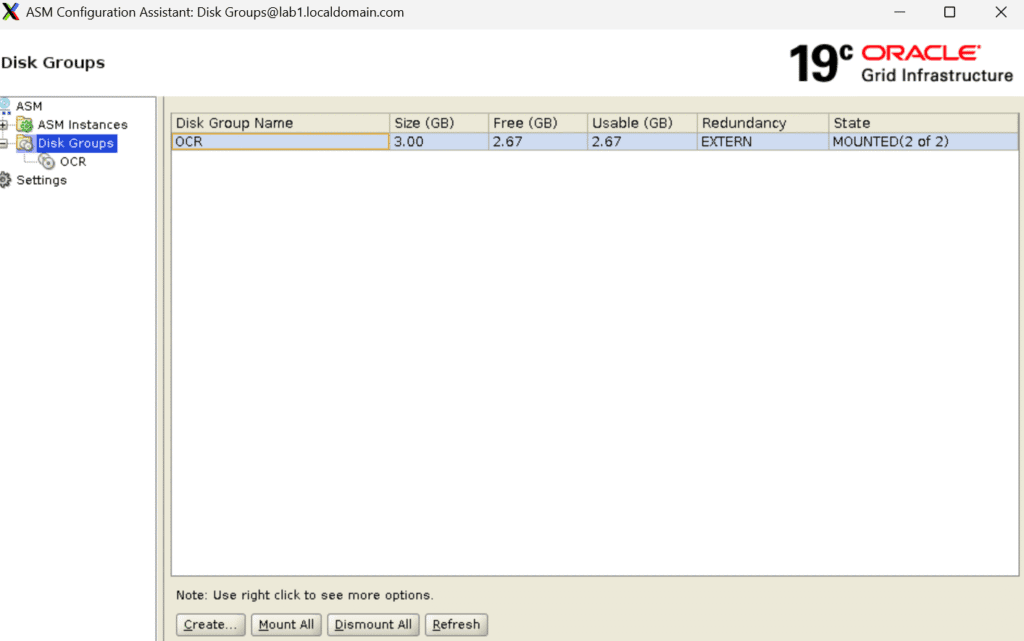
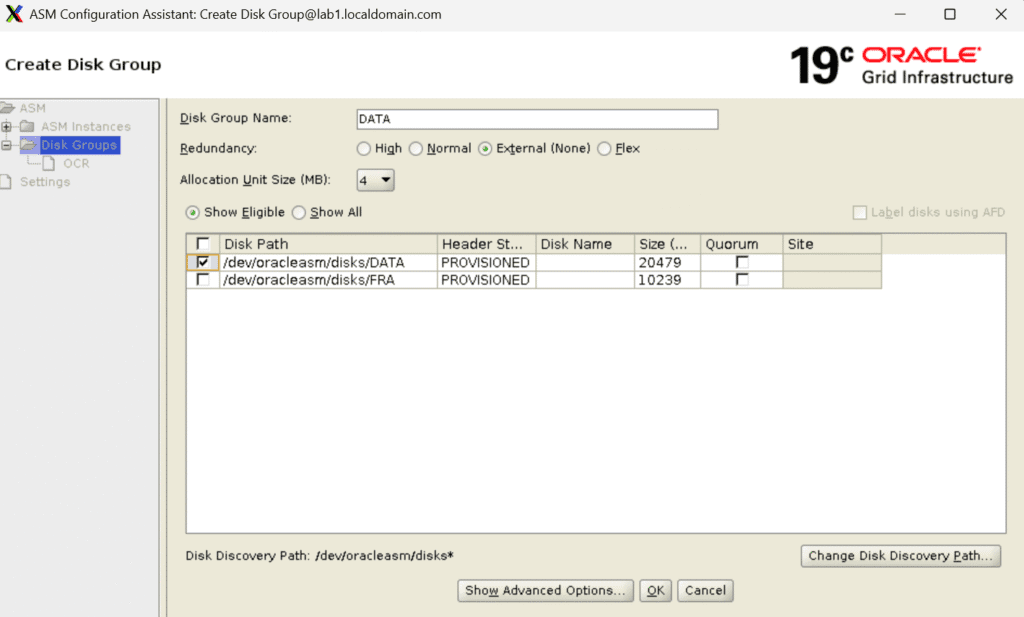
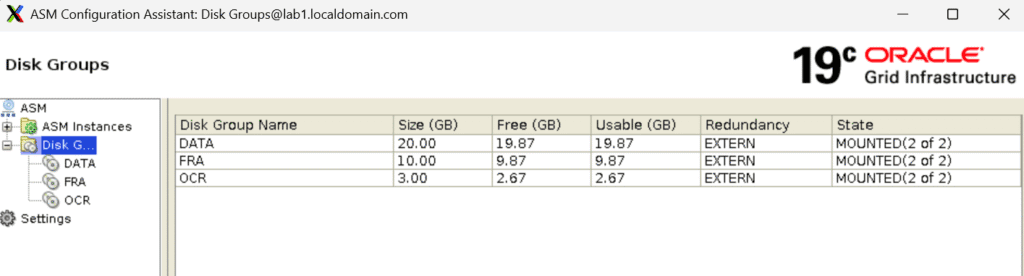
18. Disk group Creation
The next step in Oracle 19c RAC database is Disk Group Creation. We will use ASMCA utility for the creation.
Step 1) We need to click on the CREATE option once open the ASMCA utility.
Step 2) Put the Disk group name and disk path to for the creation.
Step 3) We can see from below output that DISK GROUP has been created and we are one step away from the Oracle 19c RAC database Installation.
ASMCMD Output : –

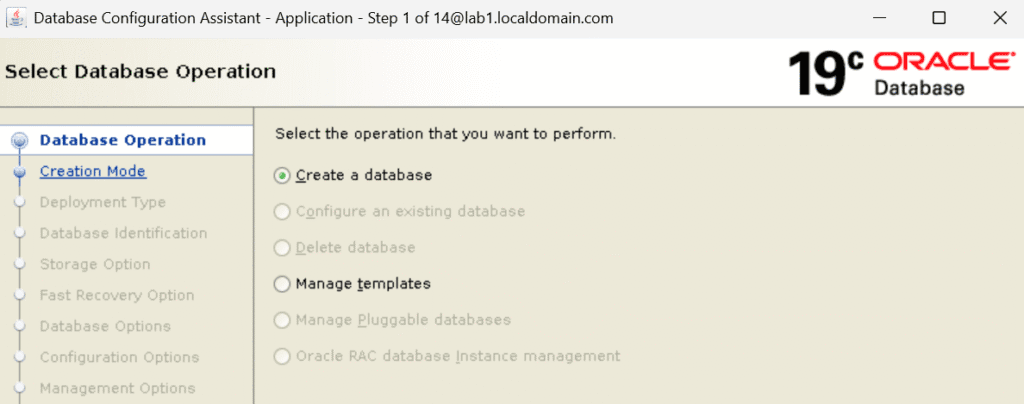
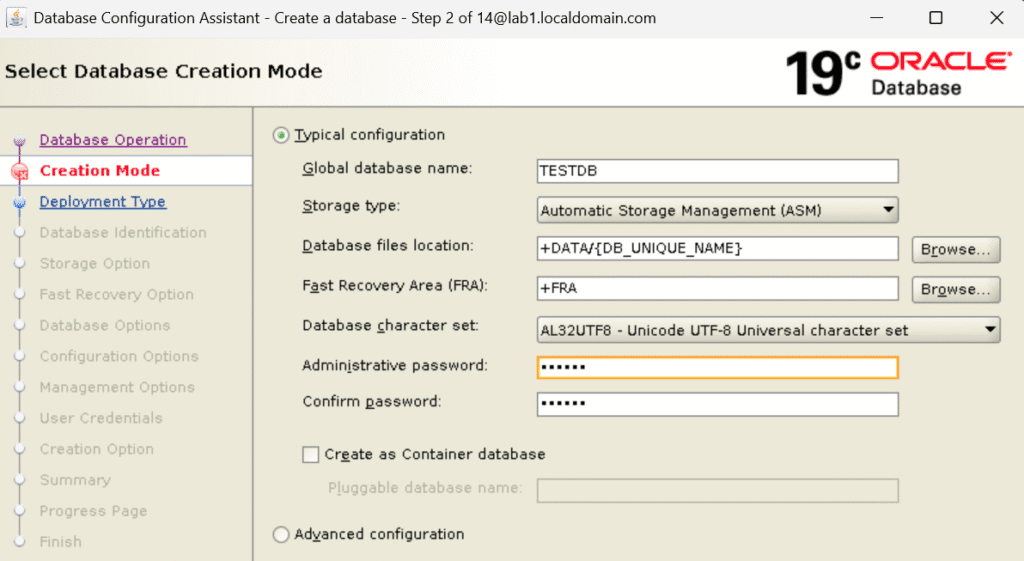
19. Database Creation
Now are at the final step of Oracle 19c RAC Database Installation. We will use DBCA utility for creation.
Step 1) Launch the DBCA utility from Oracle home and click on Create a database option.
Step 2) We will go with the typical configuration in this activity and we will create database as Normal database and in future article we will migrate Normal to Multitenant database.
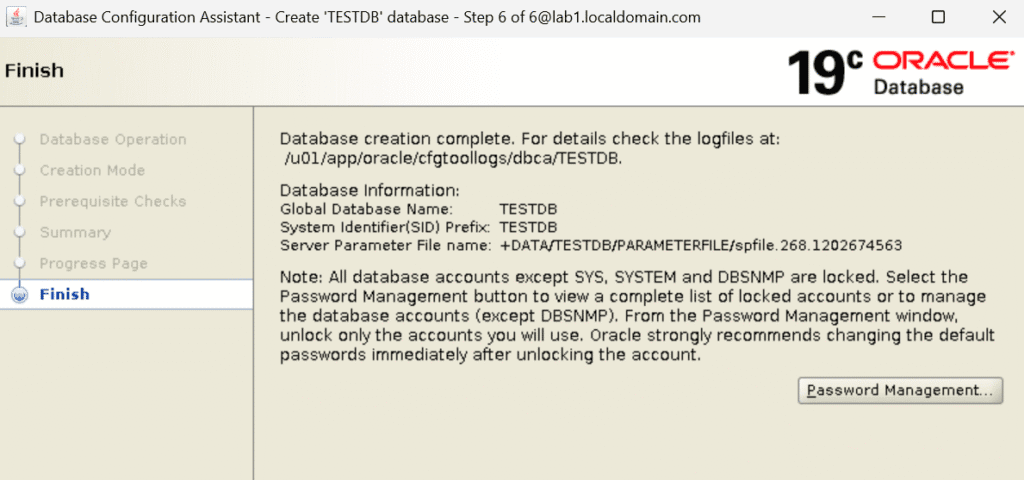
Step 3) Check the Summary part and click on the Finish the Oracle 19c RAC database installation..

Step 4) Database has been created.
Database and Instance Status : –


Conclusion
Finally!! We have done with the Oracle 19c RAC Database Installation.
Note: If you want to set the Lab in your home for practice to get your hands dirty then you can download and install Oracle VirtualBox, followed by the operating system, the Oracle binary software, and finally, create the database.