Table of Contents
Introduction
In this article, I will show a detailed step-by-step guide of an Oracle RAC database upgrade from 12c to 19c through the Autoupgrade Utility.
Oracle RAC database upgrade through Autoupgrade
We will perform the Oracle RAC database upgrade in 2 parts.
1) PRECHECK
2) UPGRADE
PRECHECK
Precheck is the first step in the Oracle RAC database upgrade.
Step 1) Check the database status
[oracle@lab1 ~]$ srvctl status database -d QADB
Instance QADB1 is running on node lab1
Instance QADB2 is running on node lab2

SQL> select name, open_mode, version from v$database, v$instance;

NAME      OPEN_MODE            VERSION
--------- -------------------- -----------------
QADB      READ WRITE           12.2.0.1.0
Step 2) Spfile and pfile backup
SQL> create pfile='/tmp/initQADB1.ora' from spfile;

File created.
Step 3) Database Archive Log mode
Note: – Before performing the Oracle RAC database upgrade, putting the database in Archive log is one of the mandatory steps.
SQL> archive log list;
Database log mode              No Archive Mode
Automatic archival             Disabled
Archive destination            USE_DB_RECOVERY_FILE_DEST
Oldest online log sequence     1
Current log sequence           1
We can check from the above output Database is in No Archive log mode. First, we need to change the IT mode from No Archive to Archive log mode.
Step 4) Putting the Database in Archive Log Mode
Note: – Before performing the Oracle RAC database upgrade, putting the database in Archive log is one of the mandatory steps.
[oracle@lab1 ~]$ srvctl stop database -d QADB
[oracle@lab1 ~]$
[oracle@lab1 ~]$
[oracle@lab1 ~]$ sqlplus / as sysdba

SQL*Plus: Release 12.2.0.1.0 Production on Fri Aug 29 17:32:40 2025

Copyright (c) 1982, 2016, Oracle.  All rights reserved.

Connected to an idle instance.

SQL> startup mount;
ORACLE instance started.

Total System Global Area 2667577344 bytes
Fixed Size                  8624264 bytes
Variable Size             754976632 bytes
Database Buffers         1895825408 bytes
Redo Buffers                8151040 bytes
Database mounted.
SQL>  alter database archivelog;

Database altered.

SQL> archive log list;
Database log mode              Archive Mode
Automatic archival             Enabled
Archive destination            USE_DB_RECOVERY_FILE_DEST
Oldest online log sequence     1
Next log sequence to archive   1
Current log sequence           1
SQL>
SQL> Shut Immediate
ORA-01109: database not open


Database dismounted.
ORACLE instance shut down.
SQL>
SQL>
SQL> exit
Disconnected from Oracle Database 12c Enterprise Edition Release 12.2.0.1.0 - 64bit Production
[oracle@lab1 ~]$  srvctl start database -d QADB
[oracle@lab1 ~]$
[oracle@lab1 ~]$
[oracle@lab1 ~]$ srvctl status database -d QADB
Instance QADB1 is running on node lab1
Instance QADB2 is running on node lab2
Step 5) Download the autoupgrade.jar file
You can download the autoupgrade.jar file using the link below from Oracle MOS.
AutoUpgrade Tool (Doc ID 2485457.1)Step 6) Copy the autoupgrade.jar file to the 19c Oracle home/rdbms/admin location
cp autoupgrade.jar -d /u01/app/oracle/product/19.0.0.0/dbhome_1/rdbms/adminStep 7) Create the Sample File for the Oracle RAC database upgrade
mkdir -p /u01/upgrade/QADB
cd /u01/upgrade/QADB
/u01/app/oracle/product/19.0.0.0/dbhome_1/jdk/bin/java -jar /u01/app/oracle/product/19.0.0.0/dbhome_1/rdbms/admin/autoupgrade.jar -create_sample_file config
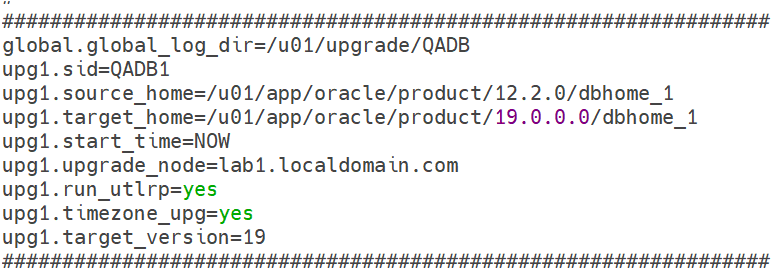
cp sample_config.cfg QADB_config.cfgStep 8) Edit the configuration file and put the relevant entries for the Oracle RAC database upgrade
Step 9) Export the ORACLE_HOME and PATH for 19c
export ORACLE_HOME=/u01/app/oracle/product/19.0.0.0/dbhome_1
export PATH=$ORACLE_HOME/jdk/bin:$PATH

Before
[oracle@lab1 QADB]$ which java
/usr/bin/java

After
[oracle@lab1 QADB]$ which java
/u01/app/oracle/product/19.0.0.0/dbhome_1/jdk/bin/java
Step 10) Run the ANALYZE command to perform the perchecks
/u01/app/oracle/product/19.0.0.0/dbhome_1/jdk/bin/java -jar /u01/app/oracle/product/19.0.0.0/dbhome_1/rdbms/admin/autoupgrade.jar -config /u01/upgrade/QADB/QADB_config.cfg -mode ANALYZE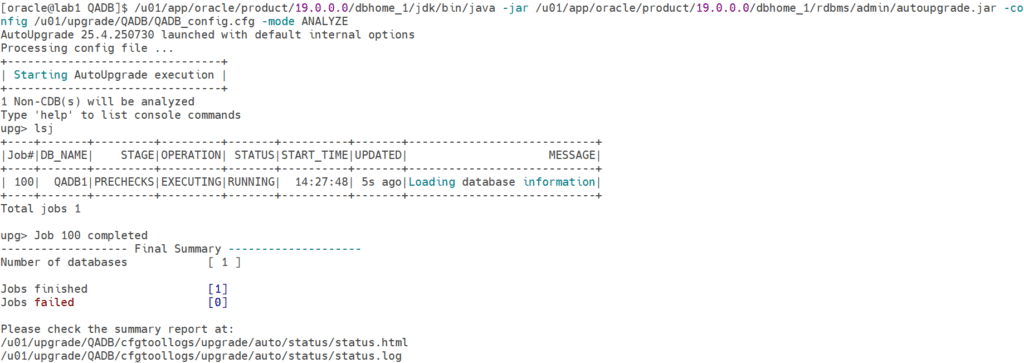
UPGRADE
The next step is the Oracle RAC database upgrade using the Autoupgrade utility.
Step 1) Now run the DEPLOY command to start the Oracle RAC database upgrade.
/u01/app/oracle/product/19.0.0.0/dbhome_1/jdk/bin/java -jar /u01/app/oracle/product/19.0.0.0/dbhome_1/rdbms/admin/autoupgrade.jar -config /u01/upgrade/QADB/QADB_config.cfg -mode DEPLOY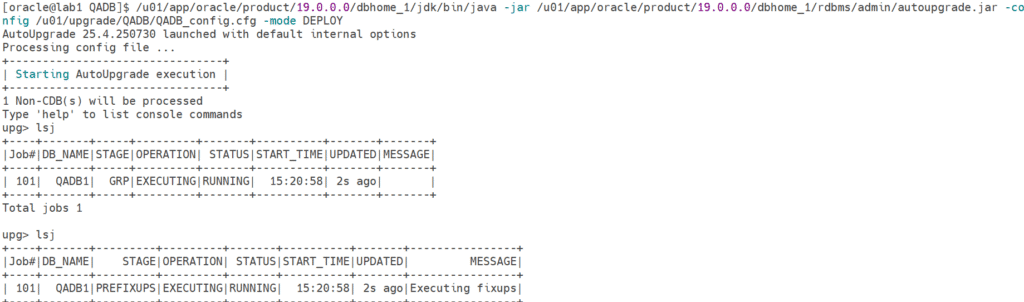
Below Prefixups will run before starting the Upgrade

2025-08-31 15:21:24.316 INFO [69] The following fixups will run
Batch #[0] [PARALLEL]
QADB1|EXISTENCE_OF_DATAPUMP_AQ_TABLES
QADB1|DICTIONARY_STATS
Batch #[1] [SERIAL]
QADB1|MANDATORY_UPGRADE_CHANGES
Batch #[2] [PARALLEL]
QADB1|INVALID_OBJECTS_EXIST
Batch #[3] [PARALLEL]
QADB1|MIN_RECOVERY_AREA_SIZE
Batch #[4] [PARALLEL]
QADB1|PURGE_RECYCLEBIN
 - FixUpsRunner.setup#150
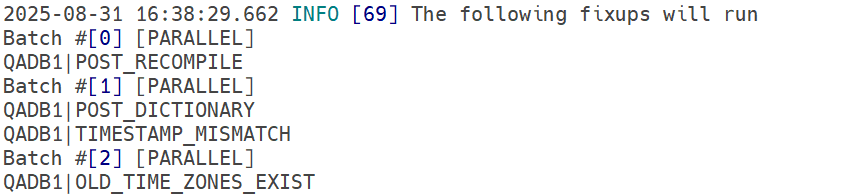
Step 2) Upgrade In Progress

Step 3) Postfixup Script

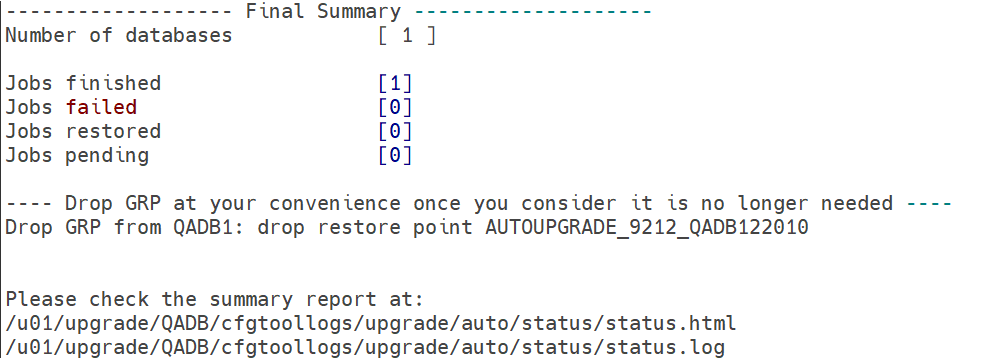
Step 4) Final Summary
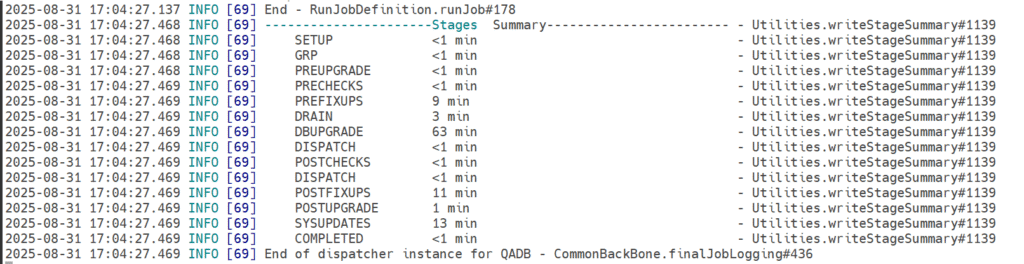
Step 5) Summary Logs
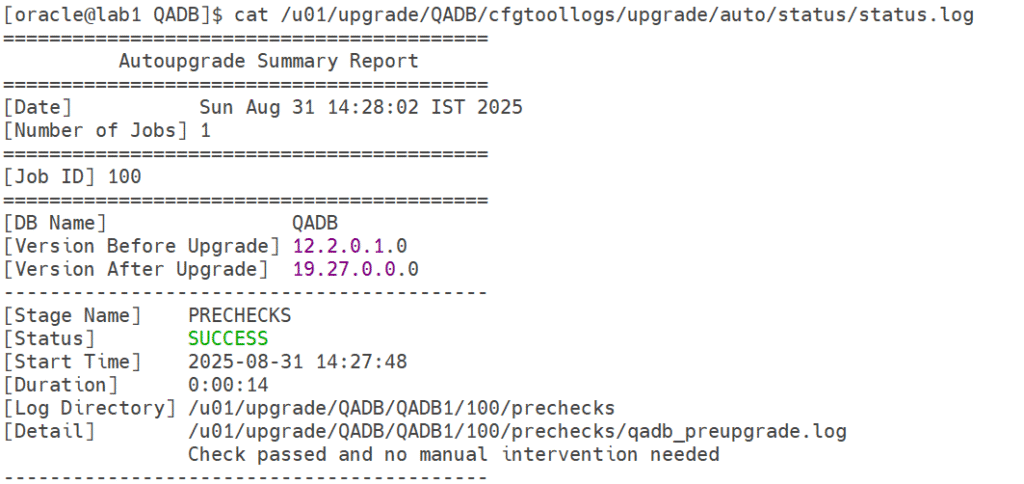
[oracle@lab1 QADB]$ cat /u01/upgrade/QADB/cfgtoollogs/upgrade/auto/status/status.log
==========================================
          Autoupgrade Summary Report
==========================================
[Date]           Sun Aug 31 17:04:28 IST 2025
[Number of Jobs] 1
==========================================
[Job ID] 101
==========================================
[DB Name]                QADB
[Version Before Upgrade] 12.2.0.1.0
[Version After Upgrade]  19.27.0.0.0
------------------------------------------
[Stage Name]    GRP
[Status]        SUCCESS
[Start Time]    2025-08-31 15:20:58
[Duration]      0:00:11
[Detail]        Please drop the following GRPs after Autoupgrade completes:
                 AUTOUPGRADE_9212_QADB122010
------------------------------------------
[Stage Name]    PREUPGRADE
[Status]        SUCCESS
[Start Time]    2025-08-31 15:21:10
[Duration]      0:00:00
[Log Directory] /u01/upgrade/QADB/QADB1/101/preupgrade
------------------------------------------
[Stage Name]    PRECHECKS
[Status]        SUCCESS
[Start Time]    2025-08-31 15:21:10
[Duration]      0:00:13
[Log Directory] /u01/upgrade/QADB/QADB1/101/prechecks
[Detail]        /u01/upgrade/QADB/QADB1/101/prechecks/qadb_preupgrade.log
                Check passed and no manual intervention needed
------------------------------------------
[Stage Name]    PREFIXUPS
[Status]        SUCCESS
[Start Time]    2025-08-31 15:21:24
[Duration]      0:09:31
[Log Directory] /u01/upgrade/QADB/QADB1/101/prefixups
[Detail]        /u01/upgrade/QADB/QADB1/101/prefixups/prefixups.html
------------------------------------------
[Stage Name]    DRAIN
[Status]        SUCCESS
[Start Time]    2025-08-31 15:30:55
[Duration]      0:03:15
[Log Directory] /u01/upgrade/QADB/QADB1/101/drain
------------------------------------------
[Stage Name]    DBUPGRADE
[Status]        SUCCESS
[Start Time]    2025-08-31 15:34:10
[Duration]      1:03:44
[Log Directory] /u01/upgrade/QADB/QADB1/101/dbupgrade
------------------------------------------
[Stage Name]    POSTCHECKS
[Status]        SUCCESS
[Start Time]    2025-08-31 16:38:23
[Duration]      0:00:01
[Log Directory] /u01/upgrade/QADB/QADB1/101/postchecks
[Detail]        /u01/upgrade/QADB/QADB1/101/postchecks/qadb_postupgrade.log
                Check passed and no manual intervention needed
------------------------------------------
[Stage Name]    POSTFIXUPS
[Status]        SUCCESS
[Start Time]    2025-08-31 16:38:29
[Duration]      0:11:17
[Log Directory] /u01/upgrade/QADB/QADB1/101/postfixups
[Detail]        /u01/upgrade/QADB/QADB1/101/postfixups/postfixups.html
------------------------------------------
[Stage Name]    POSTUPGRADE
[Status]        SUCCESS
[Start Time]    2025-08-31 16:49:46
[Duration]      0:01:12
[Log Directory] /u01/upgrade/QADB/QADB1/101/postupgrade
------------------------------------------
[Stage Name]    SYSUPDATES
[Status]        SUCCESS
[Start Time]    2025-08-31 16:50:59
[Duration]      0:13:27
[Log Directory] /u01/upgrade/QADB/QADB1/101/sysupdates
------------------------------------------
Summary:/u01/upgrade/QADB/QADB1/101/dbupgrade/upg_summary.log
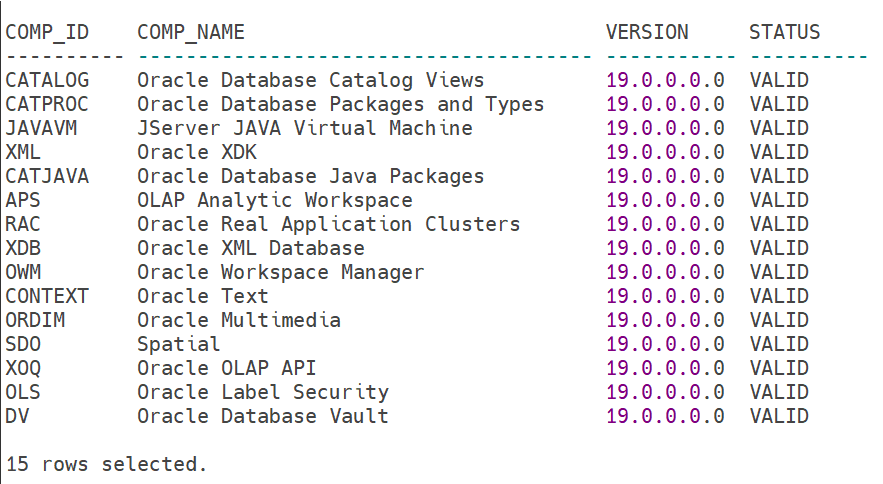
Step 6) DBA Registry Output
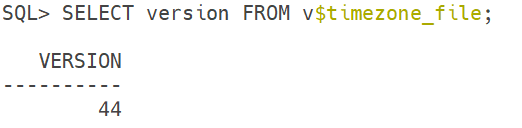
Step 7) TimeZone Output
From this point, you can hand over the database to the application team for the sanity checks as we have completed our Oracle RAC database upgrade part, and if all looks good from the app team, then you can change the compatibility parameter from 12.2.0 to 19.0.0
Conclusion
Finally, we have completed our Oracle RAC database upgrade from 12c to 19c using the Autoupgrade utility.
Note: – If you want to practice this whole activity in your home lab, then you'll need a platform to perform the installation. To set that up, you first need to download and install Oracle VirtualBox, followed by the operating system, the Oracle binary software, and finally, create the database.
If you enjoyed the article, please leave a comment and share it with your friends. Also, let me know which Oracle and MySQL topics you'd like to see covered in future articles.