Table of Contents
Introduction
In this article, I will cover the step-by-step guide on the Oracle 19c RAC add node procedure, which involves prerequisites, Grid Node, and RDBMS Node addition.
Oracle RAC Node Addition in 19c
Note: – If you want to practice this whole activity in your home lab, then you'll need a platform to perform the installation. To set that up, you first need to download and install Oracle VirtualBox, followed by the operating system, the Oracle binary software, and finally, create the database.
Now, let's begin the Oracle RAC node addition steps.
I assume you have already installed Oracle VirtualBox and the Operating system. If not, kindly go through the articles that I have shared above, and then start from here.
In my previous article, I installed the single-instance Oracle on ASM. You can check out this article and complete that setup, and then start from here.
Oracle RAC Single Instance Creation Output

[oracle@rac1 ~]$ srvctl status database -d PRODDB
Instance PRODDB1 is running on node rac1
Step 1) We need to perform the prerequisites for the required nodes before adding a node to the cluster.
a) Install the required packages.
yum install oracle*
or
yum install oracle* --skip broken
b) Install the bind RPM to edit the named.conf file for the forward and reverse lookup zones.
yum install bind*c) Install the CVUQdisk rpm to use the cluster verification utility.
Note: If it is not present in the respective node, you can perform SCP from the nodes where the cluster is already installed, using the path mentioned below.
location: - $ORACLE_HOME/cv/rpm

Installation command : - rpm -ivh (package name)

[root@rac2 tmp]# rpm -qa | grep cvu
cvuqdisk-1.0.10-1.x86_64
d) Put all node entries in /etc/hosts file and set up passwordless connectivity between all the nodes.
e) Attach the shared disk for the 2nd node as well.

f) Configure the oracleasm in node 2
1) oracleasm init
2) oracleasm configure -i
3) oracleasm scandisks
4) oracleasm listdisks
We have completed our prerequisites for the Oracle 19c RAC add node procedure.
Grid Node Addition
When the new node is ready with all the necessary prerequisites to become part of the existing cluster, such as Storage, network, OS, and Patches use the below commands to perform the prechecks before Oracle RAC Node Addition in Oracle 19c.
Cluvfy command : - cluvfy stage -pre nodeadd -n rac1,rac2 -fixup -verboseGrid Node Addtion Command: - $ORACLE_HOME/addnode/addnode.sh -silent "CLUSTER_NEW_NODES={rac2}" "CLUSTER_NEW_VIRTUAL_HOSTNAMES={rac2vip}" "CLUSTER_NEW_NODE_ROLES={HUB}"
log location: - /u01/app/oraInventory/logs
Detailed Logs: - /u01/app/oraInventory/logs/addNodeActions.log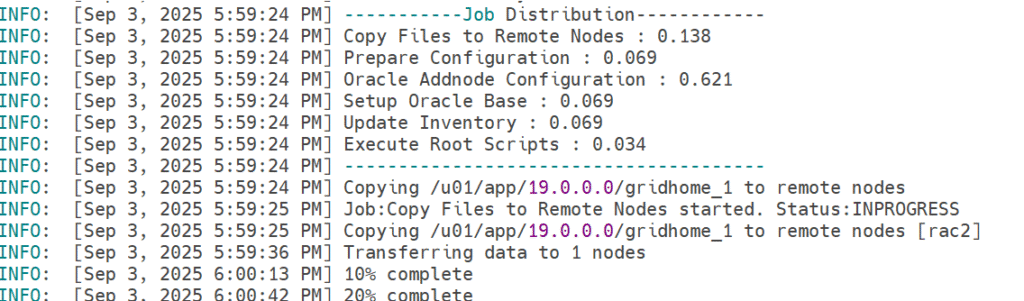
Full Output of Oracle RAC Node Addition.

[oracle@rac1 ~]$ $ORACLE_HOME/addnode/addnode.sh -silent "CLUSTER_NEW_NODES={rac2}" "CLUSTER_NEW_VIRTUAL_HOSTNAMES={rac2vip}" "CLUSTER_NEW_NODE_ROLES={HUB}"

[WARNING] [INS-40111] The specified Oracle Base location is not empty on following nodes: [rac2].
   ACTION: Specify an empty location for Oracle Base.
[WARNING] [INS-13014] Target environment does not meet some optional requirements.
   CAUSE: Some of the optional prerequisites are not met. See logs for details. /u01/app/oraInventory/logs/addNodeActions2025-09-03_05-56-25PM.log
   ACTION: Identify the list of failed prerequisite checks from the log: /u01/app/oraInventory/logs/addNodeActions2025-09-03_05-56-25PM.log. Then either from the log file or from installation manual find the appropriate configuration to meet the prerequisites and fix it manually.

Copy Files to Remote Nodes in progress.
..................................................   6% Done.
..................................................   11% Done.
....................
Copy Files to Remote Nodes successful.

Prepare Configuration in progress.

Prepare Configuration successful.
..................................................   21% Done.
You can find the log of this install session at:
 /u01/app/oraInventory/logs/addNodeActions2025-09-03_05-56-25PM.log

Instantiate files in progress.

Instantiate files successful.
..................................................   49% Done.

Saving cluster inventory in progress.
..................................................   83% Done.

Saving cluster inventory successful.
The Cluster Node Addition of /u01/app/19.0.0.0/gridhome_1 was successful.
Please check '/u01/app/oraInventory/logs/silentInstall2025-09-03_05-56-25PM.log' for more details.

Setup Oracle Base in progress.

Setup Oracle Base successful.
..................................................   90% Done.

Update Inventory in progress.
You can find the log of this install session at:
 /u01/app/oraInventory/logs/addNodeActions2025-09-03_05-56-25PM.log

Update Inventory successful.
..................................................   97% Done.

As a root user, execute the following script(s):
        1. /u01/app/19.0.0.0/gridhome_1/root.sh

Execute /u01/app/19.0.0.0/gridhome_1/root.sh on the following nodes:
[rac2]

The scripts can be executed in parallel on all the nodes.

Successfully Setup Software with warning(s).
..................................................   100% Done.


[root@rac2 admin]# /u01/app/19.0.0.0/gridhome_1/root.sh
Check /u01/app/19.0.0.0/gridhome_1/install/root_rac2.localdomain.com_2025-09-03_18-39-39-712745716.log for the output of root script
[root@rac2 admin]#

[oracle@rac2 install]$ tail -100f /u01/app/19.0.0.0/gridhome_1/install/root_rac2.localdomain.com_2025-09-03_18-39-39-712745716.log
Performing root user operation.

The following environment variables are set as:
    ORACLE_OWNER= oracle
    ORACLE_HOME=  /u01/app/19.0.0.0/gridhome_1
   Copying dbhome to /usr/local/bin ...
   Copying oraenv to /usr/local/bin ...
   Copying coraenv to /usr/local/bin ...

Entries will be added to the /etc/oratab file as needed by
Database Configuration Assistant when a database is created
Finished running generic part of root script.
Now product-specific root actions will be performed.
Relinking oracle with rac_on option
Using configuration parameter file: /u01/app/19.0.0.0/gridhome_1/crs/install/crsconfig_params
The log of current session can be found at:
  /u01/app/oracle/crsdata/rac2/crsconfig/rootcrs_rac2_2025-09-03_06-39-41PM.log
2025/09/03 18:39:52 CLSRSC-594: Executing installation step 1 of 19: 'SetupTFA'.
2025/09/03 18:39:52 CLSRSC-594: Executing installation step 2 of 19: 'ValidateEnv'.
2025/09/03 18:39:52 CLSRSC-363: User ignored prerequisites during installation
2025/09/03 18:39:52 CLSRSC-594: Executing installation step 3 of 19: 'CheckFirstNode'.
2025/09/03 18:39:53 CLSRSC-4002: Successfully installed Oracle Trace File Analyzer (TFA) Collector.
2025/09/03 18:39:54 CLSRSC-594: Executing installation step 4 of 19: 'GenSiteGUIDs'.
2025/09/03 18:39:56 CLSRSC-594: Executing installation step 5 of 19: 'SetupOSD'.
2025/09/03 18:39:56 CLSRSC-594: Executing installation step 6 of 19: 'CheckCRSConfig'.
2025/09/03 18:39:59 CLSRSC-594: Executing installation step 7 of 19: 'SetupLocalGPNP'.
2025/09/03 18:40:03 CLSRSC-594: Executing installation step 8 of 19: 'CreateRootCert'.
2025/09/03 18:40:03 CLSRSC-594: Executing installation step 9 of 19: 'ConfigOLR'.
2025/09/03 18:40:13 CLSRSC-594: Executing installation step 10 of 19: 'ConfigCHMOS'.
2025/09/03 18:40:46 CLSRSC-594: Executing installation step 11 of 19: 'CreateOHASD'.
2025/09/03 18:40:49 CLSRSC-594: Executing installation step 12 of 19: 'ConfigOHASD'.
2025/09/03 18:40:49 CLSRSC-330: Adding Clusterware entries to file 'oracle-ohasd.service'
2025/09/03 18:41:18 CLSRSC-594: Executing installation step 13 of 19: 'InstallAFD'.
2025/09/03 18:41:21 CLSRSC-594: Executing installation step 14 of 19: 'InstallACFS'.
2025/09/03 18:41:24 CLSRSC-594: Executing installation step 15 of 19: 'InstallKA'.
2025/09/03 18:41:26 CLSRSC-594: Executing installation step 16 of 19: 'InitConfig'.
2025/09/03 18:41:39 CLSRSC-594: Executing installation step 17 of 19: 'StartCluster'.
2025/09/03 18:42:54 CLSRSC-343: Successfully started Oracle Clusterware stack
2025/09/03 18:42:55 CLSRSC-594: Executing installation step 18 of 19: 'ConfigNode'.
clscfg: EXISTING configuration version 19 detected.
Successfully accumulated necessary OCR keys.
Creating OCR keys for user 'root', privgrp 'root'..
Operation successful.
2025/09/03 18:43:47 CLSRSC-594: Executing installation step 19 of 19: 'PostConfig'.
2025/09/03 18:44:02 CLSRSC-325: Configure Oracle Grid Infrastructure for a Cluster ... succeeded
Verification after Node Addition

cluvfy stage -post nodeadd -n rac2
crsctl check cluster -all
olsnodes -n -s -t

[oracle@rac2 install]$ crsctl check cluster -all
**************************************************************
rac1:
CRS-4537: Cluster Ready Services is online
CRS-4529: Cluster Synchronization Services is online
CRS-4533: Event Manager is online
**************************************************************
rac2:
CRS-4537: Cluster Ready Services is online
CRS-4529: Cluster Synchronization Services is online
CRS-4533: Event Manager is online
**************************************************************

[oracle@rac2 install]$ olsnodes -n -s -t
rac1    1       Active  Unpinned
rac2    2       Active  Unpinned
RDBMS Node Addition
The next step in Oracle RAC node addition is to add an RDBMS node.
RDBMS Node Addtion Command: - $ORACLE_HOME/addnode/addnode.sh -silent "CLUSTER_NEW_NODES={rac2}"

log location: - /u01/app/oraInventory/logs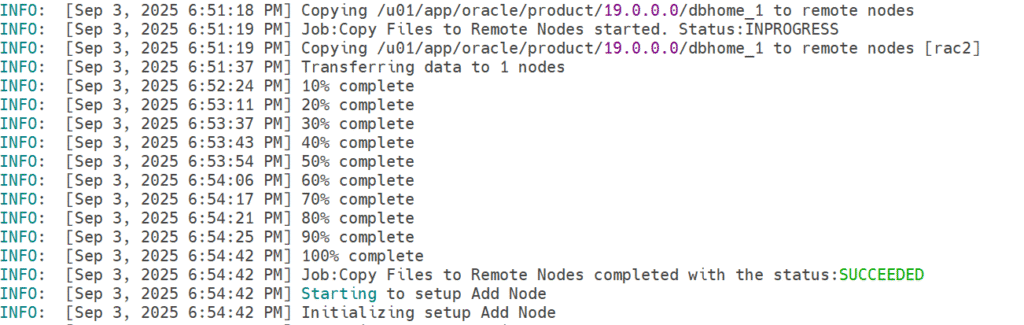
Full output of ORACLE RAC node addition

[oracle@rac1 ~]$ $ORACLE_HOME/addnode/addnode.sh -silent "CLUSTER_NEW_NODES={rac2}"

Prepare Configuration in progress.

Prepare Configuration successful.
..................................................   7% Done.

Copy Files to Remote Nodes in progress.
..................................................   12% Done.
..................................................   18% Done.
..............................
Copy Files to Remote Nodes successful.
You can find the log of this install session at:
 /u01/app/oraInventory/logs/addNodeActions2025-09-03_06-48-47PM.log

Instantiate files in progress.

Instantiate files successful.
..................................................   52% Done.

Saving cluster inventory in progress.
..................................................   89% Done.

Saving cluster inventory successful.
The Cluster Node Addition of /u01/app/oracle/product/19.0.0.0/dbhome_1 was successful.
Please check '/u01/app/oraInventory/logs/silentInstall2025-09-03_06-48-47PM.log' for more details.

Setup Oracle Base in progress.

Setup Oracle Base successful.
..................................................   96% Done.

As a root user, execute the following script(s):
        1. /u01/app/oracle/product/19.0.0.0/dbhome_1/root.sh

Execute /u01/app/oracle/product/19.0.0.0/dbhome_1/root.sh on the following nodes:
[rac2]


Successfully Setup Software.
..................................................   100% Done.
[oracle@rac1 ~]$


[root@rac2 admin]# /u01/app/oracle/product/19.0.0.0/dbhome_1/root.sh
Check /u01/app/oracle/product/19.0.0.0/dbhome_1/install/root_rac2.localdomain.com_2025-09-03_18-56-32-032292840.log for the output of root script
Database Instance Addition
The next step in Oracle 19c RAC add node procedure is Database Instance addition.
alter system set undo_tablespace=UNDOTBS2 sid='PRODDB2';
alter system set instance_number=2 sid='PRODDB2' scope=spfile;
alter system set instance_name='PRODDB2' sid='PRODDB2' scope=spfile;
alter system set thread=2 sid='PRODDB2' scope=spfile;
alter database add logfile thread 2 group 4 ('+DATA') size 200m;
alter database add logfile thread 2 group 5 ('+FRA') size 200m;
alter database enable public thread 2;
Database Instance Addition to OCR
The next step in the Oracle 19c RAC add node procedure is to add the Database Instance to OCR.
srvctl config database -d PRODDB
srvctl add instance -d PRODDB -instance PRODDB2 -node rac2
srvctl start instance -i PRODDB2 -d PRODDB
srvctl status database -d PRODDB -v
srvctl start database -d PRODDB
Output
[oracle@rac1 ~]$ srvctl config database -d PRODDB
Database unique name: PRODDB
Database name: PRODDB
Oracle home: /u01/app/oracle/product/19.0.0.0/dbhome_1
Oracle user: oracle
Spfile: +DATA/PRODDB/PARAMETERFILE/spfile.257.1210787295
Password file: +DATA/PRODDB/PASSWORD/pwdproddb.256.1210786721
Domain:
Start options: open
Stop options: immediate
Database role: PRIMARY
Management policy: AUTOMATIC
Server pools:
Disk Groups: FRA,DATA
Mount point paths:
Services:
Type: RAC
Start concurrency:
Stop concurrency:
OSDBA group: oinstall
OSOPER group: oinstall
Database instances: PRODDB1,PRODDB2
Configured nodes: rac1,rac2
CSS critical: no
CPU count: 0
Memory target: 0
Maximum memory: 0
Default network number for database services:
Database is administrator managed
Final Output in Oracle RAC node addition
[oracle@rac1 ~]$ crsctl stat res -t
--------------------------------------------------------------------------------
Name           Target  State        Server                   State details
--------------------------------------------------------------------------------
Local Resources
--------------------------------------------------------------------------------
ora.LISTENER.lsnr
               ONLINE  ONLINE       rac1                     STABLE
               ONLINE  ONLINE       rac2                     STABLE
ora.chad
               ONLINE  ONLINE       rac1                     STABLE
               ONLINE  ONLINE       rac2                     STABLE
ora.net1.network
               ONLINE  ONLINE       rac1                     STABLE
               ONLINE  ONLINE       rac2                     STABLE
ora.ons
               ONLINE  ONLINE       rac1                     STABLE
               ONLINE  ONLINE       rac2                     STABLE
--------------------------------------------------------------------------------
Cluster Resources
--------------------------------------------------------------------------------
ora.ASMNET1LSNR_ASM.lsnr(ora.asmgroup)
      1        ONLINE  ONLINE       rac1                     STABLE
      2        ONLINE  ONLINE       rac2                     STABLE
      3        ONLINE  OFFLINE                               STABLE
ora.DATA.dg(ora.asmgroup)
      1        ONLINE  ONLINE       rac1                     STABLE
      2        ONLINE  ONLINE       rac2                     STABLE
      3        OFFLINE OFFLINE                               STABLE
ora.FRA.dg(ora.asmgroup)
      1        ONLINE  ONLINE       rac1                     STABLE
      2        ONLINE  ONLINE       rac2                     STABLE
      3        OFFLINE OFFLINE                               STABLE
ora.LISTENER_SCAN1.lsnr
      1        ONLINE  ONLINE       rac2                     STABLE
ora.LISTENER_SCAN2.lsnr
      1        ONLINE  ONLINE       rac1                     STABLE
ora.LISTENER_SCAN3.lsnr
      1        ONLINE  ONLINE       rac1                     STABLE
ora.OCR.dg(ora.asmgroup)
      1        ONLINE  ONLINE       rac1                     STABLE
      2        ONLINE  ONLINE       rac2                     STABLE
      3        OFFLINE OFFLINE                               STABLE
ora.asm(ora.asmgroup)
      1        ONLINE  ONLINE       rac1                     Started,STABLE
      2        ONLINE  ONLINE       rac2                     Started,STABLE
      3        OFFLINE OFFLINE                               STABLE
ora.asmnet1.asmnetwork(ora.asmgroup)
      1        ONLINE  ONLINE       rac1                     STABLE
      2        ONLINE  ONLINE       rac2                     STABLE
      3        OFFLINE OFFLINE                               STABLE
ora.cvu
      1        ONLINE  ONLINE       rac1                     STABLE
ora.proddb.db
      1        ONLINE  ONLINE       rac1                     Open,HOME=/u01/app/o
                                                             racle/product/19.0.0
                                                             .0/dbhome_1,STABLE
      2        ONLINE  ONLINE       rac2                     Open,HOME=/u01/app/o
                                                             racle/product/19.0.0
                                                             .0/dbhome_1,STABLE
ora.qosmserver
      1        ONLINE  ONLINE       rac1                     STABLE
ora.rac1.vip
      1        ONLINE  ONLINE       rac1                     STABLE
ora.rac2.vip
      1        ONLINE  ONLINE       rac2                     STABLE
ora.scan1.vip
      1        ONLINE  ONLINE       rac2                     STABLE
ora.scan2.vip
      1        ONLINE  ONLINE       rac1                     STABLE
ora.scan3.vip
      1        ONLINE  ONLINE       rac1                     STABLE
--------------------------------------------------------------------------------
Conclusion
Finally, we have completed the step-by-step guide on how to add a new node in Oracle RAC 19c.
If you enjoyed the article, please leave a comment and share it with your friends. Also, let me know which Oracle and MySQL topics you'd like to see covered in future articles.