Table of Contents
Introduction
In this article, we will cover the steps to Start MySQL Service in Linux using systemctl.
In our earlier blog, we have covered the MySQL Server Installation Using a Generic Binary. You must first understand the concepts and then proceed with this service method.
Start MySQL Service in Linux using systemctl
I assume you have already completed the setup, including creating the virtual machine, downloading the Software, Creating User Accounts, Creating Directories, untarring the software, and setting PATH variables. If not, then please check out my previous article for the same.
Note: – I am creating the new comman BASE DIR directory, so that it can be used for Multiple MySQL servers during installation on the same machine. I will show you again the directory structure.
You can create directories as per your requirement.
Step 1) Directories Structure
a) Base directory : – /local/mysql/8.0.36/mysqlhome

b) Data directory : – /local/mysql/MYS00999/data

c) Log directory : – /local/mysql/MYS00999/admin/log

d) Socket directory: – /local/mysql/MYS00999/admin/subsys
Step 2) Server Creation
Command to create the mysql server

/local/mysql/8.0.36/mysqlhome/bin/mysqld --no-defaults --initialize-insecure --user=mysql --basedir /local/mysql/8.0.36/mysqlhome --datadir /local/mysql/MYS00999/data &
Step 3) Configuration File Creation
Now, this step is very important whenever we are planning to start the MySQL server service using systemctl.
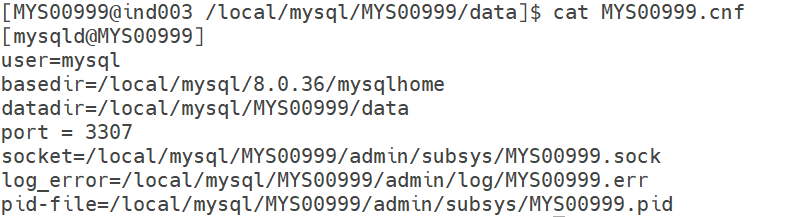
[MYS00999@ind003 /local/mysql/MYS00999/data]$ cat MYS00999.cnf
[mysqld@MYS00999]
user=mysql
basedir=/local/mysql/8.0.36/mysqlhome
datadir=/local/mysql/MYS00999/data
port = 3307
socket=/local/mysql/MYS00999/admin/subsys/MYS00999.sock
log_error=/local/mysql/MYS00999/admin/log/MYS00999.err
pid-file=/local/mysql/MYS00999/admin/subsys/MYS00999.pid
Note : - We are using mysqld@MYS00999 where the name which is used after @ is our service name.Output
Step 4) mysql@.service file creation (as root user)
There are 2 paths where this mysql@.service files can be created which are as follows.
1. /usr/lib/systemd/system
2. /etc/systemd/system
We are creating a service file under /usr/lib/systemd/system path.
This file is used to run multiple MySQL instances on the same server using systemd.
[root@ind003 ~]# cat /usr/lib/systemd/system/mysql@.service

[Unit]
Description=MySQL Multi Server for instance %i
After=network.target
After=syslog.target

[Install]
WantedBy=multi-user.target

[Service]
User=mysql
Group=mysql
PIDFile=/local/mysql/%i/admin/subsys/%i.pid
Type=simple

# Disable service start and stop timeout logic of systemd for mysqld service.
TimeoutSec=0

# Start main service - software path can changed as per your setup
ExecStart=/local/mysql/8.0.36/mysqlhome/bin/mysqld --defaults-file=/local/mysql/%i/data/%i.cnf --defaults-group-suffix=@%i $MYSQLD_OPTS

# Use this to switch malloc implementation
EnvironmentFile=-/etc/sysconfig/mysql

# Sets open_files_limit
LimitNOFILE=10000
Restart=on-failure
RestartPreventExitStatus=1

# Set environment variable MYSQLD_PARENT_PID. This is required for restart.
Environment=MYSQLD_PARENT_PID=1
PrivateTmp=false
Let's explain each group in detail.
1. [Unit]: – This group tells systemd what this service is and when it should start.
[Unit]
Description=MySQL Multi Server for instance %i ==> here %i stands for Instance name or service name
After=network.target ==> Start this service only after the network is ready
After=syslog.target ==> Ensure logging system is ready before MySQL starts
2. [Install]: – This group tells Start MySQL automatically during system boot in normal multi-user mode, where there is no requirement of GUI tool.
[Install]
WantedBy=multi-user.target
3. [Service]: – This is the main engine of the service.
User=mysql  ==> It means run MySQL using mysql user (not root)

Group=mysql ==> It means run the MySQL service under the mysql group

PIDFile=/local/mysql/%i/admin/subsys/%i.pid  ==> It stores process ID of MySQL

Type=simple  ==> It means run MySQL directly in foreground mode

TimeoutSec=0 ==> It means disable timeout for start/stop

ExecStart=/local/mysql/8.0.36/mysqlhome/bin/mysqld --defaults-file=/local/mysql/%i/data/%i.cnf --defaults-group-suffix=@%i $MYSQLD_OPTS ==> This is the actual command to start MySQL

EnvironmentFile=-/etc/sysconfig/mysql ==> It Loads extra environment variables

LimitNOFILE=10000 ==> It means Max number of files MySQL can open

Restart=on-failure ==> It means Restart MySQL only if it crashes

RestartPreventExitStatus=1 ==> It means Do NOT restart if exit code = 1

Environment=MYSQLD_PARENT_PID=1 ==> It sets parent PID

PrivateTmp=false ==> It means MySQL will NOT use private /tmp
Step 5) Reload daemon
systemctl daemon-reload

systemctl daemon-reexec
Step 6) Start the MySQL server service
systemctl status mysql@MYS00999Output

sudo systemctl start mysql@MYS00999Output


Conclusion
By following this approach, we can start the MySQL Service in Linux using systemd.
If you enjoyed the article, please leave a comment and share it with your friends. Also, let me know which Oracle and MySQL topics you'd like to see covered in future articles.
Note: – If you want to practice this whole activity in your home lab, then you'll need a platform to perform the installation. To set that up, you first need to download and install Oracle VirtualBox, followed by the operating system, the MySQL binary software, and finally, MySQL server creation.
Related Articles
1. Mysql Installation using Repository method (RPM-based)
2. Mysql Installation without using the repository method (RPM-based)