Table of Contents
Introduction
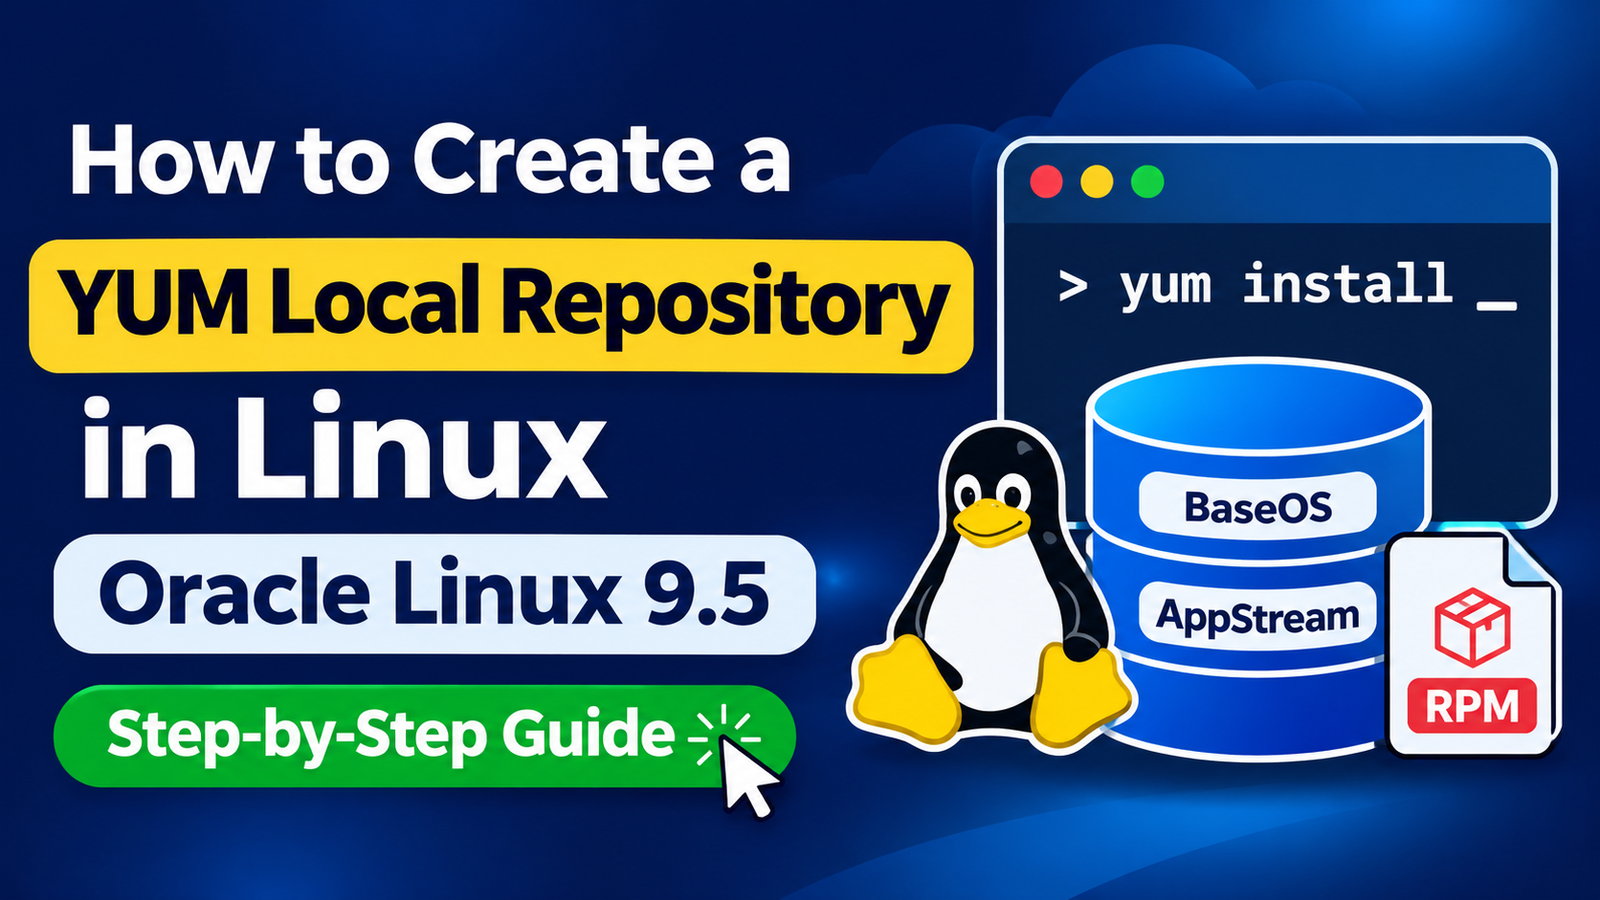
How to Create a YUM Local Repository in Linux is an important topic for Linux system administrators who regularly install, update, upgrade, and manage software packages.
In enterprise environments, Linux servers may not always have direct internet access due to security policies, firewall restrictions, or network isolation. In such situations, installing packages from online repositories becomes difficult.
To overcome this challenge, Linux administrators can configure a YUM Local Repository.
A local YUM repository allows administrators to install and manage RPM packages from locally available installation media, ISO images, or custom repository directories without depending on external repositories.
In this hands-on tutorial, we will learn how to create a YUM local repository in Linux using an Oracle Linux ISO image.
We will also cover:
1. Understanding YUM and DNF repositories.
2. Mounting an Oracle Linux ISO image.
3. Configuring BaseOS and AppStream repositories.
4. Refreshing repository metadata.
5. Disabling online repositories.
6. Creating a custom local repository.
7. Adding additional RPM packages.
8. Generating repository metadata using createrepo_c.
9. Installing packages using the local repository.
Now let's start a step-by-step guide on how to create a YUM local repository in Linux on OEL 9.5.
Step 1) Understanding YUM and DNF
Before configuring a local repository, let's understand what YUM and DNF are.
YUM (Yellowdog Updater Modified) is a package management utility used in RPM-based Linux distributions to install, update, and remove software packages.
DNF (Dandified YUM) is the next-generation package manager and is used by modern Linux distributions, including Oracle Linux 9.
The yum command is also available in Oracle Linux 9 and provides compatibility with the DNF package manager.
What is a YUM repository?
A YUM repository is a location that stores RPM packages along with metadata files.
The package manager uses this metadata to identify available packages, package versions, and dependencies during installation.
Repositories can be configured from different sources:
1. Online repositories.
2. Local directories.
3. Mounted ISO images.
4. Internal repository servers.
What are BaseOS and AppStream?
Oracle Linux installation media contains two important repository components.
BaseOS Repository
- Contains core operating system packages.
- Includes essential system utilities and libraries.
- Provides packages required for the basic operating system.
AppStream Repository
- Contains additional application packages.
- Provides application streams and software components.
- Includes packages required by various applications and services.
Both repositories are important for installing packages and resolving dependencies.
Step 2) Lab Environment
For this practical, we are using Oracle Linux 7.9 installed on Oracle VirtualBox.
| Component | Details |
| Operating System | Oracle Linux 9.5 |
| Architecture | x86_64 |
| Virtualization | Oracle VirtualBox |
| Package Manager | YUM / DNF |
| Repository Type | Local Repository |
| Repository Source | Oracle Linux ISO |
| Repository Components | BaseOS and AppStream |
Note: Although this demonstration uses Oracle Linux 9.5, the general concept of configuring a local RPM repository applies to other compatible RPM-based Linux distributions. Repository paths and package manager configurations may vary by distribution and version.
Step 3) Check the Filesystem and Available Mount Points
Before configuring the local repository, check the available filesystems and mount points.
Execute:
df -h Output:
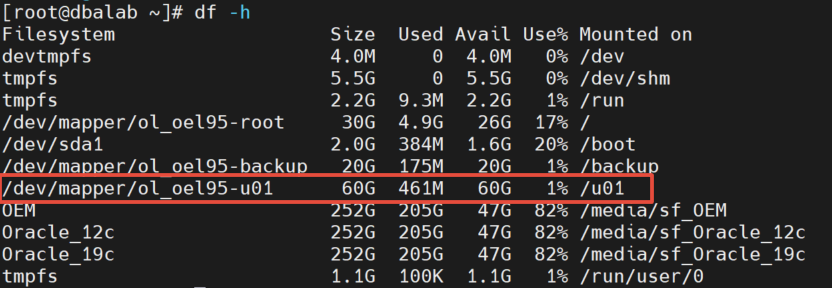
The df -h command displays filesystem size, used space, available space, and mount points.
Use this information to identify available storage before copying ISO contents or creating a custom repository.
Step 4) Mount the Oracle Linux ISO Image
To create a local repository, we first need the Oracle Linux installation ISO.
Attach the Oracle Linux 9.5 ISO to the virtual machine through Oracle VirtualBox storage settings.

Once the ISO is attached, check the available mount points:
df -hYou can also check mounted filesystems using:
findmnt -t iso9660Output:
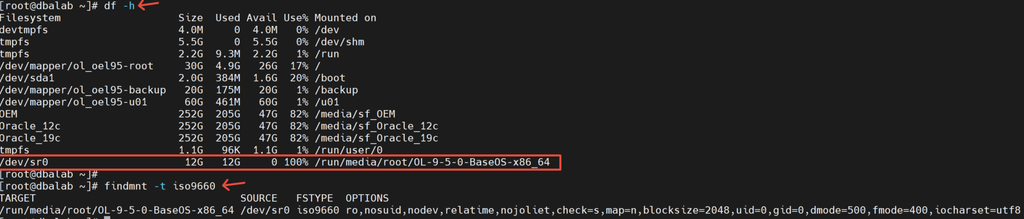
Navigate to the mount directory:
cd /run/media/root/OL-9-5-0-BaseOS-x86_64Check the contents:
ls -lrtExpected Focus Directories:
BaseOS
AppStream
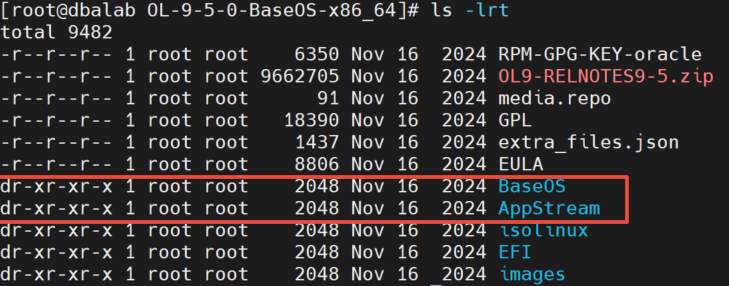
These directories contain the Oracle Linux installation packages.
Important: Make sure you are using the Oracle Linux installation ISO, not the VirtualBox Guest Additions ISO. They are different ISO images.
Step 5) Configure the Local YUM Repository
Once the Oracle Linux ISO is mounted, we can configure YUM to access the packages directly from the ISO.
YUM/DNF repository configuration files are maintained under:
/etc/yum.repos.dCreate a new repository configuration file:
vi /etc/yum.repos.d/local.repoAdd the following configuration:
[BaseOS]
name=Oracle Linux 9.5 BaseOS
baseurl=file:///run/media/root/OL-9-5-0-BaseOS-x86_64/BaseOS
enabled=1
gpgcheck=0

[AppStream]
name=Oracle Linux 9.5 AppStream
baseurl=file:///run/media/root/OL-9-5-0-BaseOS-x86_64/AppStream
enabled=1
gpgcheck=0
Save and exit the file.
Explanation of repository parameters
| Parameter | Description |
| [BaseOS] | Unique repository ID |
| name | Repository description |
| baseurl | Location of the repository |
| file:// | Specifies a local filesystem repository |
| enabled=1 | Enables the repository |
| gpgcheck=0 | Disables RPM signature verification |
Note: Replace the example ISO path with the actual mount path in your environment.
For production environments, configure GPG verification and trusted repository signing keys instead of disabling package signature verification.
Step 6) Refresh the Repository Metadata
After creating the repository configuration file, refresh the package manager cache.
First, clean the existing cache:
yum clean all
Next, create the repository metadata cache:
yum makecache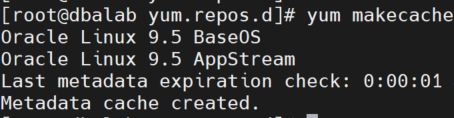
This indicates the package manager could access the configured repositories and create the metadata cache.
Step 7) Verify the Local Repository
Now verify whether the local repositories are configured successfully.
Execute:
yum repolistOutput:
[root@dbalab yum.repos.d]# yum repolist
repo id                                                                                                  repo name
AppStream                                                                                         Oracle Linux 9.5 AppStream
BaseOS                                                                                                Oracle Linux 9.5 BaseOS
To display all configured repositories, including disabled repositories, execute:
yum repolist allOutput:
[root@dbalab yum.repos.d]# yum repolist all
repo id                       repo name                                             status
AppStream              Oracle Linux 9.5 AppStream             enabled
BaseOS                     Oracle Linux 9.5 BaseOS                    enabled
This command helps us identify the enabled and disabled repositories.
At this stage, the local BaseOS and AppStream repositories are configured.
Step 8) Disable the Online Oracle Linux Repositories
By default, Oracle Linux may have online repositories configured.
For example:
- ol9_baseos_latest
- ol9_appstream
- ol9_UEKR7
To use only the local ISO repository, disable the corresponding online repositories.
Open the Oracle Linux repository configuration file:
vi /etc/yum.repos.d/oracle-linux-ol9.repoOpen the UEK repository configuration file:
vi /etc/yum.repos.d/uek-ol9.repoLocate the following repository sections:
[ol9_baseos_latest]
enabled=1

[ol9_appstream]
enabled=1

[ol9_UEKR7]
enabled=1
Change the enabled parameter to 0:
[ol9_baseos_latest]
enabled=0

[ol9_appstream]
enabled=0

[ol9_UEKR7]
enabled=0
Save the configuration files.
Now clean the repository cache:
yum clean allRefresh the metadata:
yum makecacheVerify the enabled repositories:
yum repolistNow only the enabled local BaseOS and AppStream repositories will be listed.
Important: Disabling online repositories is optional. Do this only when you specifically want to use the local repository. Make sure all required dependencies are available locally before attempting package installation.
Create a Custom Local Repository for Additional RPM Packages
Sometimes, the RPM package we need may not be available in the Oracle Linux installation ISO.
For example, while preparing an Oracle Database installation environment, we may need the following package:
oracle-database-preinstall-19c
In this situation, we can create a custom local repository and add the required RPM package.
For this practical, we will create a writable repository directory under /repo.
Step 1) Create the local repository directory
Execute:
mkdir -p /repo/OL9/AppStreamThis creates the directory structure for our custom repository.
Step 2) Copy the AppStream repository contents
The mounted ISO is generally read-only.
Therefore, we will copy the AppStream contents into our writable repository directory.
Execute:
cp -av /run/media/root/OL-9-5-0-BaseOS-x86_64/AppStream/. /repo/OL9/AppStream/This copies the existing AppStream packages and repository metadata into the new directory.
Step 3) Copy the additional RPM package
You can download the package oracle-database-preinstall-19c from this online repository link.
Assume that the Oracle Database preinstallation RPM has already been downloaded into /root.
Copy the RPM into the custom repository:
cp /root/oracle-database-preinstall-19c*.rpm /repo/OL9/AppStream/Output:

Now the additional RPM package is available in the custom repository directory.
Step 4) Install createrepo_c
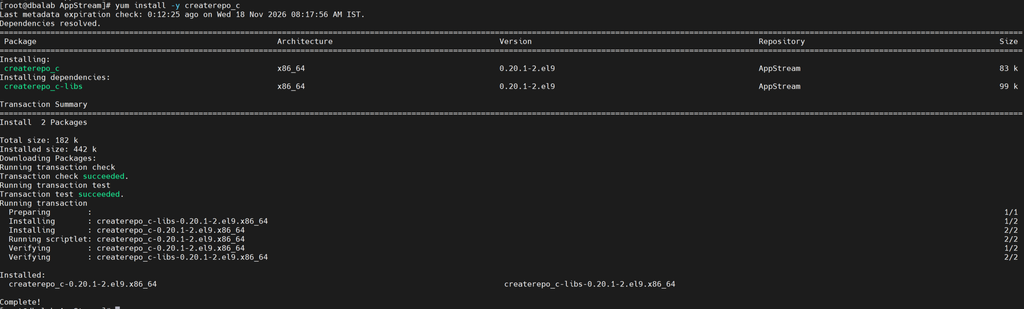
The createrepo_c utility is used to generate repository metadata for RPM packages.
Install it using:
yum install -y createrepo_cMake sure the enabled repositories provide the required package and its dependencies.
Step 5) Generate repository metadata
After copying the additional RPM package, we need to update the repository metadata.
Execute:
createrepo_c --update /repo/OL9/AppStream/This command generates or updates the repository metadata.
The metadata allows YUM/DNF to identify the additional RPM package when searching the repository.

Step 6) Configure the custom repository
Create a new repository configuration file:
vi /etc/yum.repos.d/local.repoAdd the following configuration:
[local-appstream]
name=Oracle Linux 9.5 Local AppStream
baseurl=file:///repo/OL9/AppStream
enabled=1
gpgcheck=0
Save and exit the file.
Step 7) Refresh the repository cache
Execute the following commands:
yum clean all
yum makecache
Now verify the configured repositories:
yum repolist[root@dbalab yum.repos.d]# yum repolist
repo id repo name
AppStream Oracle Linux 9.5 AppStream
BaseOS Oracle Linux 9.5 BaseOS
local-appstream Oracle Linux 9.5 Local AppStreamThe custom repository should appear in the repository list.
Step 8) Install the Oracle preinstallation RPM
Now we can install the additional package using YUM:
yum install -y oracle-database-preinstall-19cYUM will search the enabled repositories for the requested package and attempt to resolve its dependencies.
Important: The Oracle Database preinstallation RPM may require additional dependencies. Keep the original BaseOS and AppStream repositories enabled and available so that YUM/DNF can resolve the dependencies.
Also ensure that the preinstallation RPM is compatible with your operating system version.
Difference Between a Local Repository and a Custom Repository
| Local ISO Repository | Custom Local Repository |
| Uses packages available on installation media | Uses packages copied into a writable directory |
| Can be configured directly from a mounted ISO | Requires a local directory |
| Contains the original installation repository metadata | Metadata can be generated or updated using createrepo_c |
| Useful for offline OS package installation | Useful for adding additional RPM packages |
| Generally read-only when using ISO media | Writable and can be maintained by administrators |
Important YUM Commands
Here are some useful commands that Linux administrators regularly use while managing repositories.
| Command | Purpose |
| df -h | Check filesystem usage |
| mount | Display mounted filesystems |
| findmnt -t iso9660 | Identify mounted ISO images |
| ls -lrt | List directory contents |
| yum clean all | Clean package manager cache |
| yum makecache | Create repository metadata cache |
| yum repolist | Display enabled repositories |
| yum repolist all | Display all repositories |
| yum install -y package_name | Install a package |
| yum list available | List available packages |
| rpm -qa | List installed RPM packages |
| createrepo_c /path/to/repository | Generate repository metadata |
| createrepo_c –update /path/to/repository | Update repository |
Conclusion
In this hands-on tutorial, we learned how to create a YUM local repository in Linux using an Oracle Linux ISO image.
We configured BaseOS and AppStream repositories, refreshed the repository metadata, disabled online repositories, and created a custom local repository for additional RPM packages.
We also learned how to use the createrepo_c utility to generate repository metadata and install additional packages using the local repository.
Configuring a local YUM repository is particularly useful in enterprise environments where Linux servers operate without direct internet access or where administrators need controlled package installation.
A properly configured local repository simplifies Linux package management, improves software installation consistency, and reduces dependency on external repositories.
Related Articles
Oracle Linux 9.5 Installation on VirtualBox 7
How to Install Oracle 19c Binaries on Linux
Oracle Database 19c Installation Guide
👍 Enjoyed This Practical?
If you found this practical useful, please consider sharing it with your friends and colleagues.
🔗 Follow me on LinkedIn | 📢 Join my Telegram Community
💼 Need Database Consulting or Have a Project?
Looking for help with Oracle Database, MySQL, OCI, database migration, performance tuning, backup and recovery, or automation? Let's connect to discuss your requirements and explore how I can help.
👉 Explore Database Consulting Services | Discuss Your Project
💬 What would you like me to cover next? Share your suggestions in the comments.
Thank you for reading and supporting the blog! 🙏