Table of Contents
Introduction
A Virtual Cloud Network (VCN) is one of the first networking components you normally create when working with Oracle Cloud Infrastructure (OCI).
In this article, we will create an OCI VCN using the OCI Console.
A VCN provides a private network in an OCI region where you can later create resources such as Compute instances, Load Balancers, databases, and other OCI services.
This article focuses only on VCN creation. We will create the public and private subnets in a separate article so that we can understand subnet configuration properly.
The lab will use a simple network design:
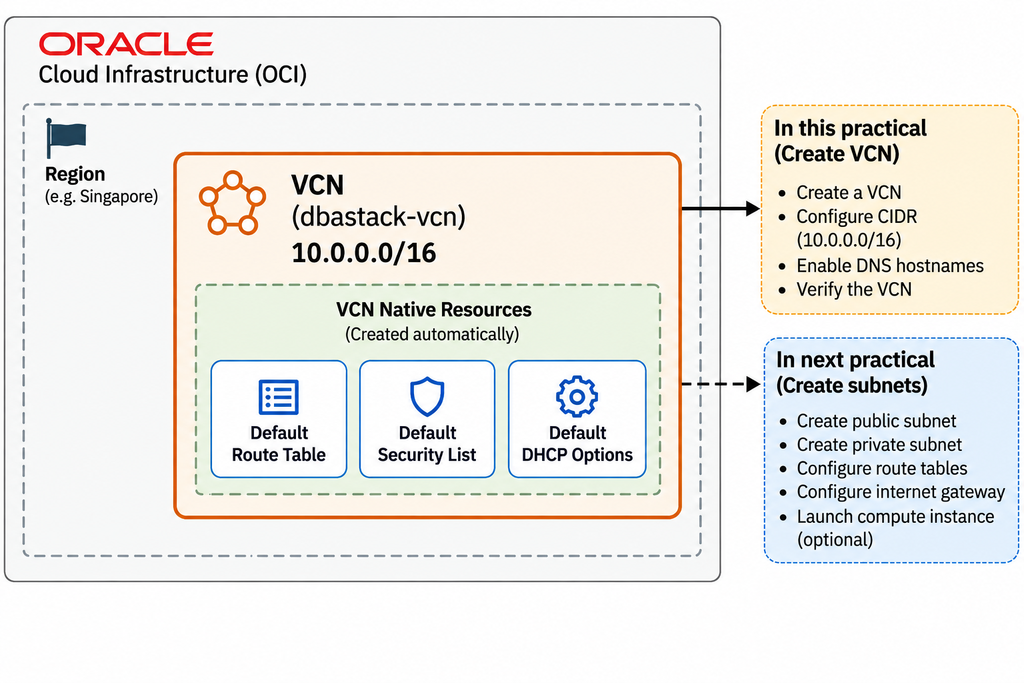
According to Oracle's current documentation, creating a VCN does not automatically enable communication with the internet or an on-premises network. You configure subnets, gateways, routing rules, and security settings separately. Check out this Oracle Official document on VCN Creation for more details.
What is an OCI VCN?
VCN stands for Virtual Cloud Network. It is a software-defined private network that you create inside an OCI region.
You can think of a VCN as the main network boundary for your OCI resources.
For example:
VCN: 10.0.0.0/16
|
+— Public Subnet
|
+— Private Subnet
Later, compute instances, databases, load balancers, and other resources can be placed inside these subnets.
Note: A VCN can contain one or more IPv4 CIDR blocks. OCI currently allows VCN IPv4 CIDR blocks from /16 through /30, subject to the applicable OCI networking rules. Oracle recommends using private address ranges for VCNs.
Prerequisites
Before you create an OCI VCN using the OCI Console, make sure you have:
1. An active OCI tenancy.
2. Access to the OCI Console.
3. Permission to create networking resources.
4. A compartment where the VCN will be created.
5. A planned CIDR range.
For this lab, I will use:
| Parameter | Value |
| Region | Singapore |
| Compartment | Network |
| VCN Name | dbastack-vcn |
| VCN CIDR | 10.0.0.0/16 |
| DNS Hostnames | Enabled |
| DNS Label | dbastackvcn |
Note: Use your own OCI region and compartment if they are different.
How to Calculate CIDR for an OCI VCN
CIDR can initially look confusing, especially if you are new to networking.
CIDR stands for: Classless Inter-Domain Routing.
A CIDR is written like:
10.0.0.0/16Here:
10.0.0.0 = Network address
/16         = Prefix length
The /16 tells us how many bits are used for the network portion.
IPv4 has 32 bits.
Therefore:
32 - 16 = 16So /16 leaves 16 bits for host addresses.
The total number of addresses is:
2^16 = 65,536Therefore:
10.0.0.0/16contains 65,536 IP addresses.
You can try out this link for calculating the CIDR notation.
However, you should not simply assume all of those addresses are available for resources. OCI reserves three IP addresses in each subnet.
Example: /24
Suppose we create:
10.0.1.0/24Calculation:
32 - 24 = 8 host bits

2^8 = 256 addresses
So:
10.0.1.0/24contains 256 total IP addresses.
OCI reserves three addresses in each subnet, so the number available for resources is lower.
1. First IP — 10.0.1.0: Network Address
This IP represents the subnet itself. It is used to identify the network and cannot be assigned to a server or other resource.
2. Second IP — 10.0.1.1: Default Gateway
This IP acts as the entry and exit point for the subnet. When a server needs to communicate outside its own subnet, the traffic is sent through the default gateway.
3. Last IP — 10.0.1.255: Broadcast Address
This IP is used to send traffic to all devices within the subnet at the same time. It is reserved and cannot be assigned to an individual server.
Now let's learn how to create an OCI VCN using the OCI Console step-by-step.
Step 1) Open OCI Networking
Log in to the OCI Console. Select the appropriate Region.
From the navigation menu:
Navigation Menu ==> Networking ==> Virtual Cloud Networks 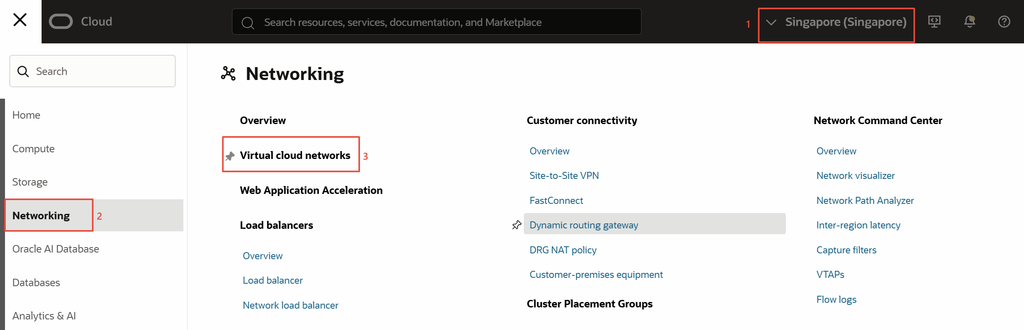
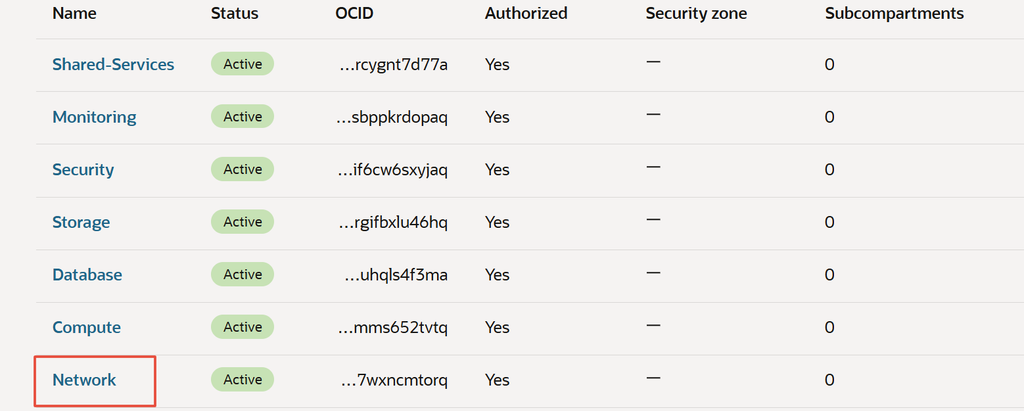
Step 2) Select the Compartment
Before creating the VCN, select the compartment where you want the VCN to reside.
For this lab, I am using:
Compartment: NetworkThe compartment is important because OCI resources are organized and controlled through compartments.
If you are following a similar compartment structure, keeping networking resources in a dedicated Network compartment can make the environment easier to manage.
Step 3) Create a VCN
On the Virtual Cloud Networks page, click Create VCN.
OCI will open the VCN creation form.
Why are we using the manual method instead of the VCN Wizard?
The VCN Wizard can create a complete basic network setup automatically. However, in this practical, we want to understand each networking component and create them step by step.
Therefore, we will use the manual VCN creation method.

Step 4) Configure VCN CIDR and DNS
Now configure the VCN.
VCN Name
Enter:
dbastack-vcnIPv4 CIDR Block
Enter:
10.0.0.0/16The important point here is that this is the overall network range.
Later, our subnets will use smaller ranges from this block.
For example:
VCN
10.0.0.0/16
|
|──> 10.0.1.0/24
|──> 10.0.2.0/24
|──> 10.0.3.0/24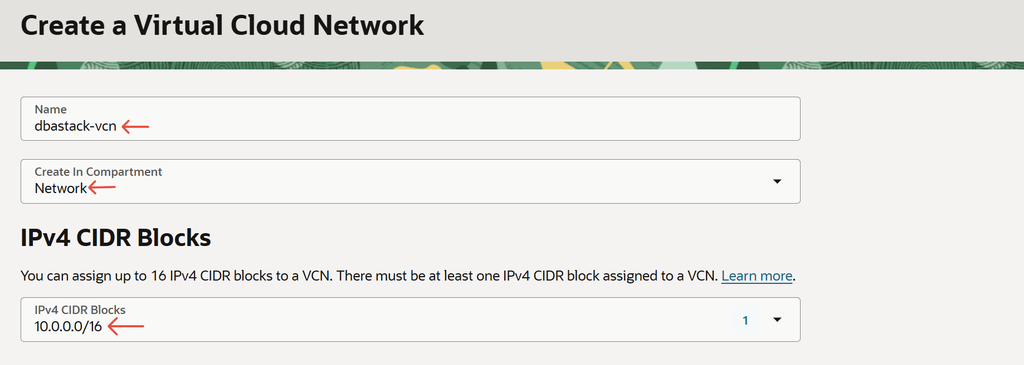
Important CIDR rule
Don't select a VCN CIDR that overlaps with your existing on-premises network if you plan to connect OCI to your data center later.
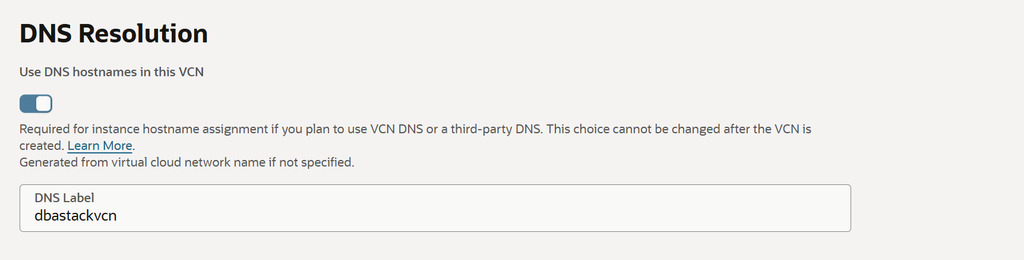
In the same section of the VCN creation, you will get the option called Use DNS Hostnames in this VCN.
You can specify a DNS label or allow the OCI Console to generate one.
For example:
DNS Label: dbastackvcnOCI will use this to create a VCN domain name similar to:
dbastackvcn.oraclevcn.comWhy enable DNS?
From a DBA perspective, DNS becomes useful when you start working with:
- application servers
- database servers
- private endpoints
- internal services
- hostname-based connectivity
Instead of always working with IP addresses, you can use hostnames where appropriate.
Step 5) Review and Create
Before clicking Create VCN, review the configuration.
If everything looks correct, click:
Create VCN
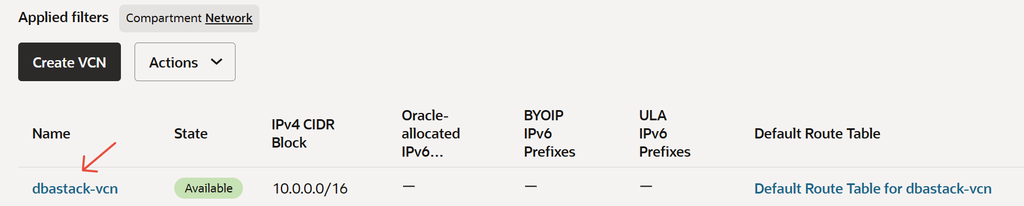
OCI will create the VCN.
You should then be taken to the VCN details page.
What Gets Created with the VCN?
One thing that can confuse you is that OCI creates or associates some default networking resources with the VCN.
For example, the VCN has default resources such as:
- Default Route Table
- Default Security List
- Default DHCP Options
             VCN
              |
    +---------+---------+
    |         |         |
 Route     Security    DHCP
 Table      List       Options
These resources are important, but they don't mean that the VCN is automatically configured for every networking requirement.
For example, if you want a Compute instance in a public subnet to access the internet, you still need appropriate subnet, routing, gateway, and security configuration.
We will configure those components in separate articles.
Common OCI VCN Creation Mistakes
1. Choosing an overlapping CIDR
For example:
On-Premises:
10.0.0.0/16

OCI:
10.0.0.0/16
This can become a problem when you later configure connectivity between the environments.
Recommendation: Plan your OCI CIDR before creating the VCN.
2. Choosing a very small CIDR
For example:
10.0.0.0/28This provides only 16 total IP addresses.
It may be fine for a very small requirement, but it doesn't provide much room for future expansion.
For a lab or general-purpose VCN, a larger range such as below will provide much more flexibility.
10.0.0.0/163. Using the same subnet CIDR
If you try to create the subnets like below, then you will face an overlap issue.
Public subnet:
10.0.1.0/24

Private subnet:
10.0.1.0/24
This is incorrect because the ranges overlap.
Instead:
Public:
10.0.1.0/24

Private:
10.0.2.0/24
Subnet CIDRs need to be valid ranges within the parent VCN and must not overlap.
4. Assuming VCN creation provides internet access
Creating the VCN doesn't automatically mean your Compute instance will have internet connectivity.
You need to configure the following:
Subnet
   ↓
Route Table
   ↓
Gateway
   ↓
Security Rules
5. Creating a VCN without future planning
A VCN might initially contain only a few resources:
VCN
 └── One subnet
But later you may need:
VCN
├── Public subnet
├── Private application subnet
├── Database subnet
├── Load Balancer subnet
└── Management subnet
Therefore, don't select a CIDR without considering future expansion.
Oracle's networking best-practice guidance similarly recommends planning VCN address ranges for future expansion and avoiding overlap with on-premises or other networks.
What's Next?
At this point, we create an OCI VCN using the OCI Console.
OCI Region
     |
     +--------------------------+
     |       dbastack-vcn       |
     |       10.0.0.0/16              |
     |       VCN Created        |
     +--------------------------+
However, the VCN by itself is only the beginning.
The next step is to create subnets inside the VCN.
For our lab, we will create:
dbastack-vcn
10.0.0.0/16
      |
      +---- Public Subnet
      |     10.0.1.0/24
      |
      +---- Private Subnet
            10.0.2.0/24
Continue the OCI Networking Series
Next article:
How to Create Public and Private Subnets in OCI Using OCI Console
Conclusion
In this article, we created an OCI VCN using the OCI Console.
We also covered the important concepts that should be understood before creating a VCN:
- What an OCI VCN is
- Basic VCN architecture
- CIDR and IP address planning
- How to calculate CIDR ranges
- How to select a VCN CIDR
- How to enable DNS hostnames
- How to create the VCN using the OCI Console
- How to verify the VCN
- Common VCN creation mistakes
- Basic VCN best practices
The important point is that VCN creation is only the first step of OCI networking.
In the next practical, we will create the public and private subnets inside this VCN and understand how subnet CIDRs, route tables, and subnet access work.
👍 Enjoyed This Practical?
If you found this practical useful, please consider sharing it with your friends and colleagues.
🔗 Follow me on LinkedIn | 📢 Join my Telegram Community
💬 What would you like me to cover next? Share your suggestions in the comments.
Thank you for reading and supporting the blog! 🙏