Table of Contents
Introduction
Oracle Linux 9.5 Installation is the first step in building a stable environment for Oracle Database, Oracle Grid Infrastructure, and Oracle Enterprise Manager deployments. In this guide, we'll perform an Oracle Linux 9.5 Installation on Oracle VirtualBox 7, creating a clean virtual machine suitable for Oracle Database 19c, 21c, 23ai, and OEM lab environments.
This step-by-step tutorial follows a practical DBA approach, making it easy to build a stable testing environment before installing Oracle software.
Prerequisites
| Requirement | Value |
| Oracle VirtualBox | Version 7.x |
| Oracle Linux ISO | Oracle Linux 9.5 |
| RAM | Minimum 8 GB (12 GB Recommended) |
| CPU | 2 vCPU (4 Recommended) |
| Storage | 120 GB |
Download Oracle Linux 9.5
Oracle Software Delivery Cloud (Recommended)

1) Sign in with your account

2) Search for Oracle Linux 9.5 x86_64

3) Download the full DVD ISO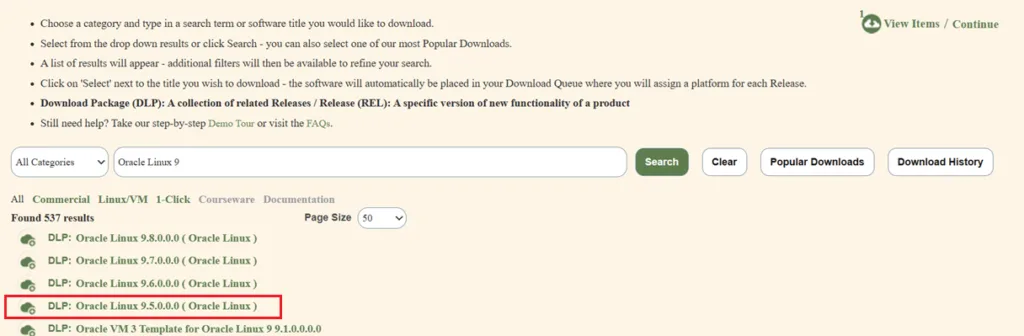
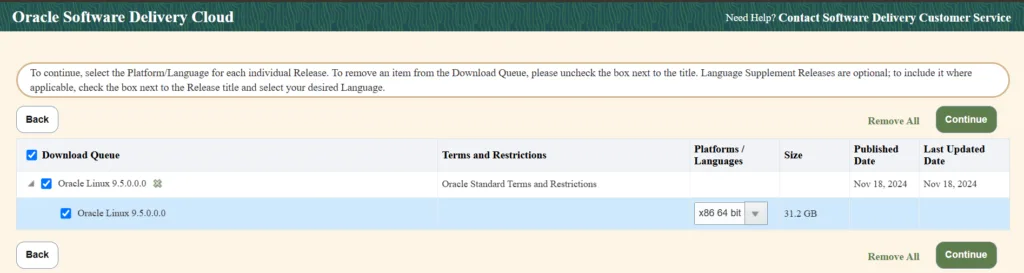
Once you have selected the required ISO image, click on the Continue button to proceed further.
Download Oracle VirtualBox 7
You can download Oracle VirtualBox 7 from the official website.
Create Virtual Machine
This is the main step in the Oracle Linux 9.5 Installation on VirtualBox 7.
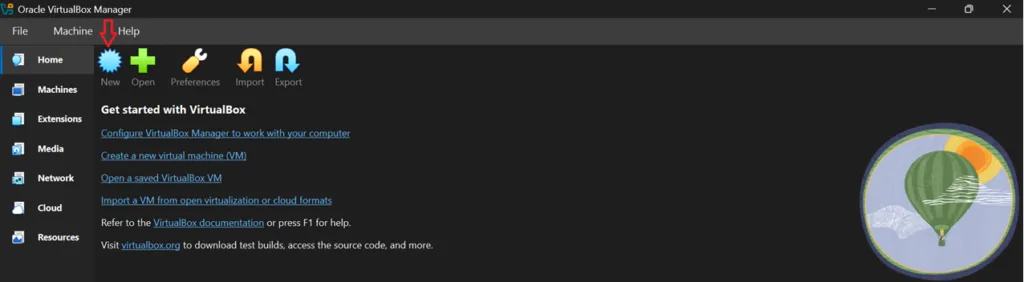
Step 1) Launch Oracle VirtualBox
After successfully installing Oracle VirtualBox 7, launch the application from the Start menu or desktop shortcut. Once VirtualBox opens, click the New button (highlighted in the screenshot) to begin creating a new virtual machine. This virtual machine will be used for the Oracle Linux 9.5 installation.
Note: Ensure that virtualization (Intel VT-x/AMD-V) is enabled in your system BIOS/UEFI before creating the virtual machine.
Step 2) Create a New Virtual Machine
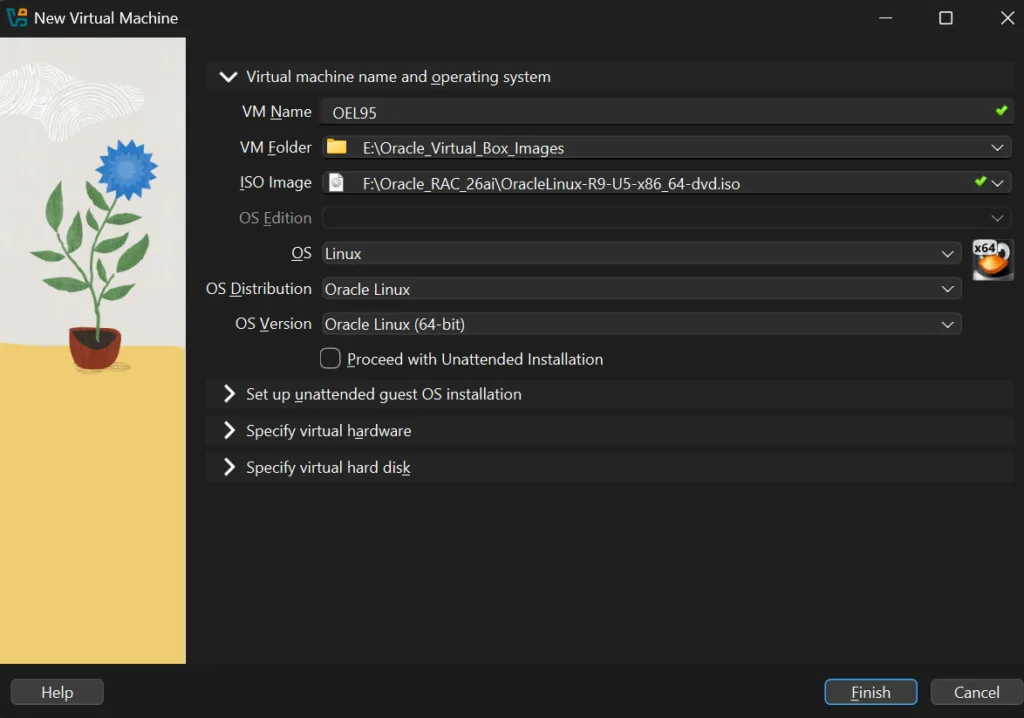
After clicking New, the New Virtual Machine window appears. In this step, provide the basic information required to create the virtual machine that will host Oracle Linux.
Configure the Virtual Machine
| Parameter | Value | Description |
| VM Name | OEL95 | Enter a meaningful name to identify the virtual machine. |
| VM Folder | Select your preferred location | Choose the directory where the virtual machine files will be stored. Ensure sufficient free disk space is available. |
| ISO Image | Browse and select the Oracle Linux 9.5/9.8 ISO file | Click the drop-down arrow and select the downloaded Oracle Linux ISO image. |
| OS | Linux | Automatically detected after selecting the ISO. |
| OS Distribution | Oracle Linux | Automatically detected. |
| OS Version | Oracle Linux (64-bit) | Automatically detected. |
Step 3) Configure Virtual Hardware
In the Specify virtual hardware section, allocate the memory (RAM) and CPU resources that will be assigned to the Oracle Linux virtual machine. These resources determine the performance of the operating system and any Oracle software installed inside it.

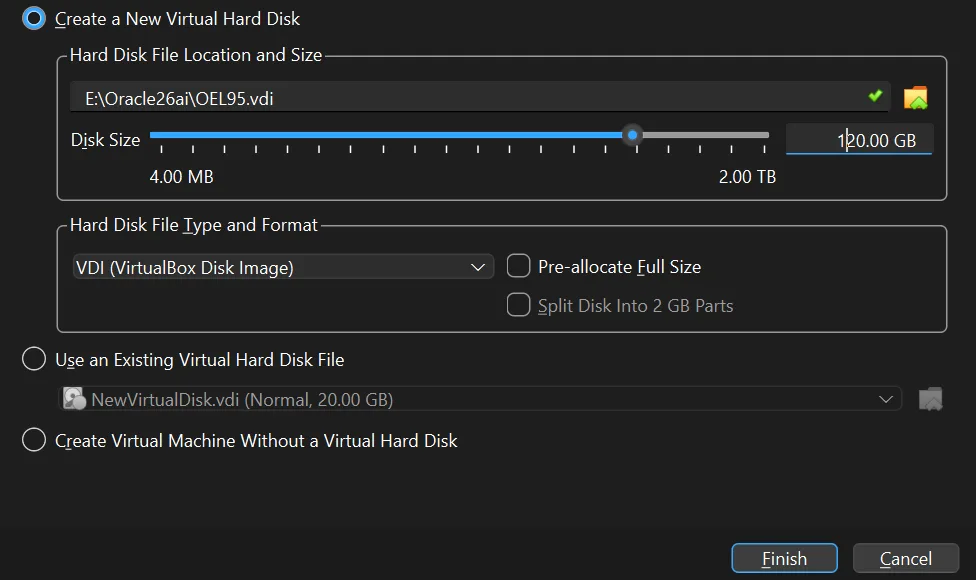
Step 4) Create a Virtual Hard Disk
In this step, configure the virtual hard disk that will be used to install Oracle Linux and store all Oracle software, database files, and related components.
Step 5) Select the Installation Language
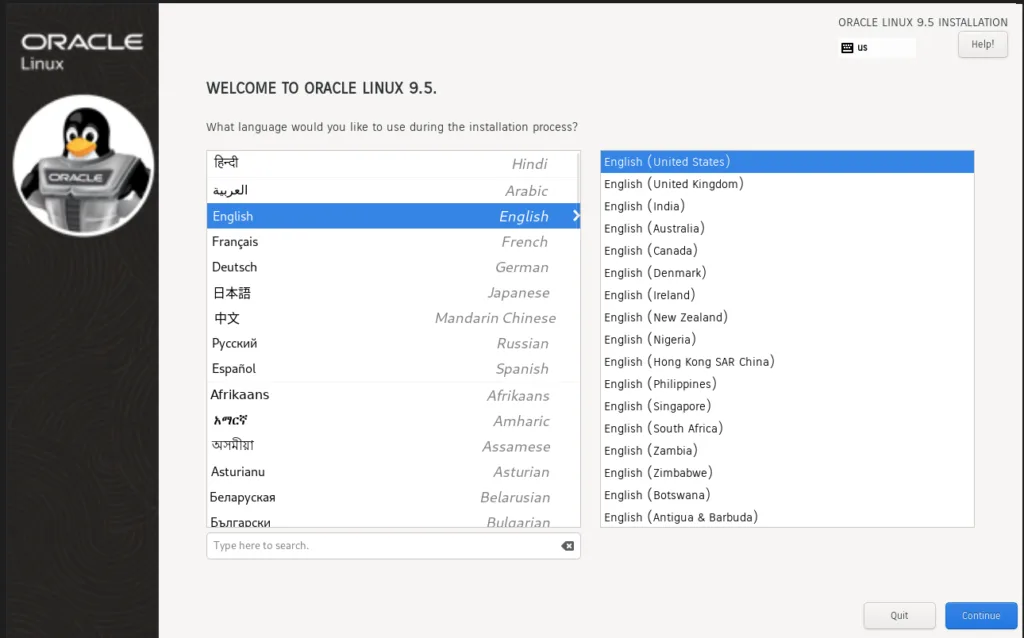
After starting the virtual machine, the Oracle Linux installer displays the Welcome screen. Select the language that will be used during the installation process and as the default system language after installation.
Step 6) Configure Date & Time
Select the appropriate Region and Time Zone, then enable Network Time if internet access is available. Accurate system time is essential for Oracle Database operations and scheduled jobs.
Step 7) Configure Installation Destination
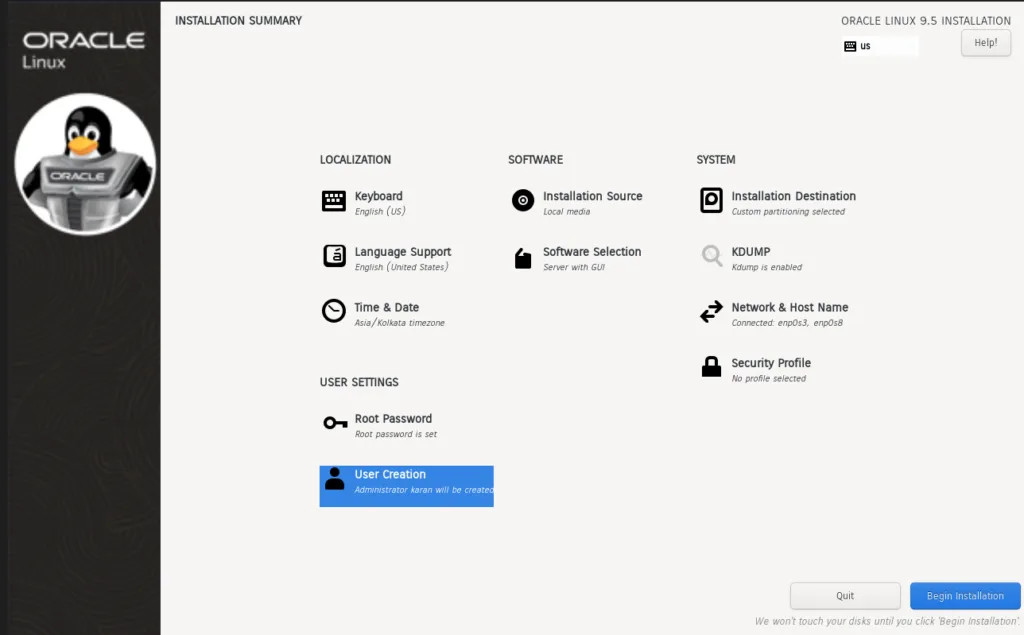
Click Installation Destination from the Installation Summary screen and select the virtual disk created in VirtualBox. Under Storage Configuration, select Custom and click Done to create the required disk partitions manually.
| Mount Point | Size | File System | Purpose |
| /boot | 2 GB | xfs | Stores boot loader and kernel files. |
/ (Root) | 30 GB | lvm | Stores the Oracle Linux operating system and installed packages. |
| /u01 | 60 GB | lvm | Used for Oracle software, database files, and Oracle Base directory. |
| swap | 8 GB | swap | Used as virtual memory by the operating system. |
Note: Manual partitioning provides better control over the filesystem layout and is the preferred approach for Oracle Database installations.
Step 8) Configure Network & Host Name
Enable the network interface and assign a meaningful hostname, such as oel95.localdomain.com.
Step 9) Configure the Root Password
Specify a strong password for the root user and click Done. This account will be used for system administration after the installation.
Step 10) Create an Operating System User
Create a standard user account (for example, oracle) that will be used to install and manage Oracle software. Enter the required details and click Done.
Step 11) Begin the Installation
After completing the required configuration, click Begin Installation to start installing Oracle Linux. Wait until the installation process completes successfully.
Step 12) Reboot the System
Once the installation is complete, click Reboot System to restart the virtual machine and boot into the newly installed Oracle Linux operating system.
Step 13) Log In to Oracle Linux
After the system restarts, log in using the user account created during installation. Verify that the Oracle Linux desktop loads successfully.
Step 14) Verify the Installation
Open a terminal and verify the operating system, kernel version, hostname, and disk usage using standard Linux commands. This confirms that Oracle Linux 9.5 Installation on VirtualBox 7 has been installed successfully and is ready for Oracle software installation.
As a verification step, execute cat /etc/system-release to confirm the Oracle Linux version and df -h To verify that all manually created partitions are mounted correctly before proceeding with the Oracle software installation.
cat /etc/system-releasedf -h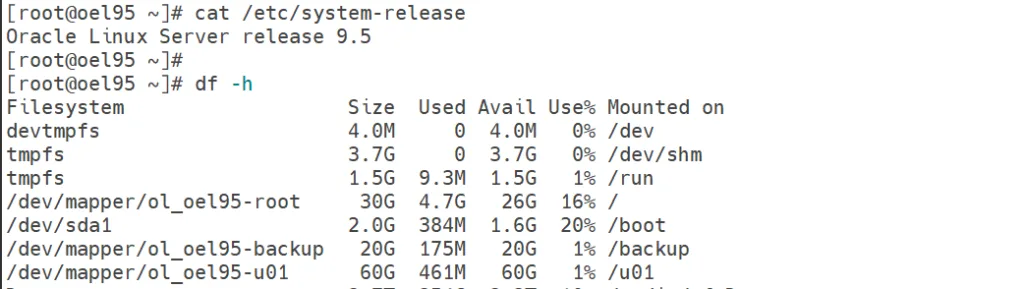
Conclusion
The Oracle Linux 9.5 Installation has been completed successfully, and the operating system is now ready for Oracle Database deployment. With the server configured and verified, the next step is to perform the required operating system configurations before installing Oracle Database 19c/23ai and other Oracle components.
Continue with the next article:
Configure Required Packages for Oracle Database
Configure Kernel Parameters for Oracle Linux 9.5
Configure User Limits for Oracle Database
Oracle Database 19c Software Installation Guide
Issues Encountered During Oracle Linux 9.5 Installation
During the installation and post-installation configuration of Oracle Linux 9.5, I encountered the following issue while connecting to the virtual machine remotely using MobaXterm.
Unable to Connect Using SSH (Access Denied)
Error
While attempting to connect to the Oracle Linux server remotely using MobaXterm, the following error was displayed:
root@192.168.1.6's password:
Access denied
Although the root user was able to log in successfully from the virtual machine console, SSH authentication failed when connecting remotely.
Cause
By default, Oracle Linux 9.5 does not allow password-based SSH login for the root user. The PermitRootLogin parameter in the SSH configuration file is commented out, causing the default setting (prohibit-password) to be applied.
Verify the SSH Service
1. Confirm that the SSH service is running.
[root@oel95 ~]# systemctl status sshd
● sshd.service - OpenSSH server daemon
     Loaded: loaded (/usr/lib/systemd/system/sshd.service; enabled; preset: enabled)
     Active: active (running) since Thu 2026-07-16 21:16:52 IST; 1min 21s ago
       Docs: man:sshd(8)
             man:sshd_config(5)
   Main PID: 913 (sshd)
      Tasks: 3 (limit: 47532)
     Memory: 6.1M
        CPU: 148ms
     CGroup: /system.slice/sshd.service
             ├─ 913 "sshd: /usr/sbin/sshd -D [listener] 1 of 10-100 startups"
             ├─3364 "sshd: root [priv]"
             └─3365 "sshd: root [net]"

Jul 16 21:16:52 oel95.localdomain.com systemd[1]: Starting OpenSSH server daemon...
Jul 16 21:16:52 oel95.localdomain.com sshd[913]: Server listening on 0.0.0.0 port 22.
Jul 16 21:16:52 oel95.localdomain.com sshd[913]: Server listening on :: port 22.
Jul 16 21:16:52 oel95.localdomain.com systemd[1]: Started OpenSSH server daemon.
Jul 16 21:17:19 oel95.localdomain.com sshd[3364]: pam_unix(sshd:auth): authentication failure; logname= uid=0 euid=0 tty=ssh ruser= rhost=192.168.1.11  user=root
Jul 16 21:17:21 oel95.localdomain.com sshd[3364]: Failed password for root from 192.168.1.11 port 49681 ssh2
2. Check the SSH configuration.
root@oel95 ~]# grep -Ei "PermitRootLogin|PasswordAuthentication" /etc/ssh/sshd_config
#PermitRootLogin prohibit-password
PasswordAuthentication yes
Resolution
1. Edit the SSH configuration file.
vi /etc/ssh/sshd_config

PermitRootLogin yes
PasswordAuthentication yes

Update the above 2 parameters in sshd_config file.
2. Restart the SSH service.
systemctl restart sshdAfter updating the configuration and restarting the SSH service, remote login using MobaXterm was successful.
Note: For production environments, Oracle recommends disabling direct root SSH login. Instead, log in using a privileged user (such as oracle) and switch to the root user using sudo or su -. Enabling PermitRootLogin yes is generally acceptable for lab and training environments but should be avoided on production systems.