Table of Contents
Introduction
Oracle 19c Database Creation is the next step after installing the Oracle software. In this guide, we will use the Oracle Database Configuration Assistant (DBCA) to create a repository database for OEM 13c.
The article covers database creation, memory configuration, storage settings, listener configuration, and verification steps required to prepare the environment for Oracle Enterprise Manager 13c Cloud Control installation.
Note – This article focuses on creating an Oracle 19c Database using DBCA. Before proceeding, ensure that the Oracle Database 19c software has already been installed on the server.
You can use either of the following installation methods –
Oracle Software Delivery Cloud → Oracle eDelivery
Oracle Database 19c Software Installation Guide → Manual Installation
Oracle Database 19c Software Installation Using Automation → Automated/Silent Installation
Once the Oracle software installation is complete, return to this guide and continue with the database creation process.
Prerequisites
Before creating the repository database, ensure that the Oracle Database 19c software has already been installed on the server. In this setup, Oracle Linux 8.10 was prepared in the previous article, and the software installation has already been completed.
The database created in this guide will be used later as the OEM 13c repository database.
Verify Oracle Environment
Before launching DBCA, verify that the Oracle environment variables are configured correctly. This helps ensure that the database creation process uses the correct Oracle Home and Oracle Base locations.
You can verify the environment using the following commands –
echo $ORACLE_BASE
echo $ORACLE_HOME
echo $ORACLE_SID
Oracle 19c Database Creation Steps
Now, let's start the Oracle 19c Database Creation for OEM 13c using DBCA.
Step 1) Launch DBCA
Oracle provides the Database Configuration Assistant (DBCA) utility to simplify database creation and configuration tasks. In this guide, we will use DBCA to create a new Oracle 19c database that will later host the OEM repository.
Launch DBCA from the Oracle user account –
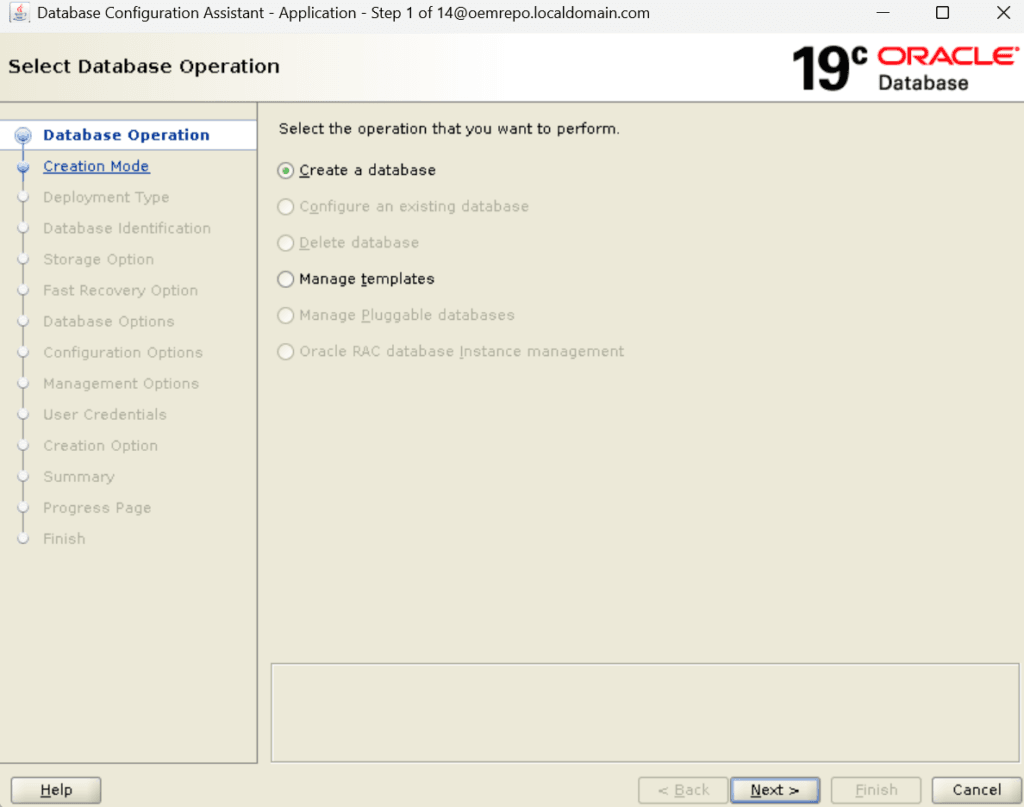
dbcaStep 2) Select Database Creation Option
When the DBCA wizard opens, select the option to create a new database. This starts the guided configuration process and allows you to define the database settings required for the OEM repository.
Step 3) Choose Deployment Type
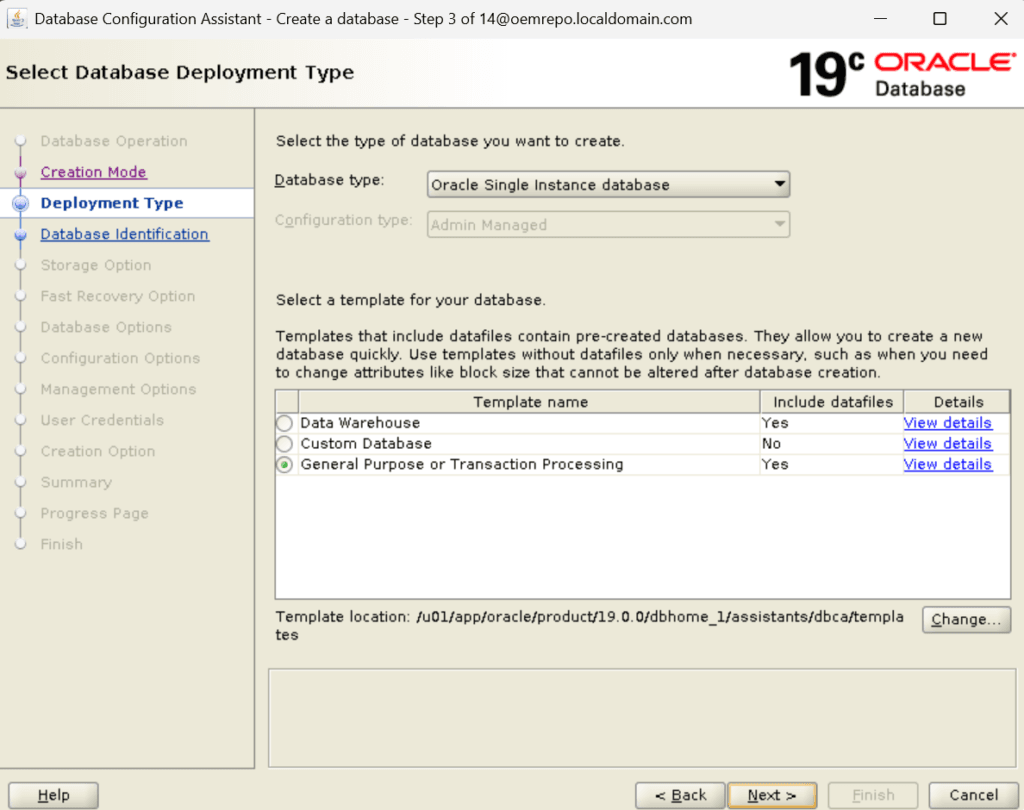
Select the deployment type that best matches your environment. For this lab setup, a single-instance database is used because it provides a simple and reliable platform for OEM 13c installation.
Step 4) Configure Global Database Name and SID
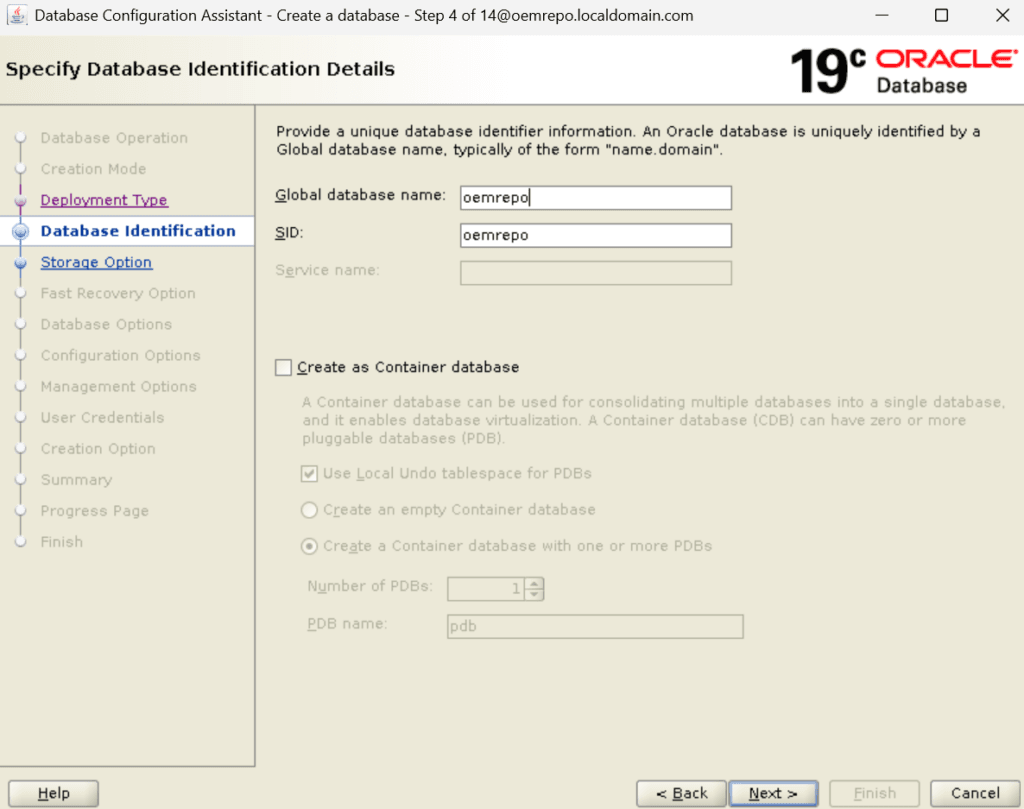
Specify the Global Database Name and Oracle SID for the new database. In my environment, I used a dedicated database specifically for the OEM repository to keep it separate from application databases.
Step 5) Configure Database Storage Settings
Specify the database storage option for the new database. In my environment, I used a dedicated /u01 filesystem specifically for the OEM repository to keep my files.
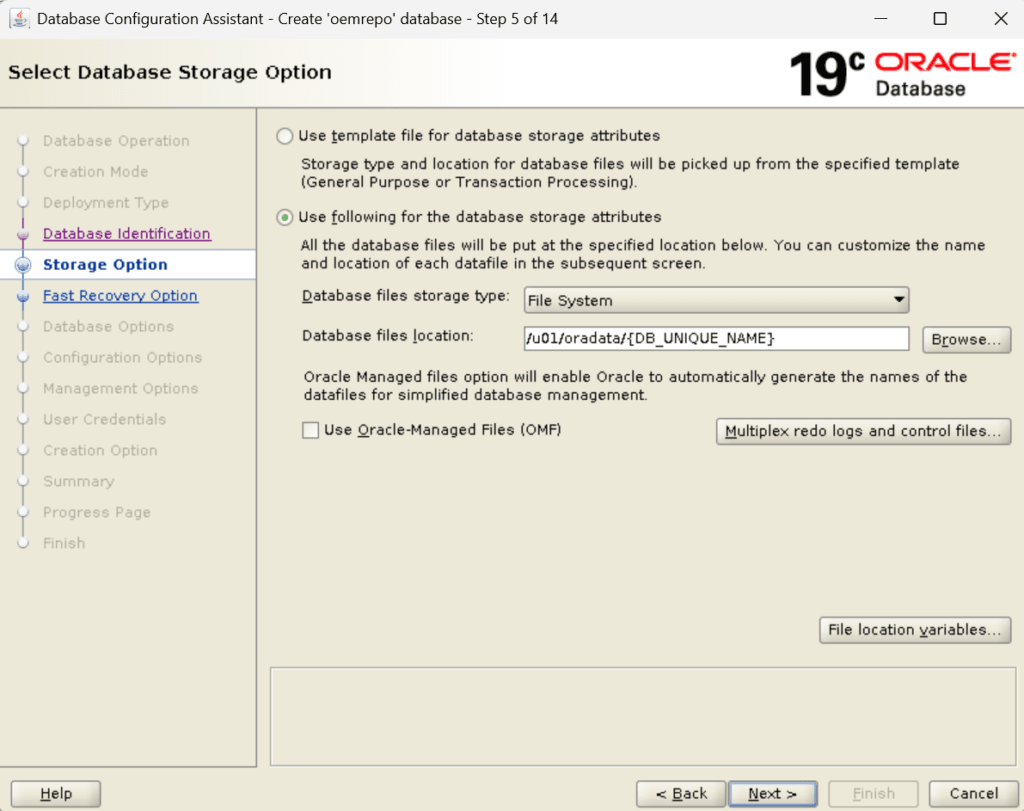
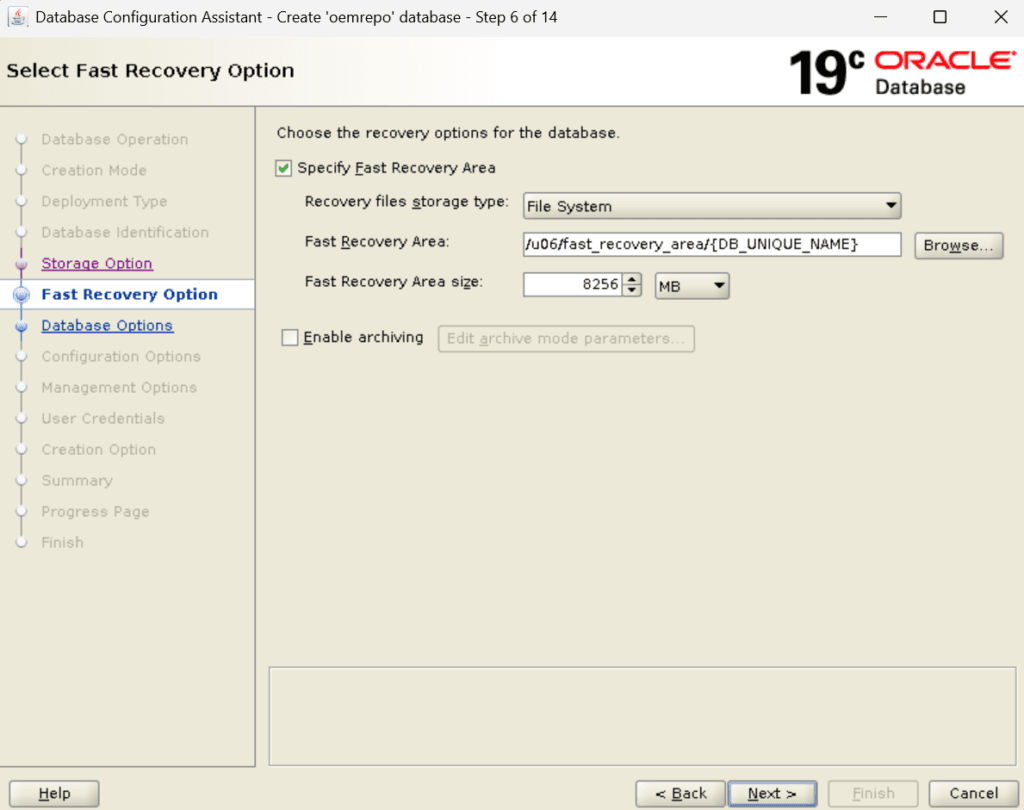
Step 6) Configure Fast Recovery Option
Specify the Fast Recovery Option. I am using the dedicated /u06 filesystem to keep my archive files.
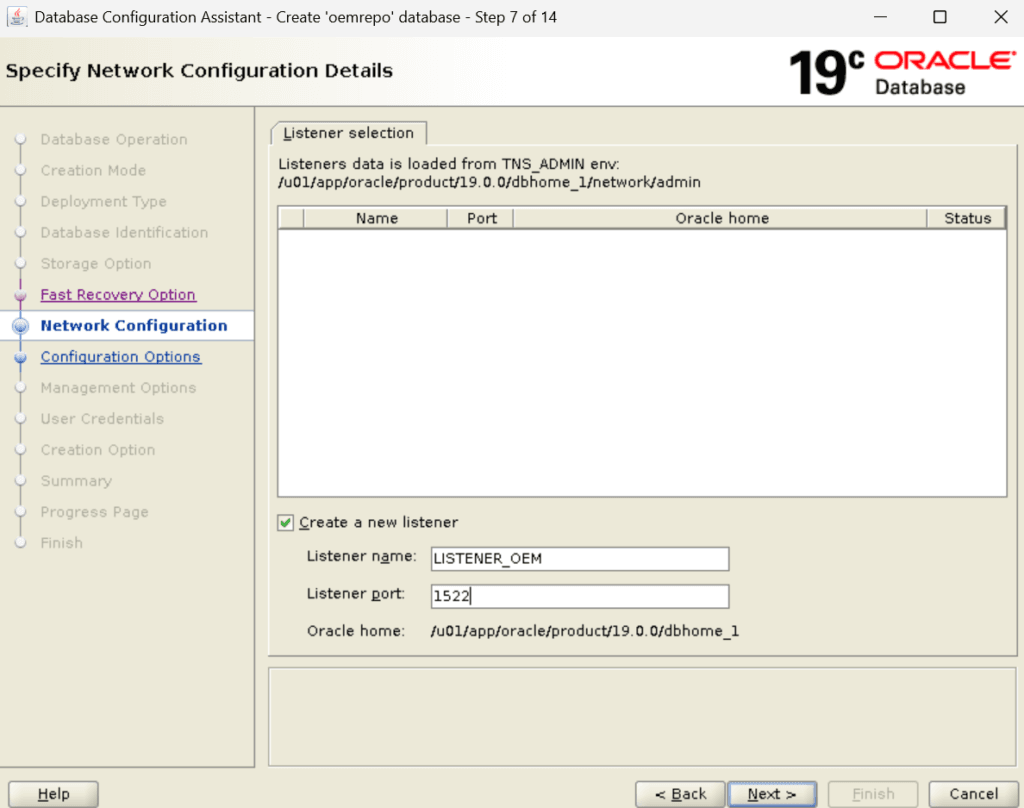
Step 7) Network Configuration
Specify the Fast Recovery Option. I am using a different LISTENER name apart from the default one with a custom port for security reasons.
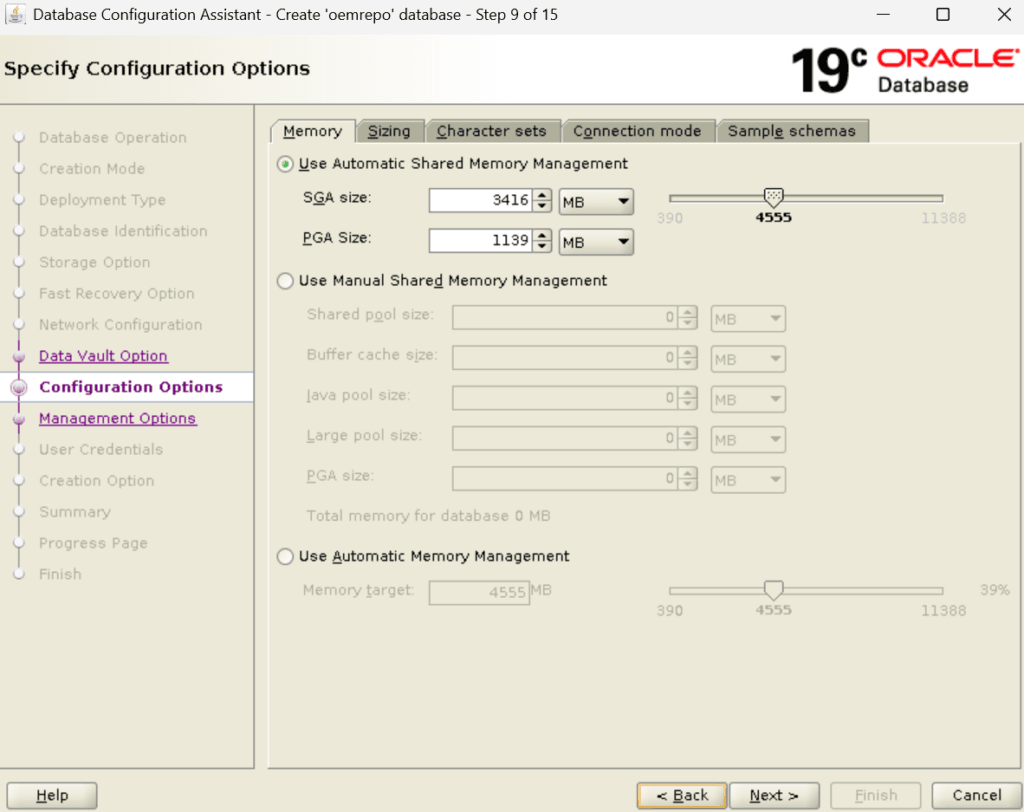
Step 8) Configure Memory Settings
Configure the memory allocation based on the available server resources. Since this database is intended for OEM 13c, allocate sufficient memory to support repository operations and future monitoring activities.
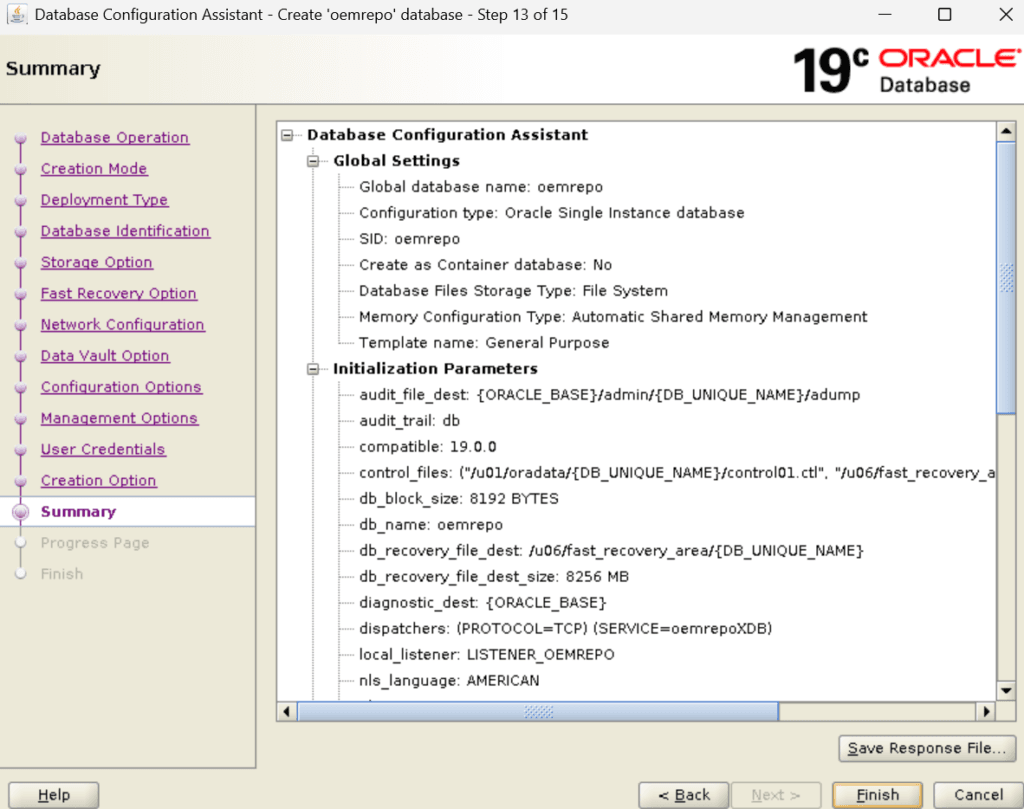
Step 9) Review Database Configuration
Before starting the database creation process, review all selected settings carefully. A final review helps identify configuration issues before DBCA creates the database.
Once satisfied with the configuration, proceed with the database creation.
Step 10) Verify Database Creation
After DBCA completes successfully, verify that the database instance is running and accessible. Confirm that the listener is operational and that the database services are registered correctly.
Performing these validation checks helps ensure that the repository database is ready for OEM 13c installation.
set lines 250 pages 250
col HOST_NAME for a25
col DB_Start_Time for a20
SELECT NAME as DB_NAME,OPEN_MODE,instance_name,status,HOST_NAME,database_role,logins,to_char(startup_time,'DD-MON-YYYY HH24:MI') DB_Start_Time FROM
gV$INSTANCE,v$database;


set lines 200
set pages 200
col NAME for a70
col STATUS for a40
select File#,name,status,bytes/1024/1024/1024 "Datafile Size in GB" from v$datafile;


set lines 999
set pages 999
col FILE_NAME for a70
select FILE_NAME,TABLESPACE_NAME,BYTES/1024/1024 as Tempfile_size_MB,STATUS from dba_temp_files;


set lines 999
set pages 999
col MEMBER for a60
select * from v$logfile;
Step 11) Repository Database Ready for OEM 13c
At this stage, the Oracle 19c Database Creation process has been completed successfully. The repository database is now ready for the next phase of the OEM 13c Installation Guide series, where we will prepare the database and create the OEM repository required by Oracle Enterprise Manager 13c Cloud Control.
Conclusion
In this guide, we successfully completed Oracle 19c Database Creation for OEM 13c using DBCA. We created the database, configured memory and storage settings, verified the database services, and prepared the environment for the next phase of the OEM 13c installation process.
In the next article, we will prepare the OEM repository database by validating prerequisite settings and performing the required repository configuration steps before installing Oracle Enterprise Manager 13c Cloud Control.
Related Articles
Oracle Linux 8.10 Installation
Oracle Database 19c Software Installation Guide
Oracle Database 19c Software Installation Using Automation
OEM 13c Installation Guide: Complete Step-by-Step Series
📚 OEM 13c Installation Guide Series
✅ Part 1 – Oracle Linux 8.10 Installation
✅ Part 2 – Oracle Database 19c Software and Database Installation (Current Article)
⏳ Coming Next:
Part 3 – Preparing the OEM Repository Database
👉 View Complete OEM 13c Installation Guide