Table of Contents
Introduction
In this article, we will cover the steps of MySQL Server Installation Using Generic Binary, which is the last method of the installation series.
In our earlier blog, we have covered the MySQL server installation using repository and without respository method. You can check out those articles as well.
MySQL Server Installation Using Generic Binary Method
Step 1) Download the software from the official website.
You can download the the sofware from the above mentioned website for the Mysql Server Installation using the generic binary method.
Note: - Don't download it directly just right click on DOWLOAD option and  copy the link address and later go to the putty or mobaxterm session and run below command ----->(Note wget command will only work when you have the internet connectivity otherwise you can download the software in you physical machine and later copy it to virtual machine)

wget https://downloads.mysql.com/archives/get/p/23/file/mysql-8.0.36-linux-glibc2.12-x86_64.tar.xz
Step 2) User Creation (as root user)
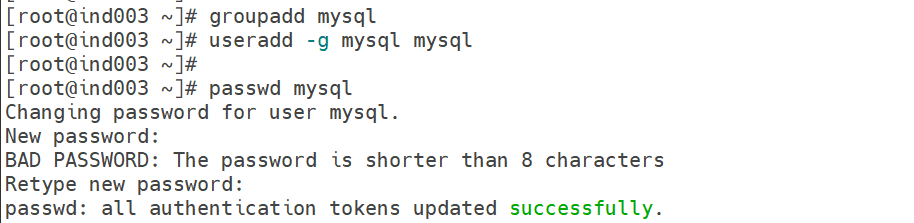
groupadd mysql

useradd -g mysql mysql

passwd mysql
Output
Step 3) Directories Creation (as root user)
a) mkdir -p /local/mysql/MYS00789

b) cd /local/mysql/MYS00789

c)
mkdir temp
mkdir admin
mkdir archive
mkdir log
mkdir data

d) cd admin

e)
mkdir mysqlhome
mkdir subsys
mkdir log

f) chown -R mysql:mysql /local

Note: - You can create directory structure as per your requirement.
Step 4) Untar the downloaded software using the MySQL user
You can check from below output my sofware is read to untar from MySQL user.
[root@ind003 local]# ls -lrt
total 603572
drwxr-xr-x 3 mysql mysql        22 Mar 10 13:47 mysql
-rwxr-x--- 1 mysql mysql 618056612 Mar 10 14:02 mysql-8.0.36-linux-glibc2.12-x86_64.tar.xz
a) su - mysql
b) cd /local
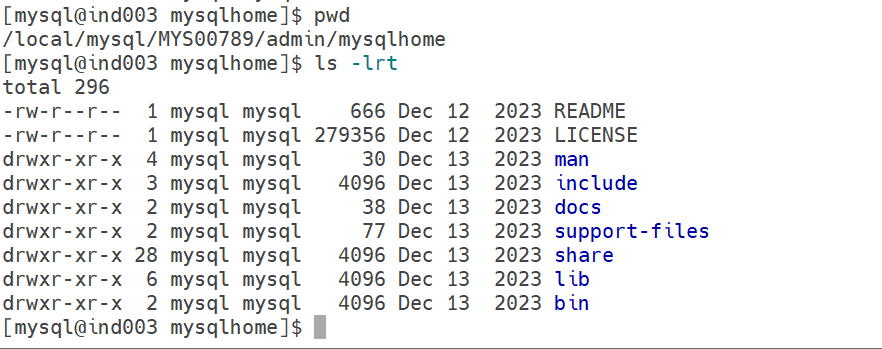
c) tar -xvf mysql-8.0.36-linux-glibc2.12-x86_64.tar.xz -C /local/mysql/MYS00789/admin/mysqlhome/
I am directly untaring the software in my MySQL home directory.Output
Step 5) Set the PATH variable in the bash profile of the MySQL user
a) vi ~/.bash_profile

b) export PATH=/local/mysql/MYS00789/admin/mysqlhome/bin:$PATH

c)  . .bash_profile

d) [mysql@ind003 ~]$ which mysqld

/local/mysql/MYS00789/admin/mysqlhome/bin/mysqld
Step 6) Server Creation
MySQL server refers to the component that receives and processes client requests.
Client (Application / MySQL Client / Workbench)
                |
                v
           MySQL Server (mysqld)
                |
      -------------------------
      |                                   |
 Query Processor        Storage Engine
 (Parser/Optimizer)      (InnoDB, MyISAM)
                |
                v
             Data Files
Before creating the server, first we will look into the directory structure.
Base directory: – /local/mysql/MYS00789/admin/mysqlhome
Socket directory: – /local/mysql/MYS00789/admin/subsys
Data directory: – /local/mysql/MYS00789/data
Log directory: – /local/mysql/MYS00789/admin/log
Command to create the server
/local/mysql/MYS00789/admin/mysqlhome/bin/mysqld --no-defaults --initialize-insecure --user=mysql --basedir /local/mysql/MYS00789/admin/mysqlhome --datadir /local/mysql/MYS00789/data &
Note: – We need to understand 2 things from the above command. First is we are using the –initialize-insecure option to avoid generating a random temporary password, and second is –no-defaults option to avoid using the default configuration file path (/etc/my.cnf). I will provide customize path for my CNF file.
Output

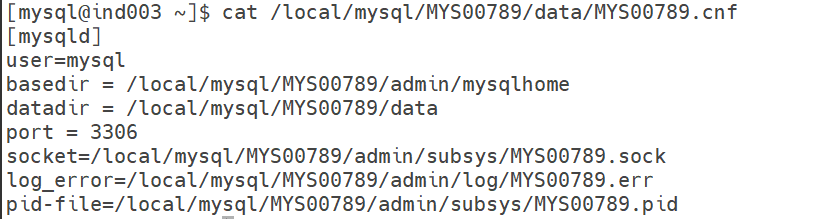
Step 7) Creation of configuration file
The configuration file is one of the important steps of MySQL Server Installation Using the Generic Binary method. We can choose any custom path as per our requirement.
vi /local/mysql/MYS00789/data/MYS00789.cnf

[mysqld]
user=mysql
basedir = /local/mysql/MYS00789/admin/mysqlhome
datadir = /local/mysql/MYS00789/data
port = 3306
socket=/local/mysql/MYS00789/admin/subsys/MYS00789.sock
log_error=/local/mysql/MYS00789/admin/log/MYS00789.err
pid-file=/local/mysql/MYS00789/admin/subsys/MYS00789.pid
Output
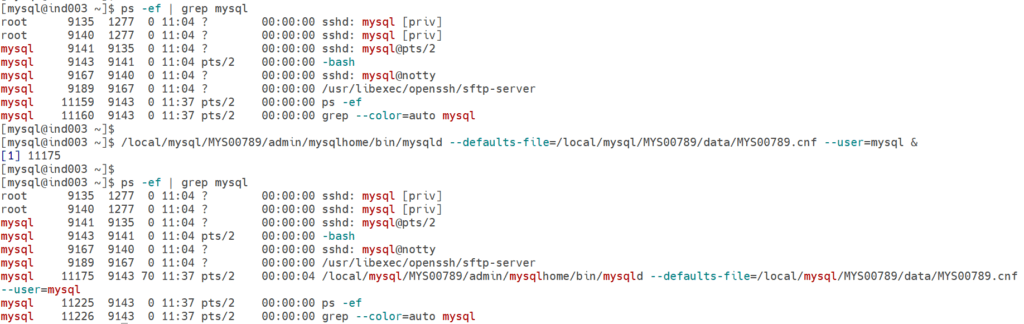
Step 8) Start the Server
a) ps -ef |grep mysql

b) /local/mysql/MYS00789/admin/mysqlhome/bin/mysqld --defaults-file=/local/mysql/MYS00789/data/MYS00789.cnf --user=mysql &

c) ps -ef |grep mysql
Output
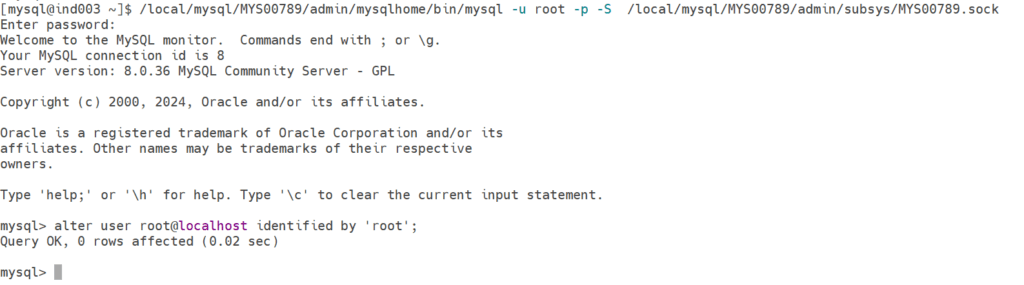
Step 9) First Time Connect to Server
a) /local/mysql/MYS00789/admin/mysqlhome/bin/mysql -u root -p -S  /local/mysql/MYS00789/admin/subsys/MYS00789.sock

b) Enter without password	---->hit enter to login without password

c) alter user root@localhost identified by 'root';
Output
Step 10) Create Scripts for start/login/stop, for later use
We are using these scripts to avoid running long commands for Start, Login, and Stop purposes.
Start Purpose
============

vi /local/mysql/MYS00789/admin/Start-Server.sh

/local/mysql/MYS00789/admin/mysqlhome/bin/mysqld --defaults-file=/local/mysql/MYS00789/data/MYS00789.cnf --user=mysql &

Login Purpose
=============

vi /local/mysql/MYS00789/admin/Login-Server.sh

/local/mysql/MYS00789/admin/mysqlhome/bin/mysql -u root -proot -S /local/mysql/MYS00789/admin/subsys/MYS00789.sock

Stop Purpose
============

vi /local/mysql/MYS00789/admin/Stop-Server.sh

/local/mysql/MYS00789/admin/mysqlhome/bin/mysqladmin -u root -proot -S /local/mysql/MYS00789/admin/subsys/MYS00789.sock shutdown

Command to execute the scripts
=============================

sh /local/mysql/MYS00789/admin/Start-Server.sh
sh /local/mysql/MYS00789/admin/Login-Server.sh
sh /local/mysql/MYS00789/admin/Stop-Server.sh
Conclusion
By following this approach, we have successfully performed the MySQL Server Installation Using Generic Binary method.
In my next article, I will cover the steps to start the MySQL server as a service.
If you enjoyed the article, please leave a comment and share it with your friends. Also, let me know which Oracle and MySQL topics you'd like to see covered in future articles.
Note: – If you want to practice this whole activity in your home lab, then you'll need a platform to perform the installation. To set that up, you first need to download and install Oracle VirtualBox, followed by the operating system, the MySQL binary software, and finally, MySQL server creation.
Related Articles
1. Mysql Installation using Repository method (RPM-based)
2. Mysql Installation without using the repository method (RPM-based)