Table of Contents
Introduction
Oracle Linux 8.10 Installation is the first step toward building a stable platform for Oracle Database, Oracle Enterprise Manager (OEM), and other Oracle technologies. In this guide, you'll learn how to install Oracle Linux 8.10 from scratch using a step-by-step approach with screenshots and practical examples. We will cover system requirements, bootable media creation, installation options, disk partitioning, network configuration, and post-installation tasks required to prepare the server for Oracle software deployment. Whether you're setting up a lab environment for learning or preparing a production-ready server, this Oracle Linux 8.10 Installation Guide will help you build a secure and reliable foundation.
Note: This article focuses on installing Oracle Linux 8.10 as part of the OEM 13c Installation Series. If you'd like to learn about Oracle VirtualBox installation, virtualization concepts, system requirements, virtual machine architecture, and detailed VirtualBox configuration, check out my complete guide: Oracle VirtualBox Installation Guide.
Prerequisites
Software Requirements
| Component | Version |
| Oracle VirtualBox | Latest |
| Oracle Linux ISO | Oracle Linux 8.10 |
| Memory | 12 GB |
| CPU | 2 vCPU |
| Disk | 120 GB |
Note: – You can use VMware as well.
Download Required Softwares
===========================
- Oracle VirtualBox – Download the latest version from the official website.
- Oracle Linux 8.10 ISO – Download the installation media from Oracle Software Delivery Cloud.
Create a New Virtual Machine
Step 1) VM Creation Screen
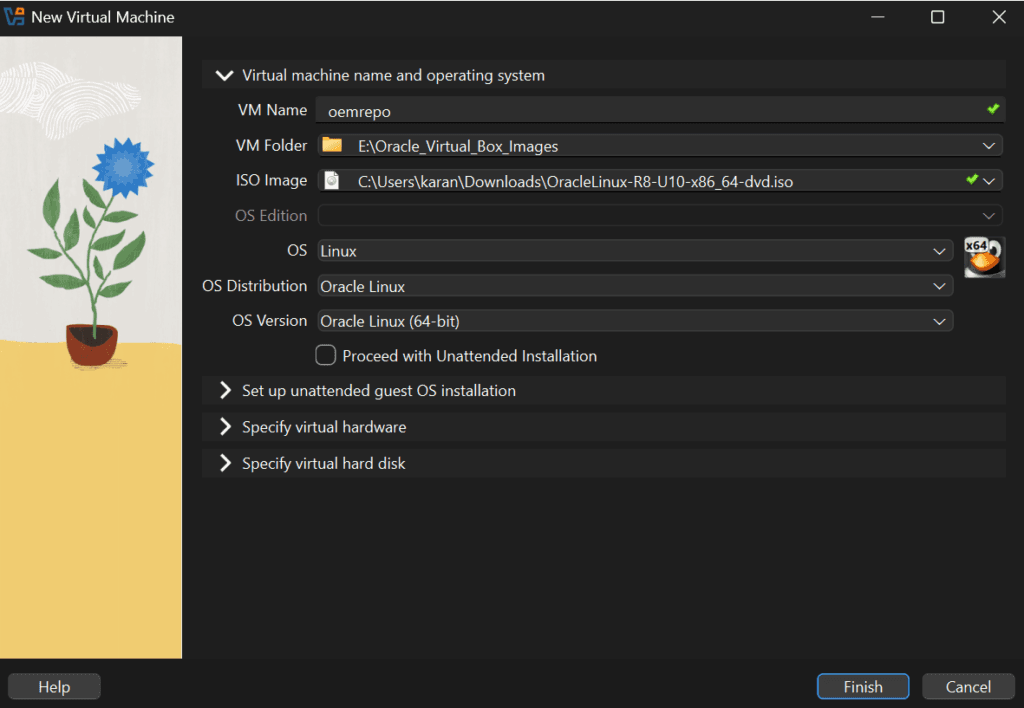
To begin the Oracle Linux 8.10 Installation, create a new virtual machine in Oracle VirtualBox. In my lab environment, I used a dedicated VM for the OEM repository server and selected the Oracle Linux 8.10 ISO image during the setup process. This virtual machine will serve as the foundation for the Oracle Database 19c and OEM 13c installation that follows in this series.
Step 2) Configure Memory and CPU
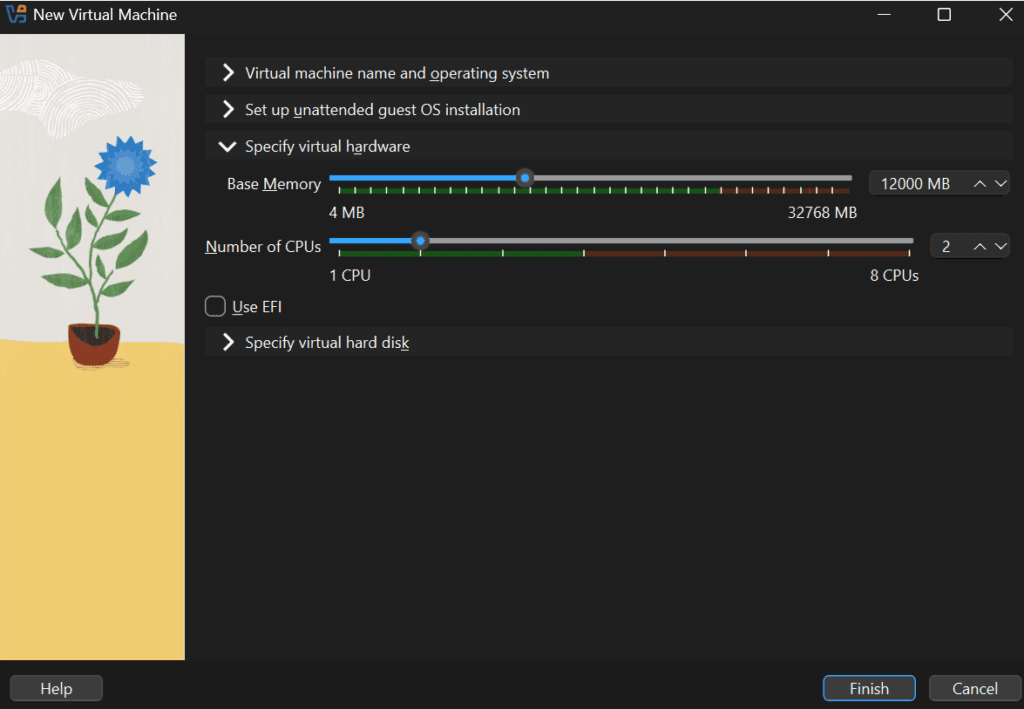
For this Oracle Linux 8.10 setup, I allocated 12 GB of RAM and 2 vCPUs to the virtual machine. These resources are sufficient for a lab environment and provide enough capacity to install Oracle Database 19c and OEM 13c components without performance issues.
Step 3) Configure Virtual Hard Disk
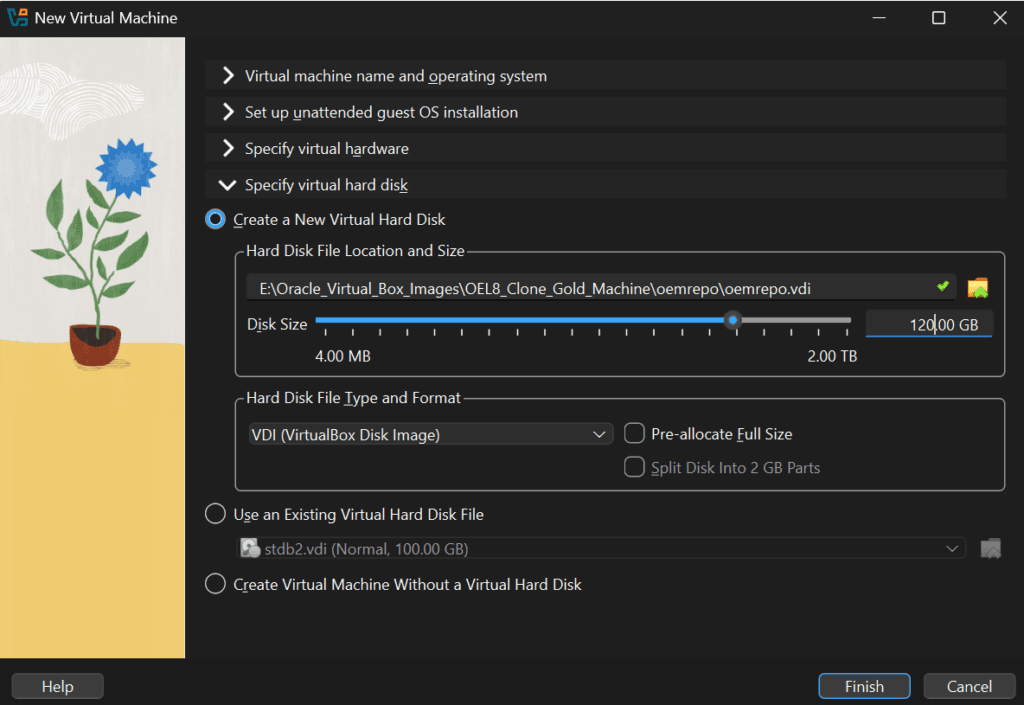
Next, create a virtual hard disk to store the operating system, Oracle software binaries, and database files. For this installation, I configured a 120 GB virtual disk, which provides adequate space for Oracle Linux 8.10, Oracle Database 19c, and the OEM repository database.
Step 4) Select Installation Language
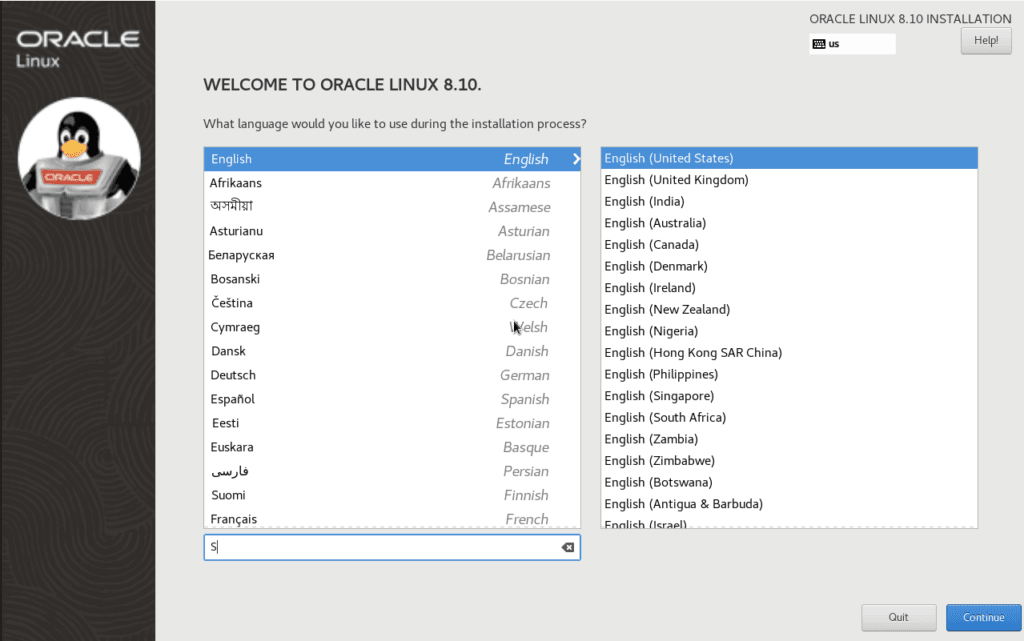
After booting from the Oracle Linux 8.10 installation media, select your preferred language and regional settings. For consistency throughout this guide, I have selected English (United States).
Step 5) Configure Installation Destination
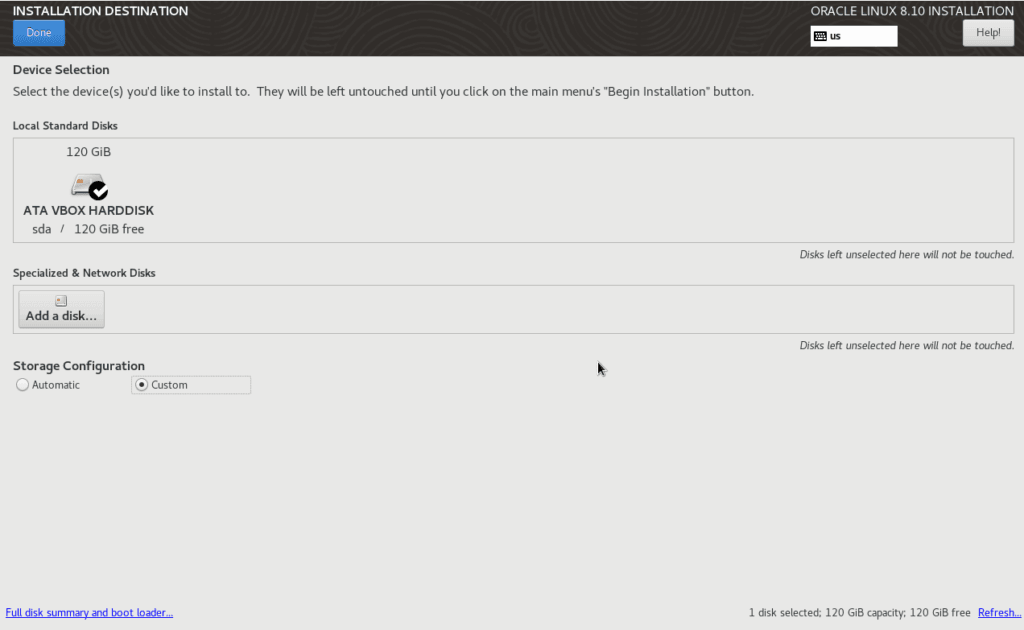
In the Installation Destination section, select the virtual disk created earlier. For this Oracle Linux 8.10 Installation, I used the 120 GB disk and created the required partitions manually using the Custom option.
Step 6) Review Installation Summary
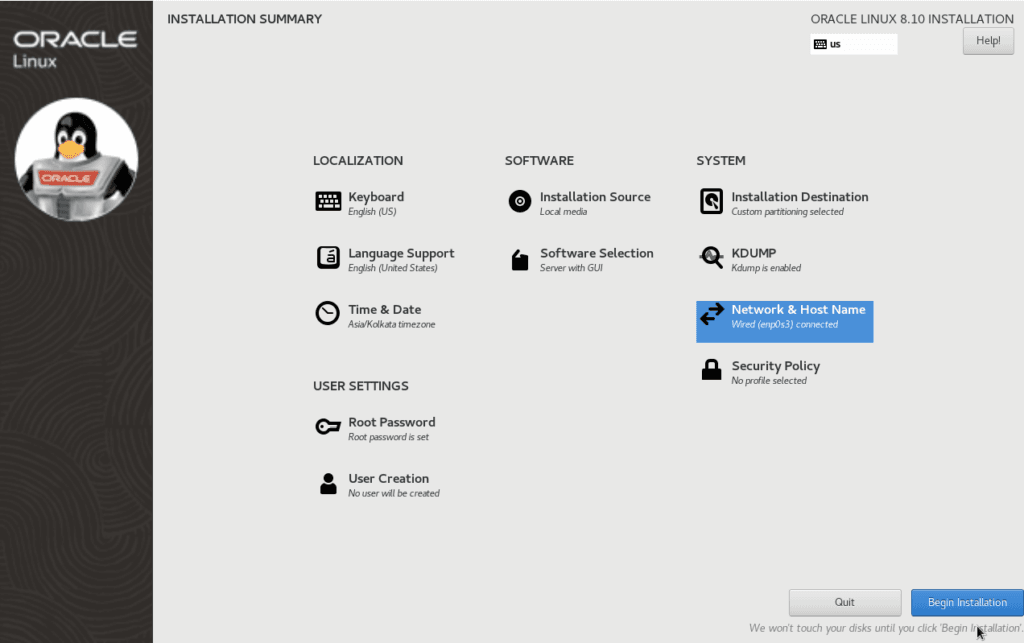
Before proceeding, review the installation summary screen and verify all selected settings, including storage, software selection, network configuration, and user settings. Spending a few minutes reviewing these options can help avoid configuration issues later in the installation process.
Step 7) Begin Oracle Linux Installation
Once all settings have been verified, click Begin Installation to start the Oracle Linux 8.10 Installation. The installer will copy the required packages, configure the operating system, and prepare the server for use.
Step 8) Verify Firewall Configuration
After the installation is complete, verify the current firewall status. In my lab environment, I disabled the firewall to simplify connectivity between Oracle components. However, for production environments, it is recommended to configure the required firewall rules rather than disabling the service completely.
systemctl status firewalld

systemctl stop firewalld

systemctl disable firewalld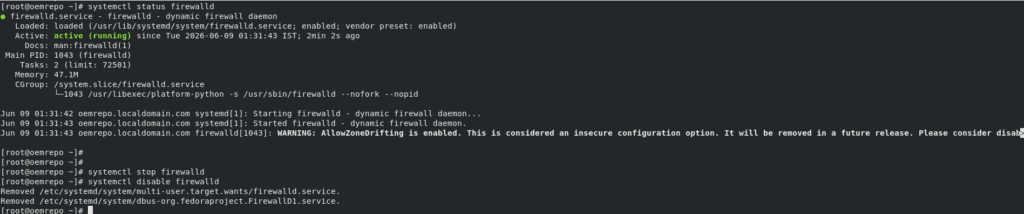
Step 9) Configure Hostname Resolution
Proper hostname resolution is an important prerequisite for Oracle products and OEM 13c deployments. Update the /etc/hosts file with the server IP address, fully qualified domain name (FQDN), and short hostname to ensure reliable name resolution across the environment.

Step 10) Verify SELinux Configuration
SELinux provides an additional layer of security for Linux systems. For this OEM 13c lab environment, SELinux has been configured in disabled mode to avoid potential issues during Oracle Database 19c and OEM 13c installation. In production environments, review your organization's security requirements before disabling SELinux.
cat /etc/selinux/config

SELINUX=disabled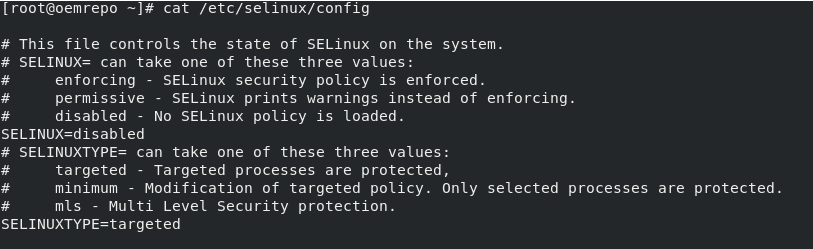
Step 11) Verify Filesystem Layout
After completing the Oracle Linux 8.10 Installation, it is a good practice to verify that all required filesystems have been created and mounted successfully. In my lab environment, I created separate mount points such as /u01, /u02, /u03, /u04, /u05, and /u06 to organize Oracle software, database files, backups, and administrative components. This layout follows common Oracle DBA best practices and helps simplify storage management.
df -h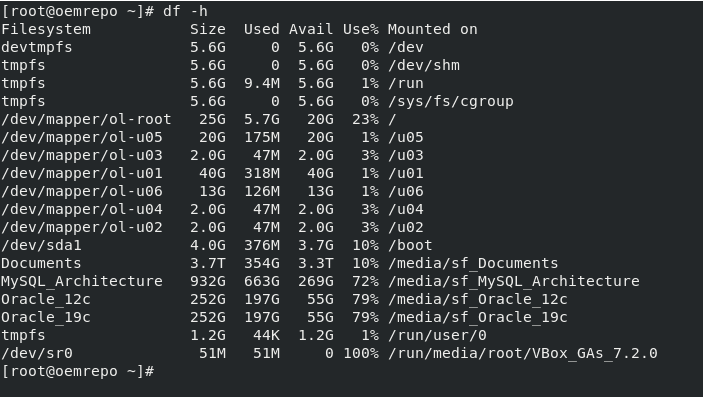
Step 12) Oracle Linux 8.10 Installation Completed
At this stage, the Oracle Linux 8.10 Installation has been successfully completed, and the server is ready for the next step in the OEM 13c Installation Guide series. In the next article, we will install Oracle Database 19c software and prepare the environment for the OEM repository database.
Conclusion
In this guide, we completed the Oracle Linux 8.10 Installation and prepared the server for the next phase of the OEM 13c deployment. We created the virtual machine, configured the required hardware resources, installed Oracle Linux 8.10, verified the filesystem layout, configured hostname resolution, reviewed SELinux settings, and validated the operating system environment.
Frequently Asked Questions (FAQ)
What is Oracle Linux 8.10 used for?
Oracle Linux 8.10 is an enterprise-grade operating system commonly used for Oracle Database, Oracle Enterprise Manager (OEM), middleware, and cloud deployments.
Can Oracle Linux 8.10 be installed on VirtualBox?
Yes. Oracle Linux 8.10 can be installed on Oracle VirtualBox, VMware Workstation, and other virtualization platforms for both learning and testing purposes.
How much RAM is required for Oracle Linux 8.10?
For a basic lab setup, 4 GB is sufficient. However, for Oracle Database 19c and OEM 13c installations, allocating 12 GB or more is recommended.
Do I need to disable SELinux for Oracle installations?
Not necessarily. Oracle products can work with SELinux, but many lab environments use permissive or disabled mode to simplify configuration and troubleshooting.
Why is hostname resolution important for OEM 13c?
Proper hostname resolution helps Oracle Database and OEM 13c components communicate reliably and prevents installation and connectivity issues.
📚 OEM 13c Installation Guide Series
✅ Part 1 – Oracle Linux 8.10 Installation (Current Article)
⏳ Coming Next:
Part 2 – Oracle Database 19c Software and Database Installation
👉 View Complete OEM 13c Installation Guide