Table of Contents
Introduction
OEM 13c Agent Deployment Using Push and Pull Methods is one of the most important post-installation activities after successfully deploying Oracle Enterprise Manager (OEM) 13c Cloud Control. The Oracle Management Agent serves as the communication bridge between monitored targets and the Oracle Management Server (OMS), collecting performance metrics, availability information, configuration details, and alert data from managed systems.
In this article, we will demonstrate both deployment approaches in a step-by-step manner, including prerequisite validation, hostname and DNS configuration, SSH connectivity checks, agent deployment, agent security configuration, target discovery, and post-deployment verification. By the end of this guide, you will have a fully operational Oracle Management Agent capable of monitoring Oracle databases, listeners, and host systems through Oracle Enterprise Manager 13c Cloud Control.
Note – This article focuses on OEM 13c Agent Deployment Using Push and Pull Methods. We will deploy the Oracle Management Agent using both the OEM Cloud Control Console (Push Method) and EMCLI (Pull Method), followed by agent validation, security configuration, and target discovery.
Before proceeding, ensure the following components are available:
Oracle Linux 8.10 Installation Guide
Oracle Database 19c Software Installation Guide
Oracle 19c Database Creation Using DBCA
Oracle Enterprise Manager 13c Installation Guide
Oracle Enterprise Manager 13c Cloud Control Installation
External References:
Oracle Enterprise Manager Cloud Control Documentation
Oracle Enterprise Manager Agent Deployment Documentation
Oracle Enterprise Manager Certification Matrix
After completing the prerequisite validation, proceed with the Oracle Management Agent deployment using either the Push Method through the OEM Console or the Pull Method using EMCLI.
Prerequisites
Verify the following before OEM 13c Agent Deployment.
Oracle Management Server (OMS) is Up and Running
oracle@oemrepo oemrepo ~$ emctl status oms
Oracle Enterprise Manager Cloud Control 13c Release 5
Copyright (c) 1996, 2021 Oracle Corporation.  All rights reserved.
WebTier is Up
Oracle Management Server is Up
JVMD Engine is Up
Forward and Reverse DNS Resolution are Configured
We need to make sure Forward and Reverse DNS Resolution are configured properly.
You can check out this article to set up the DNS Configuration for Oracle 19c.
oracle@oemrepo oemrepo ~$ nslookup linux2
Server:         192.168.1.190
Address:        192.168.1.190#53

Name:   linux2.localdomain.com
Address: 192.168.1.123

oracle@linux2 karan ~$ nslookup oemrepo
Server:         192.168.1.190
Address:        192.168.1.190#53

Name:   oemrepo.localdomain.com
Address: 192.168.1.190
SSH Connectivity Exists Between OMS and Target Host
oracle@linux2 karan ~/.ssh$ ssh oemrepo date
Tue Jun 23 01:32:01 IST 2026
oracle@linux2 karan ~/.ssh$ ssh linux2 date
Tue Jun 23 01:32:10 IST 2026

oracle@oemrepo oemrepo ~/.ssh$ ssh oemrepo date
Tue Jun 23 01:32:50 IST 2026
oracle@oemrepo oemrepo ~/.ssh$ ssh linux2 date
Tue Jun 23 01:32:52 IST 2026
OEM 13c Agent Deployment Using the Pull Method
Step 1) Log in to EMCLI
The Enterprise Manager Command Line Interface (EMCLI) allows administrators to perform OEM management tasks from the command line. Before using any EMCLI commands, log in using the SYSMAN account.
emcli login -username=sysman -password=password
Step 2) Synchronize EMCLI
After logging in, synchronize EMCLI with the OMS server to download the latest command metadata and ensure all available verbs are accessible.
emcli sync
Step 3) Verify Supported Platforms
Before downloading the agent software, verify which platforms the OMS supports. This helps ensure the correct agent image is selected for the target operating system.
emcli get_supported_platforms
Step 4) Download the Agent Software
Use the following command to download the OEM 13c Management Agent image for Linux x86-64 platforms. The image will be stored in the specified destination directory.
emcli get_agentimage -destination=/tmp/agent135_image -platform="Linux x86-64" -version="13.5.0.0.0"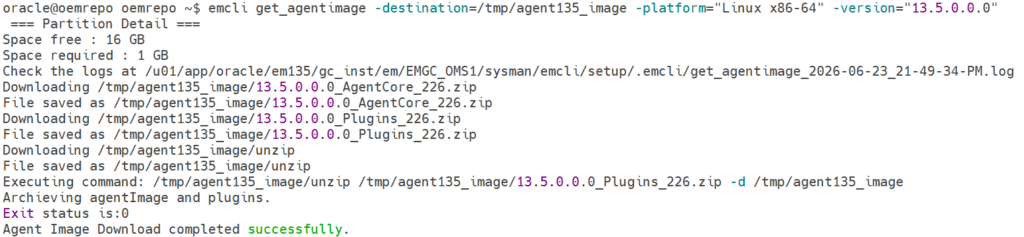
Step 5) Add Required Plugin Information
The agent image must contain plugin metadata so that the OEM can properly deploy and register the agent. Add the plugins.txt file to the downloaded agent archive.
cd /u01/app/oracle/agent13c/agent_13.5.0.0.0/sysman/install

zip /tmp/agent135_image/13.5.0.0.0_AgentCore_226.zip plugins.txt
Step 6) Transfer the Agent Image to the Target Server
Copy the downloaded agent software from the OMS server to the target host where the Management Agent will be installed.
scp /tmp/agent135_image/13.5.0.0.0_AgentCore_226.zip oracle@linux2.localdomain.com:/tmp
Step 7) Extract the Agent Software
Log in to the target server and extract the agent archive into a dedicated directory.
unzip 13.5.0.0.0_AgentCore_226.zip -d agent_135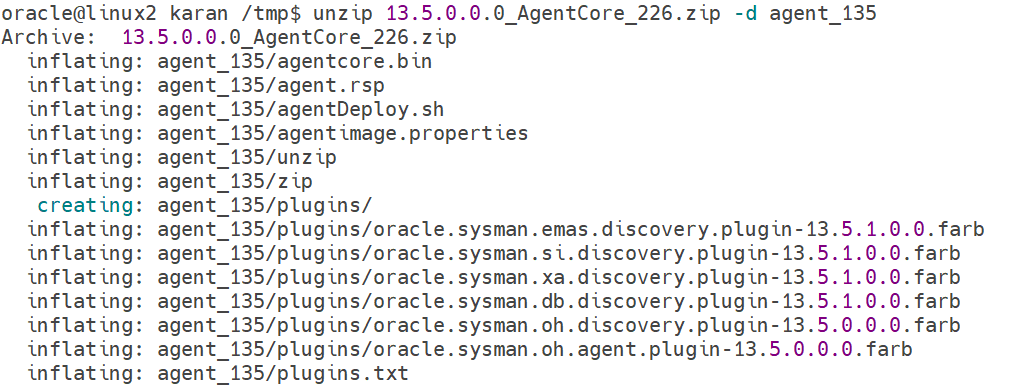
Step 8) Deploy the OEM Management Agent
Navigate to the extracted directory and execute the deployment script. During installation, specify the Agent Base Directory, Agent Instance Home, Agent Port, OMS Hostname, Upload Port, and Agent Registration Password.
./agentDeploy.sh AGENT_BASE_DIR=/u01/app/oracle/em135
AGENT_INSTANCE_HOME=/u01/app/oracle/em135/gc_inst AGENT_PORT=3872 OMS_HOST=oemrepo.localdomain.com EM_UPLOAD_PORT=4889 AGENT_REGISTRATION_PASSWORD=agentreg123
After successful deployment, the agent automatically registers with the OMS and begins uploading monitoring data.
Step 9) Verify Agent Status
Once the deployment is complete, verify that the agent is running and communicating with the OMS.
emctl status agentoracle@linux2 karan /tmp/agent_135$ emctl status agent
Oracle Enterprise Manager Cloud Control 13c Release 5
Copyright (c) 1996, 2021 Oracle Corporation. All rights reserved.
---------------------------------------------------------------
Agent Version : 13.5.0.0.0
OMS Version : 13.5.0.0.0
Protocol Version : 12.1.0.1.0
Agent Home : /u01/app/oracle/em135/gc_inst
Agent Log Directory : /u01/app/oracle/em135/gc_inst/sysman/log
Agent Binaries : /u01/app/oracle/em135/agent_13.5.0.0.0
Core JAR Location : /u01/app/oracle/em135/agent_13.5.0.0.0/jlib
Agent Process ID : 31268
Parent Process ID : 31218
Agent URL : https://linux2.localdomain.com:3872/emd/main/
Local Agent URL in NAT : https://linux2.localdomain.com:3872/emd/main/
Repository URL : https://oemrepo.localdomain.com:4903/empbs/upload
Started at : 2026-06-23 22:33:03
Started by user : oracle
Operating System : Linux version 5.4.17-2011.6.2.el7uek.x86_64 (amd64)
Number of Targets : 2
Last Reload : (none)
Last successful upload : 2026-06-23 22:35:14
Last attempted upload : 2026-06-23 22:35:14
Total Megabytes of XML files uploaded so far : 0.41
Number of XML files pending upload : 0
Size of XML files pending upload(MB) : 0
Available disk space on upload filesystem : 68.27%
Collection Status : Collections enabled
Heartbeat Status : Ok
Last attempted heartbeat to OMS : 2026-06-23 22:35:12
Last successful heartbeat to OMS : 2026-06-23 22:35:12
Next scheduled heartbeat to OMS : 2026-06-23 22:36:12
---------------------------------------------------------------
Agent is Running and ReadyThe output should show that the agent is running and that uploads are successful.
Conclusion
In this article, we successfully completed the OEM 13c Agent Deployment using the Pull Method with Enterprise Manager Command Line Interface (EMCLI). We covered the complete deployment workflow, including prerequisite validation, agent software download, plugin configuration, agent installation, agent registration, and post-deployment verification.
The Pull Method provides administrators with greater flexibility and control, making it particularly useful in environments where direct deployment from the OEM Console is restricted by network, security, or operational requirements. Once deployed, the Oracle Management Agent can securely communicate with the Oracle Management Server (OMS) and begin collecting monitoring and configuration data from managed targets.
A successful OEM 13c Agent Deployment is a critical step toward centralized monitoring and administration within Oracle Enterprise Manager Cloud Control. After validating the agent status and communication with OMS, the environment is ready for target discovery and monitoring activities.
In the next article, we will explore the OEM 13c Agent Deployment using the Push Method, where the Management Agent is deployed directly from the OEM Cloud Control Console to target hosts using the automated deployment framework.
Deinstall the OEM Management Agent
If you need to remove the Management Agent from the target host, use the Oracle-supplied deinstallation utility. This completely removes the agent software and associated configuration files.
export AGENT_HOME=/u01/app/oracle/em135/agent_13.5.0.0.0

export ORACLE_HOME=$AGENT_HOME

export PATH=$ORACLE_HOME/perl/bin:$PATH

$ORACLE_HOME/perl/bin/perl $AGENT_HOME/sysman/install/AgentDeinstall.pl -agentHome $AGENT_HOME
After the deinstallation completes, verify that the agent has been removed from both the operating system and the OEM console.
📚 OEM 13c Installation Guide Series
✅ Part 1 – Oracle Linux 8.10 Installation
✅ Part 2 – Oracle Database 19c Software and Database Installation
✅ Part 3 – Preparing the OEM Repository Database
✅ Part 4 – Oracle Enterprise Manager 13c Cloud Control Installation
✅ Part 5 – OEM 13c Agent Deployment Using Pull Method (Current Article)
⏳ Coming Next:
Part 6 – OEM 13c Agent Deployment Using Push Method
👉 View Complete OEM 13c Installation Guide