Table of Contents
Introduction
OEM 13c Cloud Control Installation is the next major step in building a centralized monitoring and administration platform for Oracle environments. In the previous articles, we installed Oracle Linux 8.10, created the Oracle 19c repository database, and completed the repository database preparation required for Oracle Enterprise Manager.
With all prerequisites validated, we can now deploy Oracle Enterprise Manager 13c Cloud Control. During this phase, the Oracle Management Service (OMS), WebTier components, and management repository integration will be configured to provide a single interface for monitoring databases, hosts, listeners, and other Oracle targets.
In this guide, I will demonstrate the complete OEM 13c Cloud Control Installation process, including software staging, prerequisite validation, repository connectivity, OMS configuration, and post-installation verification.
Note – Before starting the OEM 13c Cloud Control Installation, ensure that all prerequisite activities have been completed successfully.
You can refer to the following guides if required –
Oracle Linux 8.10 Installation Guide
Oracle Database 19c Software Installation Guide
Oracle 19c Database Creation for OEM 13c Using DBCA
Preparing the OEM Repository Database for OEM 13c Installation
OEM 13c installation media can be downloaded from Oracle Software Delivery Cloud, and the latest certification details can be verified using Oracle Enterprise Manager documentation.
Once the repository database and operating system prerequisites are validated, continue with the OEM 13c Cloud Control Installation process covered in this guide.
Prerequisites
Before starting the OEM 13c Cloud Control Installation, verify that the operating system, repository database, and Oracle software environment meet the minimum requirements required by Oracle Enterprise Manager.
The following checks were performed in this environment-
1) Verify required operating system packages.

2) Verify hostname and DNS resolution.

3) Verify kernel parameter settings.

4) Verify available filesystem space.

5) Verify /tmp filesystem free space.

6) Verify Oracle user resource limits.

7) Verify repository database profile settings.

8) Verify auto-extensible datafiles.

9) Backup Oracle Inventory.

10) Backup the Repository Database or create a Guaranteed Restore Point (GRP).

11) Verify login triggers are disabled.

12) Verify CLASSPATH environment variable is unset.
After validating the above prerequisites, proceed with the OEM 13c Cloud Control Installation.
OEM 13c Cloud Control Installation Prerequisites
Step 1) Verify Required Operating System Packages
Ensure all required operating system packages are installed on the OEM server.
Reference Article:
How to Verify Required OS Packages for OEM 13c Installation
Step 2) Verify Hostname and DNS Resolution
Confirm that the OEM server hostname can be resolved correctly using both forward and reverse DNS lookups.
Reference Article:
How to Set Up DNS Configuration for Oracle 19c
Step 3) Verify Kernel Parameter Settings
Validate the Oracle Linux kernel parameters required by Oracle Enterprise Manager.
Reference Article:
Kernel Parameters Configuration for OEM 13c
Step 4) Verify Available Filesystem Space
df -hStep 5) Verify /tmp Filesystem Free Space
The installer extracts temporary files into the /tmp filesystem during installation.
df -h /tmp
Step 6) Verify Oracle User Resource Limits
Verify that the Oracle software owner account has the required operating system limits configured.
Reference Article:
Oracle User Limits for OEM 13c Installation
Step 7) Verify Repository Database Profile Settings
Oracle recommends ensuring that the default profile does not enforce a password verification function that could interfere with OEM account creation.
set lines 999 pages 999
col PROFILE for a30
col LIMIT for a30
col RESOURCE_NAME for a30
SELECT profile, resource_name, limit FROM dba_profiles WHERE profile='DEFAULT'
AND resource_name='PASSWORD_VERIFY_FUNCTION';

PROFILE                        RESOURCE_NAME                  LIMIT
------------------------------ ------------------------------ ------------------------------
DEFAULT                        PASSWORD_VERIFY_FUNCTION       NULL
Step 8) Verify Auto-Extensible Datafiles
SELECT tablespace_name, autoextensible FROM dba_data_files;

SELECT tablespace_name,autoextensible FROM dba_temp_files;
Step 9) Backup Oracle Inventory
cp -rp /u01/app/oraInventory /u01/app/oraInventory_bkp_$(date +%F)Step 10) Backup Repository Database or Create a Guaranteed Restore Point
Before installing OEM, create a fallback mechanism.
Reference Article:
Guaranteed Restore Point Oracle 19c
Step 11) Verify Login Triggers are Disabled
Login triggers may interfere with repository account creation and OEM validation.
set lines 999 pages 999
col OWNER for a30
col TRIGGER_NAME for a30
SELECT owner, trigger_name, status FROM dba_triggers WHERE triggering_event LIKE '%LOGON%';

alter trigger DBMS_SET_PDB disable;

Disable any non-essential logon triggers during installation.
Step 12) Verify CLASSPATH Environment Variable is Unset
echo $CLASSPATH

If set, then

unset CLASSPATH
Repository Database Ready for OEM Installation
At this stage, all Oracle Enterprise Manager 13c Cloud Control prerequisite checks have been completed successfully. The OEM server and repository database are now ready for the Oracle Management Service (OMS) software installation.
In the next step, we will start the Oracle Enterprise Manager 13c Cloud Control installation and deploy the Oracle Management Service using the prepared Oracle 19c repository database.
OEM 13c Cloud Control Installation
Step 1) Create Required Directory Structure
Before starting the OEM installation, create the directories that Oracle Enterprise Manager components will use during installation.
mkdir -p /u01/app/oracle/em135/mw_home /u01/app/oracle/em_swlib /u01/app/oracle/agent13cStep 2) Configure Repository Database Parameters
Before installing Oracle Enterprise Manager 13c Cloud Control, Oracle recommends adjusting a few database initialization parameters to support repository database operations and improve OMS performance.
The OEM repository database stores monitoring data, job execution history, metric collections, incident information, and configuration data for all managed targets. Proper database configuration helps ensure efficient SQL parsing, repository updates, and OMS communication.
a) session_cached_cursors
alter system set session_cached_cursors=500 scope=spfile;The session_cached_cursors parameter controls the number of parsed SQL cursors that can be retained in a user session. Increasing this value improves cursor reuse and reduces parsing overhead generated by OEM repository activity. Oracle recommends a higher value to support the large volume of recurring SQL statements executed by the OMS and Management Agents.
b) shared_pool_size
alter system set shared_pool_size=450M scope=spfile;The shared_pool_size parameter allocates memory for SQL execution plans, PL/SQL objects, and data dictionary information. Oracle Enterprise Manager repository databases execute a significant number of SQL statements and PL/SQL procedures. Allocating sufficient shared pool memory helps improve SQL performance and reduces library cache contention during OMS operations.
c) _allow_insert_with_update_check
alter system set "_allow_insert_with_update_check"=TRUE scope=spfile;The hidden parameter _allow_insert_with_update_check is required by Oracle Enterprise Manager repository components during repository creation and management operations. Oracle recommends enabling this parameter before starting the OEM installation to ensure repository schema objects can be created and maintained successfully.
Step 3) Bounce the database as the SYS user
After setting the parameters, bounce the database to take the permanent settings.
shutdown immediate
startup
Step 4) Download Oracle Enterprise Manager 13c Software
Before starting the installation, download the Oracle Enterprise Manager 13c Cloud Control software from Oracle Software Delivery Cloud.
Download Location:
Oracle Software Delivery Cloud
After logging in with your Oracle account, search for
Oracle Enterprise Manager Cloud Control 13.5
Download all required installation zip files and transfer them to the OEM server before proceeding with the installation.
Note: Oracle Enterprise Manager installation media is distributed as multiple zip files. Ensure that all downloaded zip files are placed in the same directory before extraction. Missing installation archives may cause the installer to fail during the staging process.
Step 5) Execute the bin file for Installation
./em13500_linux64.binStep 6) Installation Types
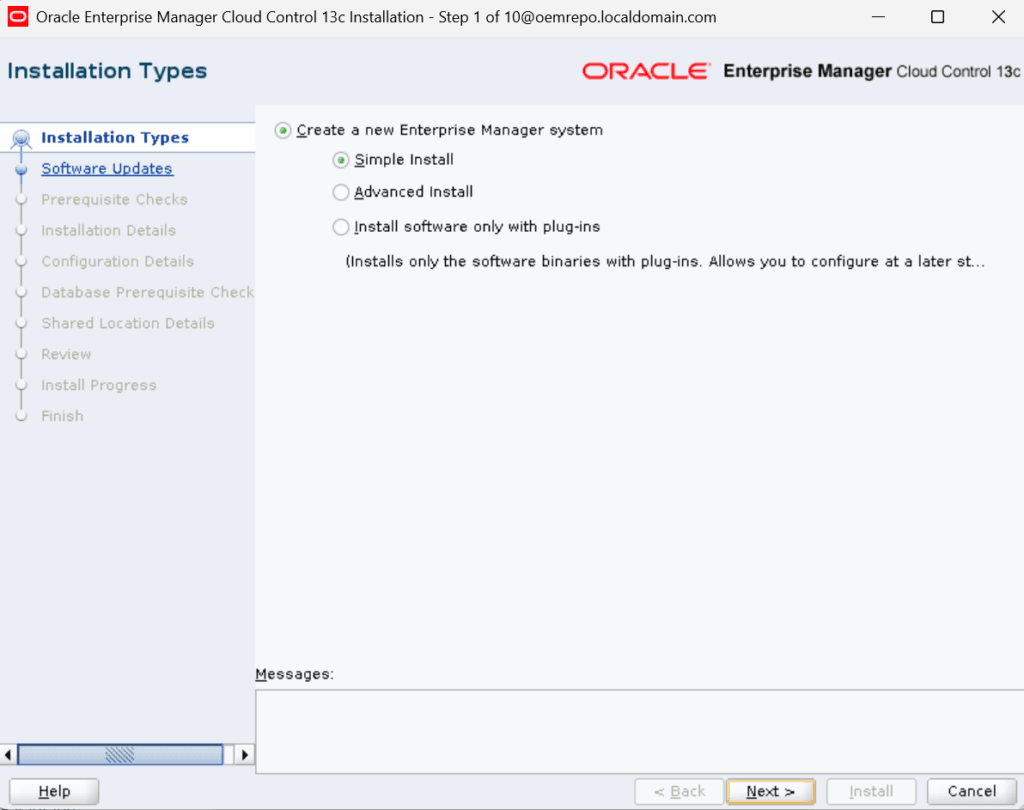
Select the Simple Install option as an installation type.
Step 7) Software Updates
Skip the software updates and proceed further.
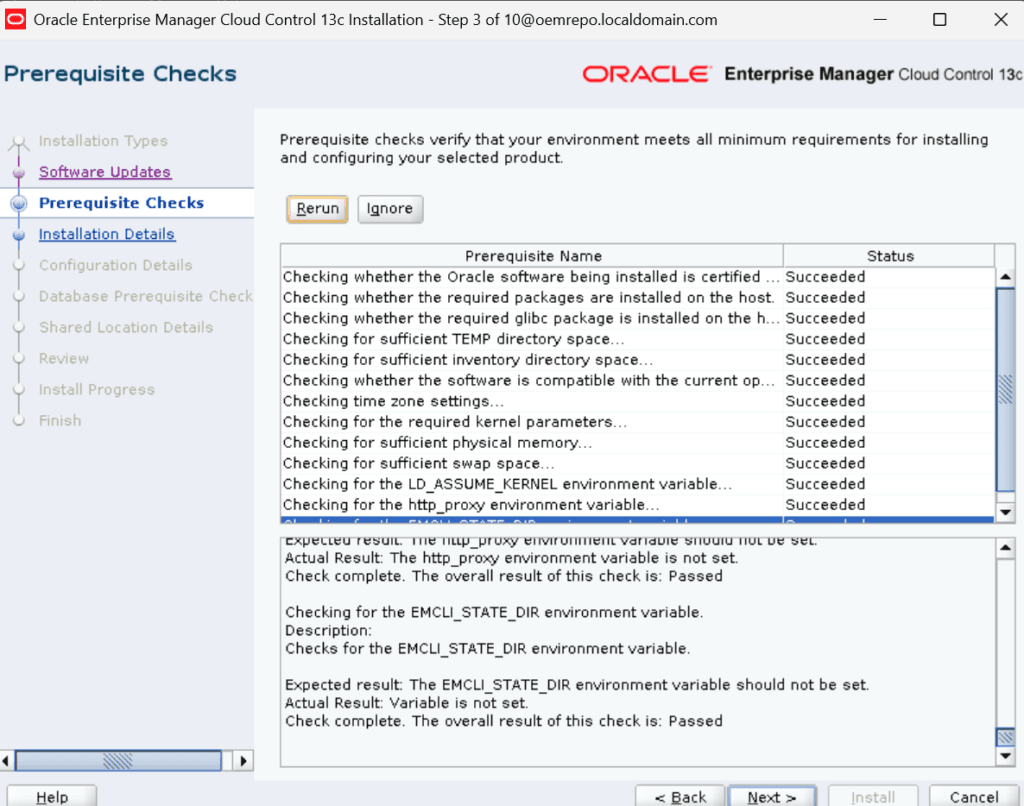
Step 8) Prerequisite Checks
Before providing, we need to check the Prerequisite checks all statuses should be successful.
Step 9) Specify Middleware Home and Agent Base Directory
In this step, specify the locations where Oracle Enterprise Manager software components will be installed.
Middleware Home is the main software location used by Oracle Enterprise Manager.
Agent Base Directory is used to install the Oracle Management Agent that monitors the OEM server and communicates with the Oracle Management Service.
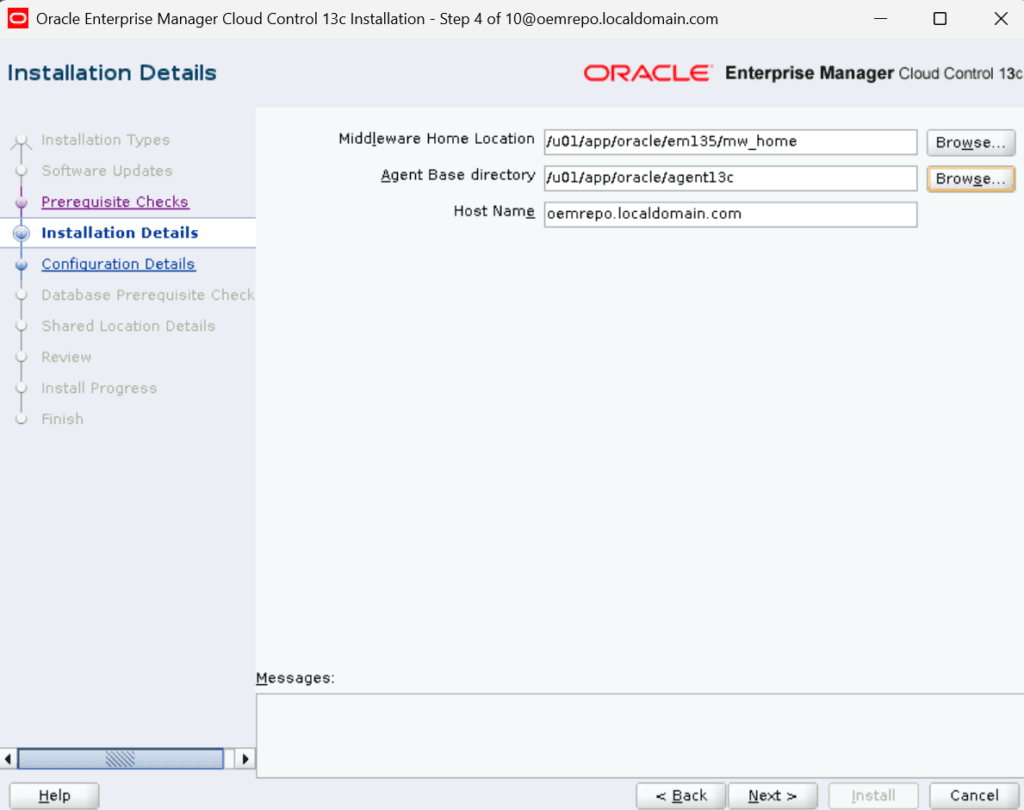
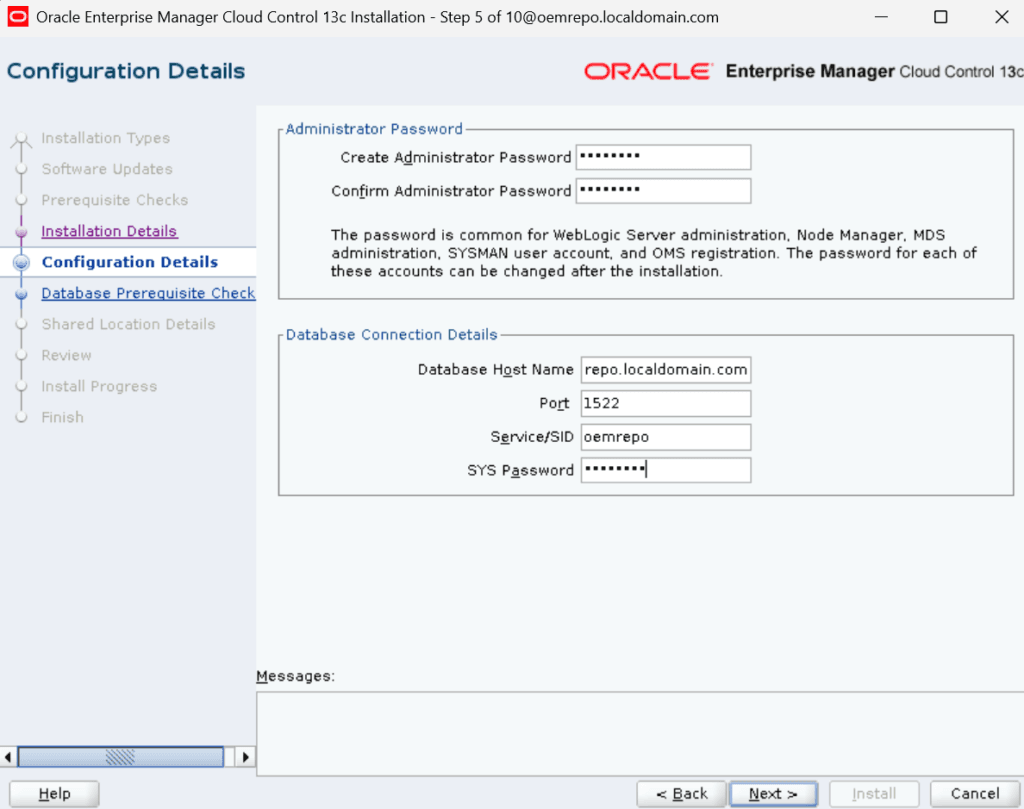
Step 10) Configure Administrator and Repository Database Details
In this step, configure the OEM administrator password and provide the repository database connection details.
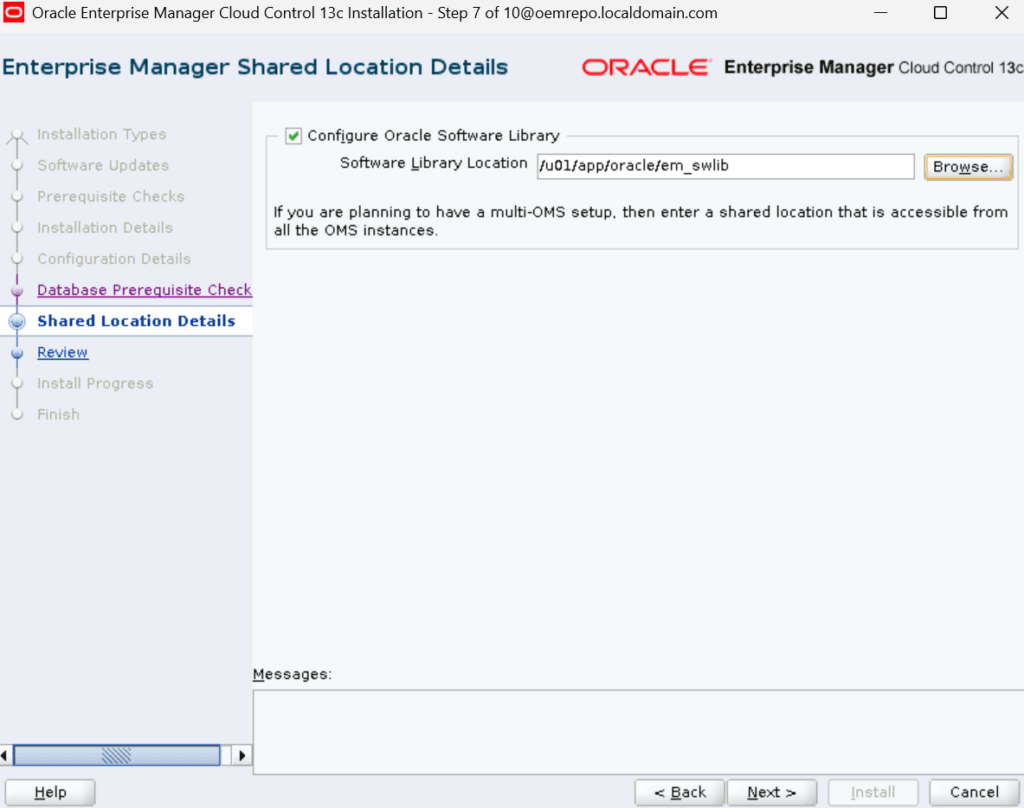
Step 11) Specify the Software Library Location
In this step, specify the Software Library Location.
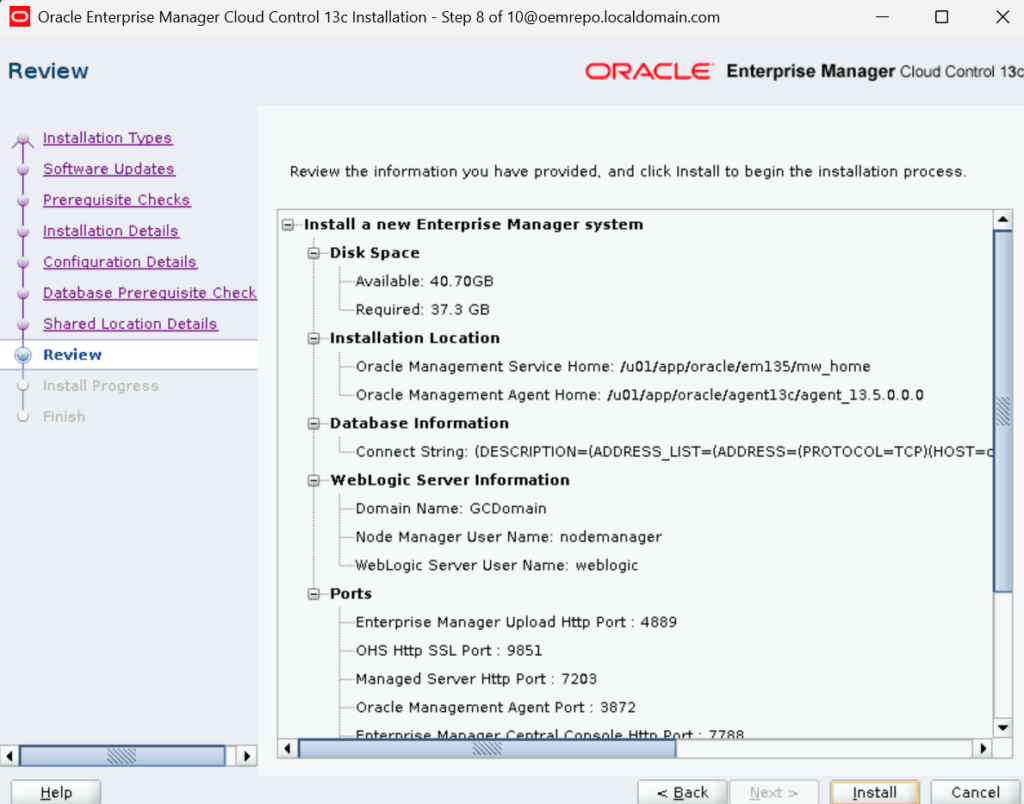
Step 12) Review the Summary
In this step, review the summary and proceed further for the OEM 13c Cloud Control Installation.
Step 13) OEM 13c Cloud Control Installation Completed
We have successfully completed the OEM 13c Cloud Control Installation.
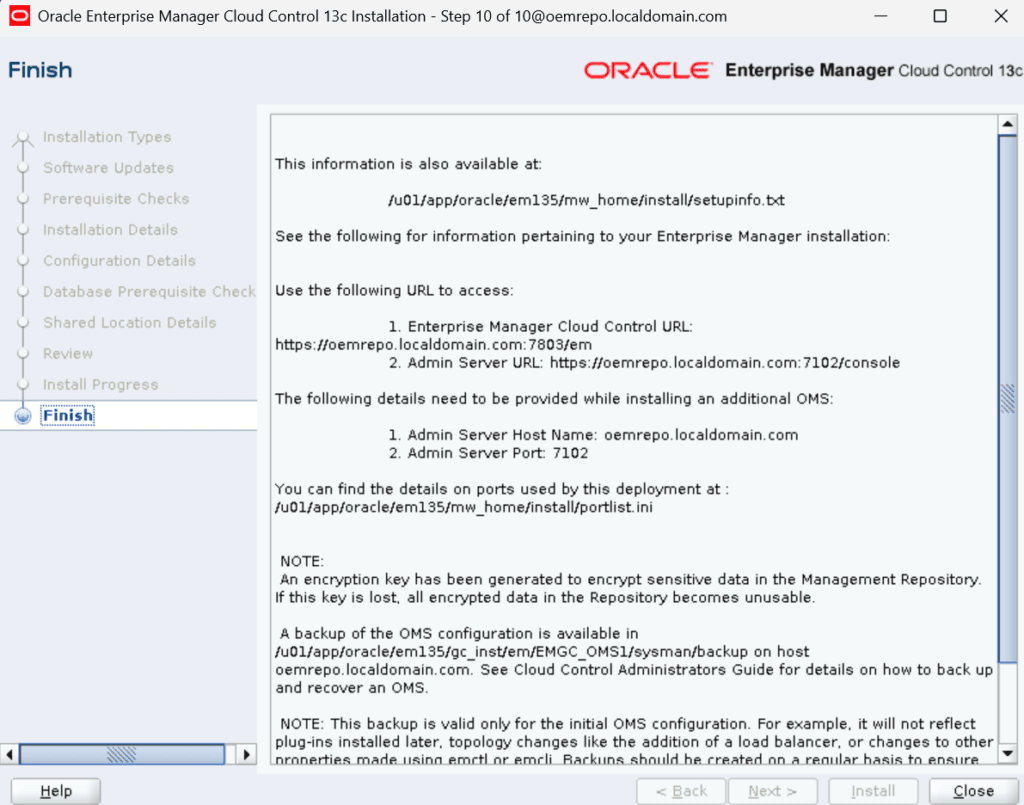
You can log in using the console URL.
oracle@oemrepo oemrepo /u01/app/oracle/em135/mw_home/bin$ emctl status oms -details
Oracle Enterprise Manager Cloud Control 13c Release 5
Copyright (c) 1996, 2021 Oracle Corporation.  All rights reserved.
Enter Enterprise Manager Root (SYSMAN) Password :
Console Server Host        : oemrepo.localdomain.com
HTTP Console Port          : 7788
HTTPS Console Port         : 7803
HTTP Upload Port           : 4889
HTTPS Upload Port          : 4903
EM Instance Home           : /u01/app/oracle/em135/gc_inst/em/EMGC_OMS1
OMS Log Directory Location : /u01/app/oracle/em135/gc_inst/em/EMGC_OMS1/sysman/log
OMS is not configured with SLB or virtual hostname
Agent Upload is unlocked.
OMS Console is unlocked.
Active CA ID: 1
Console URL: https://oemrepo.localdomain.com:7803/em
Upload URL: https://oemrepo.localdomain.com:4903/empbs/upload

WLS Domain Information
Domain Name            : GCDomain
Admin Server Host      : oemrepo.localdomain.com
Admin Server HTTPS Port: 7102
Admin Server is RUNNING

Oracle Management Server Information
Managed Server Instance Name: EMGC_OMS1
Oracle Management Server Instance Host: oemrepo.localdomain.com
WebTier is Up
Oracle Management Server is Up
JVMD Engine is Up
Conclusion
In this article, we successfully installed Oracle Enterprise Manager (OEM) 13c Cloud Control 13.5 on Oracle Linux 8 using Oracle Database 19c as the repository database.
📚 OEM 13c Installation Guide Series
✅ Part 1 – Oracle Linux 8.10 Installation
✅ Part 2 – Oracle Database 19c Software and Database Installation
✅ Part 3 – Preparing the OEM Repository Database
✅ Part 4 – Oracle Enterprise Manager 13c Cloud Control Installation (Current Article)
⏳ Coming Next:
Part 5 – Agent Deployment (Pull Method)
👉 View Complete OEM 13c Installation Guide